


路由vue-route
Vue Router是Vue.js官方的路由管理器。它允许我们在单页面应用中管理导航和路由。
安装说明
方式一:使用npm安装
npm install vue-router方式二:直接全局的 script 标签 引入
<script src="https://unpkg.com/vue-router/dist/vue-router.js"></script>vue-router的基本使用
src\router\index.js:Vue Router的配置
// 1.导入createRouter、createWebHashHistory
import {
	createRouter,
	createWebHashHistory,
	createWebHistory,
} from 'vue-router'

// 2.配置路由规则
const routes = [
	{
		// 指定页面访问的路径
		// 必须指定
		path: '/',
		// 指定该路由的名称
		name: 'root',
		// 定义当返回路径时,显示的组件
		component: () => import('../views/Home.vue')
	}
]

// 3.创建路由实例
const router = createRouter({
	// 设置路由模式
	// a.hash模式:会在url中带一个#,无需服务器进行额外配置、兼容性好、不利于SEO,搜索引擎不会抓取#后面的内容
	history: createWebHashHistory(),
	// b.HTML5模式:url中不带#,需要服务器的额外配置(nginx)、兼容性不好、利于SEO
	// history: createWebHistory(),

	// 指定路由规则数组
	// routes: routes
	routes
})

// 4.导出路由实例
export default router
src\main.js: 在main.js中导入Vue Router并使用
import { createApp } from 'vue'
import ElementPlus from 'element-plus'
import 'element-plus/dist/index.css'
import App from './App.vue'

// 1.导入路由对象所在的js文件
// import router from './router/index.js'
// import router from './router/index'
import router from './router'

const app = createApp(App)

app.use(ElementPlus)
// 将路由对象挂载到vue实例中
app.use(router)
app.mount('#app')
src\views\Home.vue:定义路由对应的组件
<template>
	<h1>项目主页</h1>
</template>

<script>
</script>

<style>
</style>
src\App.vue:app中使用<router-view><\router-view>来定义路由展示位
<template>
  <router-view />
</template>

<script>
</script>
路由重定向
Vue Router中,可以使用路由重定向来将一个路径重定向到另一个路径。路由重定向可以在路由配置中进行设置。以下是几种常见的路由重定向的配置方式:
字符串路径重定向:
const routes = [
  {
    path: '/home',
    redirect: '/dashboard' // 将 /home 重定向到 /dashboard
  }
]
命名路由重定向:
const routes = [
  {
    path: '/home',
    redirect: { name: 'dashboard' } // 将 /home 重定向到名为 dashboard 的路由
  }
]
动态路径重定向:
const routes = [
  {
    path: '/user/:id',
    redirect: '/profile/:id' // 将 /user/:id 重定向到 /profile/:id
  }
]
函数式重定向:
const routes = [
  {
    path: '/user/:id',
    redirect: '/profile/:id' // 将 /user/:id 重定向到 /profile/:id
  }
]
路由的编程式和声明式导航
编程式导航和声明式导航是Vue Router中常用的两种导航方式。
编程式导航
编程式导航是通过在代码中使用路由实例提供的方法来实现页面跳转。以下是常用的编程式导航方法:
router.push(location: RawLocation):跳转到指定的路由地址,可以是一个字符串路径或一个命名的路由对象。router.replace(location: RawLocation):替换当前的路由地址,不会保留历史记录。router.go(n: number):在浏览器历史记录中向前或向后导航多少步。 示例代码:
// 跳转到指定路径
router.push('/about')
// 跳转到命名的路由
router.push({ name: 'about' })
// 替换当前路由
router.replace('/about')
// 后退一步
router.go(-1)
在项目中我们有些时候需要主动去访问某个路由,比如登录成功之后,需要跳转到项目首页,那么在
Vue 实例内部,你可以调用 this.$router.push ,主动访问某个路由。
src\views\Login.vue
<template>
	<h1>登录页面</h1>
	<el-button @click="clickLogin">提交登录</el-button>
</template>

<script>
export default {
	data(){
		return {

		}
	},
	methods: {
		clickLogin() {
			// 二、编程式导航
			// 1.指定字符串路径
			// this.$router.push('/report')
			// 2.指定要跳转的路由对象
			this.$router.push({ name: 'report'})
			// this.$router.push({ name: 'report', path: '/report' })
		}
	}
}
</script>

<style>
</style>
src\router\index.js
// 1.导入createRouter、createWebHashHistory
import {
	createRouter,
	createWebHashHistory,
	createWebHistory,
} from 'vue-router'

// 2.配置路由规则
const routes = [
	{
		// 指定页面访问的路径
		// 必须指定
		path: '/',
		// 指定该路由的名称
		name: 'root',
		// 定义当返回路径时,显示的组件
		// component: () => import('../views/Home.vue')
		redirect: '/login'
	},
	{
		path: '/login',
		name: 'login',
		//component: () => import('../components/Login.vue')
		component: () => import('../views/Login.vue')
 	},
	{
		path: '/report',
		name: 'report',
		component: () => import('../views/Report.vue'),
	}
]

// 3.创建路由实例
const router = createRouter({
	// 设置路由模式
	// a.hash模式:会在url中带一个#,无需服务器进行额外配置、兼容性好、不利于SEO,搜索引擎不会抓取#后面的内容
	history: createWebHashHistory(),
	// b.HTML5模式:url中不带#,需要服务器的额外配置(nginx)、兼容性不好、利于SEO
	// history: createWebHistory(),

	// 指定路由规则数组
	// routes: routes
	routes
})

// 4.导出路由实例
export default router
声明式导航
声明式导航是通过在模板中使用内置的<router-link>组件来实现页面跳转。<router-link>会自动渲染为一个带有正确的href属性的<a>标签,点击时会触发路由跳转。
src\views\Login.vue
<template>
	<h1>登录页面</h1>
	<el-button @click="clickLogin">提交登录</el-button>
	<div>
		没有账号,请先进行<br>
		<!-- 一、声明式导航 -->
		<!-- router-link会渲染出一个a标签,同时指定href属性 -->
		<!-- 1.通过传递to来指定页面返回的链接 -->
		<!-- 2.指定字符串路径 -->
		<router-link to='/register'> <span style="color: blue;">注册1</span> </router-link>
		<br />

		<!-- 3.指定一个带路径的对象,必须进行绑定 -->
		<router-link :to='{ path: "/register" }'> <span style="color: blue;">注册2</span> </router-link>

		<br />
		<!-- 4.指定一个带路由名称的对象,必须进行绑定。路由命名后可以直接通过name指定路由名访问 -->
		<router-link :to='{ name: "register" }'> <span style="color: blue;">注册3</span> </router-link>
	</div>

</template>

<script>
export default {
	data(){
		return {

		}
	},
	methods: {
		clickLogin() {
			// 二、编程式导航
			// 1.指定字符串路径
			// this.$router.push('/report')
			// 2.指定要跳转的路由对象
			this.$router.push({ name: 'report'})
             // 路由命名后可以直接通过name指定路由名访问
			// this.$router.push({ name: 'report', path: '/report' })
		}
	}
}
</script>

<style>
</style>
src\router\index.js
// 1.导入createRouter、createWebHashHistory
import {
	createRouter,
	createWebHashHistory,
	createWebHistory,
} from 'vue-router'

// 2.配置路由规则
const routes = [
	{
		// 指定页面访问的路径
		// 必须指定
		path: '/',
		// 你可以在创建 Router 实例的时候,在 routes 配置中给某个路由设置名称。
		name: 'root',
		// 定义当返回路径时,显示的组件
		// component: () => import('../views/Home.vue')
		redirect: '/login'
	},
	{
		path: '/login',
		name: 'login',
		//component: () => import('../components/Login.vue')
		component: () => import('../views/Login.vue')
 	},
	{
		path: '/register',
		name: 'register',
		component: () => import('../views/Register.vue')
	},
	{
		path: '/report',
		name: 'report',
		component: () => import('../views/Report.vue'),
	}
]

// 3.创建路由实例
const router = createRouter({
	// 设置路由模式
	// a.hash模式:会在url中带一个#,无需服务器进行额外配置、兼容性好、不利于SEO,搜索引擎不会抓取#后面的内容
	history: createWebHashHistory(),
	// b.HTML5模式:url中不带#,需要服务器的额外配置(nginx)、兼容性不好、利于SEO
	// history: createWebHistory(),

	// 指定路由规则数组
	// routes: routes
	routes
})

// 4.导出路由实例
export default router
路由嵌套
在Vue Router中,可以使用路由嵌套来实现多层级的路由结构。通过路由嵌套,可以将一个组件嵌套在另一个组件内部,实现页面的层级结构。以下是一个示例:
src\router\index.js
// 1.导入createRouter、createWebHashHistory
import {
	createRouter,
	createWebHashHistory,
	createWebHistory,
} from 'vue-router'

// 2.配置路由规则
const routes = [
	{
		// 指定页面访问的路径
		// 必须指定
		path: '/',
		// 指定该路由的名称
		name: 'root',
		// 定义当返回路径时,显示的组件
		component: () => import('../views/Home.vue')
		// redirect: '/login'
		// redirect: { name: 'login' } // 将 /home 重定向到名为 dashboard 的路由
	},
	{
		path: '/login',
		name: 'login',
		//component: () => import('../components/Login.vue')
		component: () => import('../views/Login.vue')
 	},
	{
		path: '/register',
		name: 'register',
		component: () => import('../views/Register.vue')
	},
	{
		path: '/home',
		name: 'home',
		component: () => import('../views/Home.vue'),

		// 通过子路由导航时,会将匹配的组件在父路由的组件(router-view)中进行渲染
		children: [
			{
				path: '/inter',
				name: 'inter',
				// 查询字符串参数无需在定义路由条目对象的地方定义,只需要在跳转路由是进行定义
				component: () => import('../views/Inter.vue'),
			},
			{
				path: '/cases',
				name: 'cases',
				component: () => import('../views/Cases.vue'),
			}
		]
	}
]

// 3.创建路由实例
const router = createRouter({
	// 设置路由模式
	// a.hash模式:会在url中带一个#,无需服务器进行额外配置、兼容性好、不利于SEO,搜索引擎不会抓取#后面的内容
	history: createWebHashHistory(),
	// b.HTML5模式:url中不带#,需要服务器的额外配置(nginx)、兼容性不好、利于SEO
	// history: createWebHistory(),

	// 指定路由规则数组
	// routes: routes
	routes
})

// 4.导出路由实例
export default router
src\views\Home.vue
<template>
	<h1>项目主页</h1>
	<router-link to="/cases"><el-tag>用例测试</el-tag></router-link>
	<router-link to="/inter"><el-tag>接口管理1</el-tag></router-link>
	<router-view />
</template>

<script>
</script>

<style>
</style>
src\views\Cases.vue
<template>
	<h1>接口测试页面</h1>
</template>

<script>
</script>

<style>
</style>
src\views\Inter.vue
<template>
	<h1>接口管理页面</h1>
</template>

<script>
</script>

<style>
</style>
一个路由中嵌套多个子路由(一个页面中根据不同的情况显示不同的内容)
路由动态匹配及参数
路径参数
配置路由的时候把user后面的数据参数化处理即可 :路径名称
一个“路径参数”使用冒号 : 标记。当匹配到一个路由时,参数值会被设置到 this.$route.params,可以在每个组件内使用
src\router\index.js
// 1.导入createRouter、createWebHashHistory
import {
	createRouter,
	createWebHashHistory,
	createWebHistory,
} from 'vue-router'

// 2.配置路由规则
const routes = [
	{
		// 指定页面访问的路径
		// 必须指定
		path: '/',
		// 指定该路由的名称
		name: 'root',
		// 定义当返回路径时,显示的组件
		// component: () => import('../views/Home.vue')
		// redirect: '/login'
		redirect: { name: 'login' } // 将 /home 重定向到名为 dashboard 的路由
	},
	{
		path: '/login',
		name: 'login',
		//component: () => import('../components/Login.vue')
		component: () => import('../views/Login.vue')
 	},
	{
		path: '/register',
		name: 'register',
		component: () => import('../views/Register.vue')
	},
	{
		path: '/home',
		name: 'home',
		component: () => import('../views/Home.vue'),

		// 通过子路由导航时,会将匹配的组件在父路由的组件(router-view)中进行渲染
		children: [
			{
				path: '/inter',
				name: 'inter',
				// 查询字符串参数无需在定义路由条目对象的地方定义,只需要在跳转路由是进行定义
				component: () => import('../views/Inter.vue'),
			},
			{
				path: '/cases',
				name: 'cases',
				component: () => import('../views/Cases.vue'),
			},
			{
				// 路径参数必须在定义路由条目对象的地方定义
				// :路径名称
				// /report/105/lemon
				path: '/report/:id/:name',
				name: 'report',
				component: () => import('../views/Report.vue'),
			},
		]
	}
]

// 3.创建路由实例
const router = createRouter({
	// 设置路由模式
	// a.hash模式:会在url中带一个#,无需服务器进行额外配置、兼容性好、不利于SEO,搜索引擎不会抓取#后面的内容
	history: createWebHashHistory(),
	// b.HTML5模式:url中不带#,需要服务器的额外配置(nginx)、兼容性不好、利于SEO
	// history: createWebHistory(),

	// 指定路由规则数组
	// routes: routes
	routes
})

// 4.导出路由实例
export default router
src\views\Login.vue
<template>
	<h1>登录页面</h1>
	<router-link to="/report/105/lemon"><el-tag>测试报告1</el-tag></router-link>
	<hr>
</template>

<script>

</script>

<style>
</style>
src\views\Report.vue
<template>
	<h1>测试报告页面</h1>
	<!-- 方式1 -->
	<router-link to="/report/106/lemon1"><el-tag>测试报告2</el-tag></router-link>
	<!-- 方式2 -->
	<router-link :to="{ name: 'report', params: { id: 107, name: 'lemon2' }}"><el-tag>测试报告3</el-tag></router-link>
	<!-- 方式3 -->
	<el-button @click="clickReport">提交登录</el-button>
	<!-- 获取当前路由的路径参数 -->
	<p>{{ $route.params.id }}</p>
	<p>{{ $route.params.name }}</p>
</template>

<script>
export default {
	data(){
		return {

		}
	},
	methods: {
		clickReport() {
			this.$router.push({ name: 'report', params: { id: 200, name: 'keyou' } })
		}
	}
}
</script>

<style>
</style>
查询参数query
查询参数类似于get请求的参数形式, /user/login/?user=123&pwd=23333
src\router\index.js
// 1.导入createRouter、createWebHashHistory
import {
	createRouter,
	createWebHashHistory,
	createWebHistory,
} from 'vue-router'

// 2.配置路由规则
const routes = [
	{
		// 指定页面访问的路径
		// 必须指定
		path: '/',
		// 指定该路由的名称
		name: 'root',
		// 定义当返回路径时,显示的组件
		component: () => import('../views/Home.vue')
		// redirect: '/login'
		// redirect: { name: 'login' } // 将 /home 重定向到名为 dashboard 的路由
	},
	{
		path: '/login',
		name: 'login',
		//component: () => import('../components/Login.vue')
		component: () => import('../views/Login.vue')
 	},
	{
		path: '/register',
		name: 'register',
		component: () => import('../views/Register.vue')
	},
	{
		path: '/home',
		name: 'home',
		component: () => import('../views/Home.vue'),

		// 通过子路由导航时,会将匹配的组件在父路由的组件(router-view)中进行渲染
		children: [
			{
				path: '/inter',
				name: 'inter',
				// 查询字符串参数无需在定义路由条目对象的地方定义,只需要在跳转路由是进行定义
				component: () => import('../views/Inter.vue'),
			},
			{
				path: '/cases',
				name: 'cases',
				component: () => import('../views/Cases.vue'),
			},
			{
				// 路径参数必须在定义路由条目对象的地方定义
				// :路径名称
				// /report/105/lemon
				path: '/report/:id/:name',
				name: 'report',
				component: () => import('../views/Report.vue'),
			},
		]
	}
]

// 3.创建路由实例
const router = createRouter({
	// 设置路由模式
	// a.hash模式:会在url中带一个#,无需服务器进行额外配置、兼容性好、不利于SEO,搜索引擎不会抓取#后面的内容
	history: createWebHashHistory(),
	// b.HTML5模式:url中不带#,需要服务器的额外配置(nginx)、兼容性不好、利于SEO
	// history: createWebHistory(),

	// 指定路由规则数组
	// routes: routes
	routes
})

// 4.导出路由实例
export default router
src\views\Home.vue
<template>
	<h1>项目主页</h1>
	<!-- 方式1 -->
	<!-- 在进行路由跳转时指定,传递查询字符串参数(query parameter) -->
	<router-link to="/inter?name=lemon&age=18&score=99"><el-tag>接口管理1</el-tag></router-link>
	<!-- 方式2 -->
	<router-link :to="{ name: 'inter', query: { name: 'lemon', age: 19, score: 100} }">
		<el-tag>接口管理2</el-tag>
	</router-link>
	<!-- 方式3 -->
	<el-button @click="clickInter">提交登录</el-button>
	<router-view />
</template>

<script>
export default {
	data(){
		return {

		}
	},
	methods: {
		clickInter() {
			this.$router.push({ name: 'inter', query: { name: 'lemon11', age: 20, score: 60 } })
		}
	}
}
</script>

<style>
</style>
src\views\Inter.vue
<template>
	<h1>接口管理页面</h1>
	<!-- 获取当前路由中的查询参数 -->
	<!-- $route.query.查询参数名称 -->
	<p> {{ $route.query.name }} </p>
	<p> {{ $route.query.age }} </p>
	<p> {{ $route.query.score }} </p>
</template>

<script>
</script>

<style>
</style>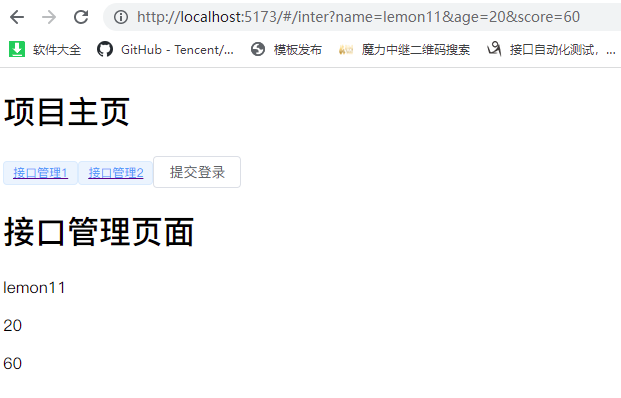
评论