


Linux + docker +jenkins + allure+接口自动化测试框架的搭建
安装 docker
Linux 上安装
在各种 Linux 系统上安装 docker 最简单的方法是使用官方脚本自动安装。
安装命令如下:
curl -fsSL https://get.docker.com | bash -s docker --mirror Aliyun
如:
[root@iZ2zebqeq8f5murg3r515qZ ~]# curl -fsSL https://get.docker.com | bash -s docker --mirror Aliyun
# Executing docker install script, commit: 93d2499759296ac1f9c510605fef85052a2c32be
+ sh -c 'yum install -y -q yum-utils'
Invalid configuration value: failovermethod=priority in /etc/yum.repos.d/CentOS-Linux-epel.repo; Configuration: OptionBinding with id "failovermethod" does not exist

Installed:
  yum-utils-4.0.21-3.el8.noarch

+ sh -c 'yum-config-manager --add-repo https://mirrors.aliyun.com/docker-ce/linux/centos/docker-ce.repo'
Invalid configuration value: failovermethod=priority in /etc/yum.repos.d/CentOS-Linux-epel.repo; Configuration: OptionBinding with id "failovermethod" does not exist
Adding repo from: https://mirrors.aliyun.com/docker-ce/linux/centos/docker-ce.repo
+ '[' stable '!=' stable ']'
+ sh -c 'yum makecache'
Invalid configuration value: failovermethod=priority in /etc/yum.repos.d/CentOS-Linux-epel.repo; Configuration: OptionBinding with id "failovermethod" does not exist
CentOS Linux 8 - AppStream                                                                                            137 kB/s | 4.3 kB     00:00
CentOS Linux 8 - BaseOS                                                                                               391 kB/s | 3.9 kB     00:00
CentOS Linux 8 - Extras                                                                                                49 kB/s | 1.5 kB     00:00
Extra Packages for Enterprise Linux 8 - x86_64                                                                        140 kB/s | 4.7 kB     00:00
Docker CE Stable - x86_64                                                                                              49 kB/s |  19 kB     00:00
Metadata cache created.
+ '[' -n '' ']'
+ sh -c 'yum install -y -q docker-ce'
Invalid configuration value: failovermethod=priority in /etc/yum.repos.d/CentOS-Linux-epel.repo; Configuration: OptionBinding with id "failovermethod" does not exist
Importing GPG key 0x621E9F35:
 Userid     : "Docker Release (CE rpm) <docker@docker.com>"
 Fingerprint: 060A 61C5 1B55 8A7F 742B 77AA C52F EB6B 621E 9F35
 From       : https://mirrors.aliyun.com/docker-ce/linux/centos/gpg

Installed:
  container-selinux-2:2.167.0-1.module_el8.5.0+911+f19012f9.noarch              containerd.io-1.4.12-3.1.el8.x86_64
  docker-ce-3:20.10.12-3.el8.x86_64                                             docker-ce-cli-1:20.10.12-3.el8.x86_64
  docker-ce-rootless-extras-20.10.12-3.el8.x86_64                               docker-scan-plugin-0.12.0-3.el8.x86_64
  fuse-common-3.2.1-12.el8.x86_64                                               fuse-overlayfs-1.7.1-1.module_el8.5.0+890+6b136101.x86_64
  fuse3-3.2.1-12.el8.x86_64                                                     fuse3-libs-3.2.1-12.el8.x86_64
  libcgroup-0.41-19.el8.x86_64                                                  libslirp-4.4.0-1.module_el8.5.0+890+6b136101.x86_64
  slirp4netns-1.1.8-1.module_el8.5.0+890+6b136101.x86_64

+ version_gte 20.10
+ '[' -z '' ']'
+ return 0
+ sh -c 'yum install -y -q docker-ce-rootless-extras'
Invalid configuration value: failovermethod=priority in /etc/yum.repos.d/CentOS-Linux-epel.repo; Configuration: OptionBinding with id "failovermethod" does not exist

================================================================================

To run Docker as a non-privileged user, consider setting up the
Docker daemon in rootless mode for your user:

    dockerd-rootless-setuptool.sh install

Visit https://docs.docker.com/go/rootless/ to learn about rootless mode.


To run the Docker daemon as a fully privileged service, but granting non-root
users access, refer to https://docs.docker.com/go/daemon-access/

WARNING: Access to the remote API on a privileged Docker daemon is equivalent
         to root access on the host. Refer to the 'Docker daemon attack surface'
         documentation for details: https://docs.docker.com/go/attack-surface/

================================================================================
查看docker 的版本号
[root@iZ2zebqeq8f5murg3r515qZ ~]# docker --version
Docker version 20.10.12, build e91ed57
各种 Linux 系统的手动安装步骤见官方文档
镜像加速
国内从 DockerHub 拉取镜像会比较慢,此时可以配置镜像加速器。Docker 官方和国内很多云服务商都提供了国内加速器服务,例如:
Docker 官方中国区 https://registry.docker-cn.com
网易 http://hub-mirror.c.163.com
中国科学技术大学 https://docker.mirrors.ustc.edu.cn
阿里云 < 你的 ID>.mirror.aliyuncs.com
修改/etc/docker/daemon.json 文件,如果没有先建一个即可
[root@iZ2zebqeq8f5murg3r515qZ ~]# mkdir -p /etc/docker/
[root@iZ2zebqeq8f5murg3r515qZ ~]# vi /etc/docker/daemon.json
修改配置文件内如下:
{
"registry-mirrors": ["https://registry.docker-cn.com"]
}
然后重启服务
$ sudo systemctl daemon-reload
$ sudo systemctl restart docker
使用 docker 安装 jenkins
下载镜像
在 hub.docker.com 中搜索 jenkins,可以找到官方镜像,但是已经弃用,推荐使用社区维护的镜像,地址为:https://hub.docker.com/r/jenkins/jenkins。选择一个合适的版本下载,例如:

docker pull jenkins/jenkins:alpine
创建容器
创建命令如下:
docker run -d -u root --name jenkins -v jenkins_home:/var/jenkins_home -v $(which docker):/usr/bin/docker -v /var/run/docker.sock:/var/run/docker.sock -p 8080:8080 -p 50000:50000 jenkins/jenkins:alpine
参数说明:
-d: 后台运行容器-u root:使用 root 用户登录--name jenkins指定一个容器的名称(可自定义名称)-v jenkins_home:/var/jenkins_home:创建卷jenkins_home持久化 workhome 保存在宿主机上:容器运行在宿主机上,但通常我们不直接往容器中写数据,而是把宿主机中的一个位置映射出来供容器写入。-v $(which docker):/usr/bin/docker: 映射宿主机中的 docker 客户端到容器中-v /var/run/docker.sock:/var/run/docker.sock: 映射 docker 守护进程的unix socket程序到容器中-p 8080:8080: 映射容器的 8080 端口到宿主机的 8080 端口(前面是宿主机的端口,后面的是容器的端口)jenkins/jenkins:alpine镜像名称
如:
[root@iZ2zebqeq8f5murg3r515qZ ~]# docker run -d -u root --name jenkins -v jenkins_home:/var/jenkins_home -v $(which docker):/usr/bin/docker -v /var/run/docker.sock:/var/run/docker.sock -p 8080:8080 -p 50000:50000 jenkins/jenkins:alpine
Unable to find image 'jenkins/jenkins:alpine' locally
alpine: Pulling from jenkins/jenkins
59bf1c3509f3: Pull complete
451f31369dc3: Pull complete
72befd8cd6f7: Pull complete
492e4aba0962: Pull complete
6e366875e2cc: Pull complete
58049cdaf964: Pull complete
9e4fdcc85df7: Pull complete
c7426b91a004: Pull complete
b4bbcb653964: Pull complete
1a810c709660: Pull complete
53ae59e5765e: Pull complete
adbb2c4eba5e: Pull complete
d967cf9acbb1: Pull complete
85cf46be0278: Pull complete
c9af5fafe36c: Pull complete
94ac2ffe547f: Pull complete
Digest: sha256:9a35dce7e55680692ea60d48f11d693019f30726bf38c315ae582d04508c1ecd
Status: Downloaded newer image for jenkins/jenkins:alpine
e125ba10d609256931171ea81d4da59fdbe225ed219a66d9911b6e795ddadfa3
[root@iZ2zebqeq8f5murg3r515qZ ~]# docker image ls
REPOSITORY        TAG       IMAGE ID       CREATED      SIZE
jenkins/jenkins   alpine    bd32a86122c6   3 days ago   256MB
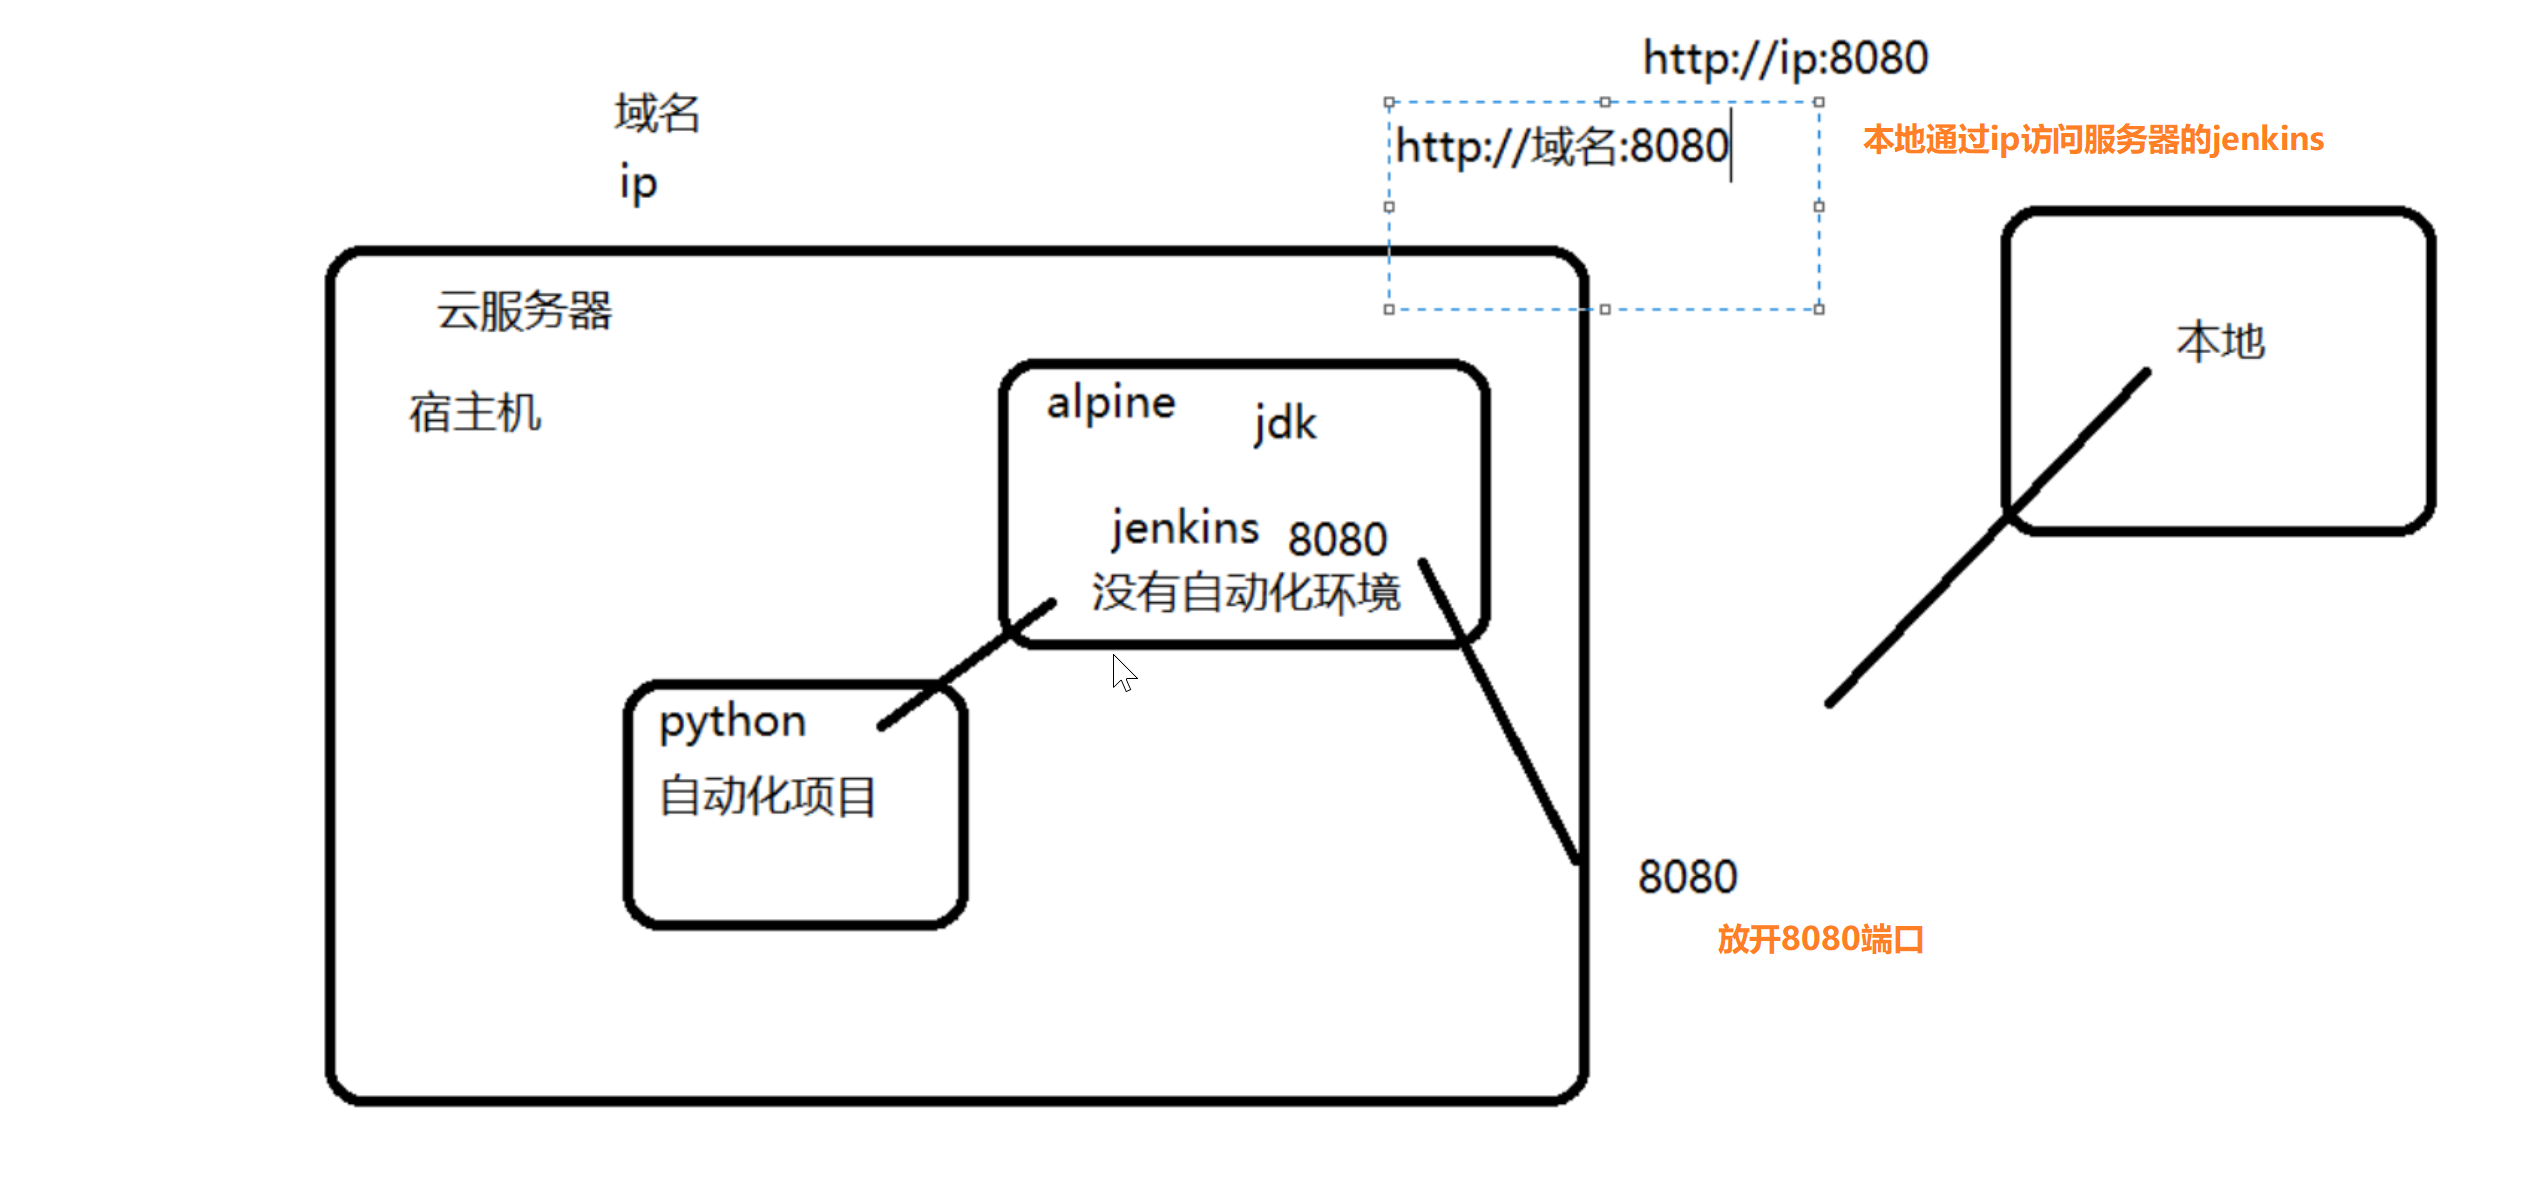
访问 jenkins
容器创建成功后,在宿主机上访问 http://127.0.0.1:8080 即可访问容器中的 jenkins
使用阿里云服务器,你永远要记住还有安全组这么个东西。想要开放8080端口,需要配置安全组。
2、先找到需要操作的目标实例,点击“更多”–“网络和安全组”–“安全组配置”
3、点击“配置规则”
4、点击“添加安全组规则”,添加8080号端口,如下图:
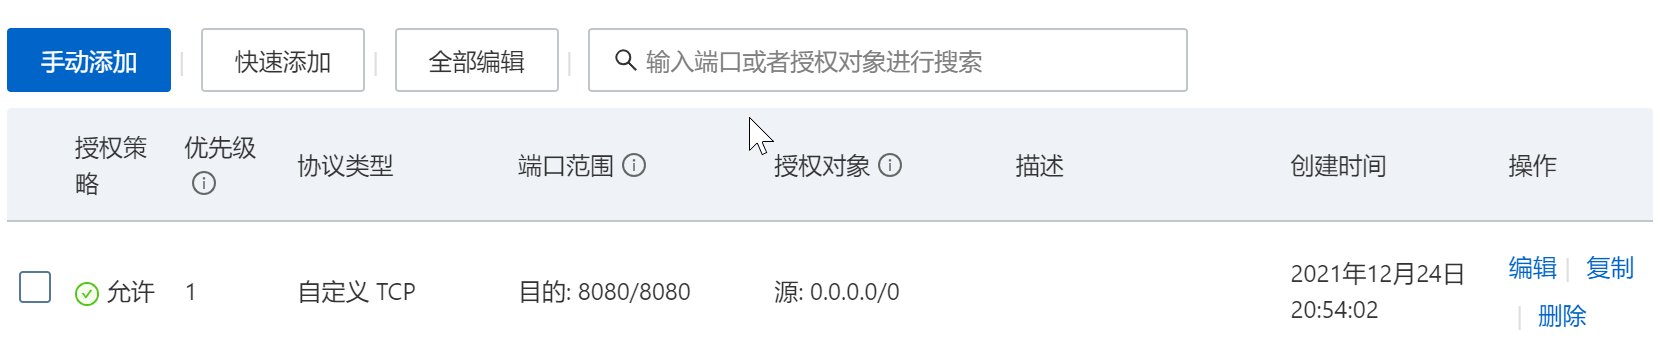
端口范围填:8080/8080
授权对象填:0.0.0.0/0
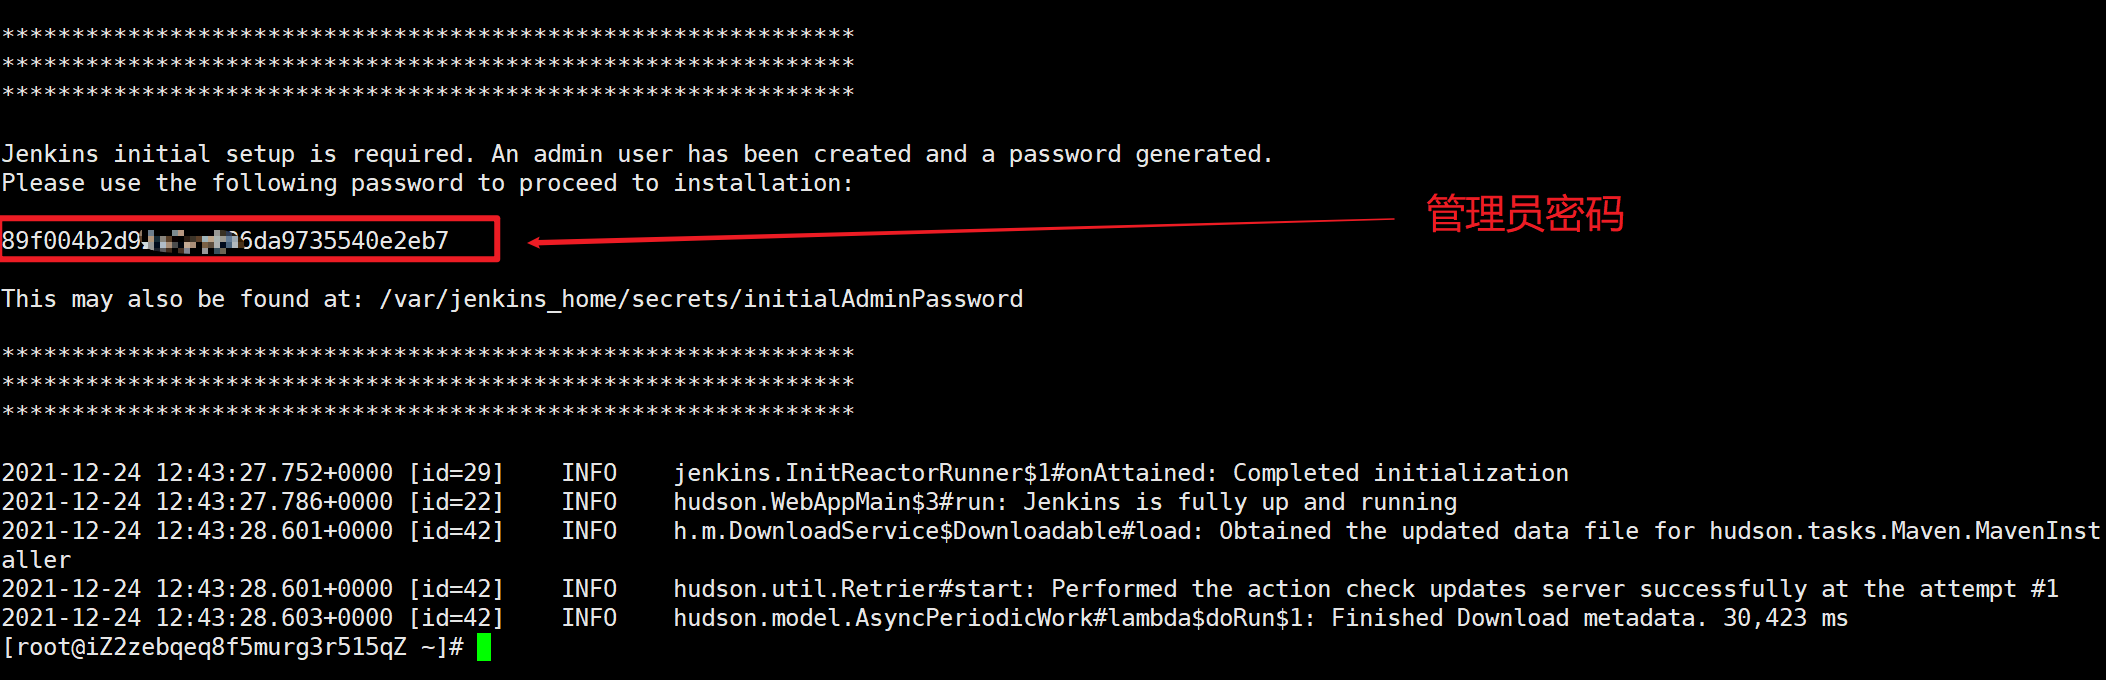
第一次登录会要填写管理员密码可以通过docker logs jenkins查看
查看jenkins镜像是否启动
[root@iZ2zebqeq8f5murg3r515qZ ~]# docker ps
CONTAINER ID   IMAGE                    COMMAND                  CREATED        STATUS        PORTS                                                                                      NAMES
e125ba10d609   jenkins/jenkins:alpine   "/sbin/tini -- /usr/…"   8 months ago   Up 8 months   0.0.0.0:8080->8080/tcp, :::8080->8080/tcp, 0.0.0.0:50000->50000/tcp, :::50000->50000/tcp   jenkins
使用docker 搭建自动化测试环境
包依赖的导出
导出
pip freeze > requirements.txt
安装
pip install -r requirements.txt
构建镜像
准备python环境
[root@iZ2zebqeq8f5murg3r515qZ pytest-auto-api2]# docker pull python:3.8.13-slim-bullseye
python:3.8.13-slim-bullseye: Pulling from library/python
2238450926aa: Pull complete
15d04b3d1b9d: Pull complete
5a828df12450: Pull complete
e401b51b4cd3: Pull complete
95726859827e: Pull complete
Digest: sha256:833585c77252992000c04c3e27582a439182055adde00f6b5595be017e5c78b3
Status: Downloaded newer image for python:3.9-slim-buster
docker.io/library/python:3.9-slim-buster
在jenkins容器中配置allure报告文件跟环境变量
先下载allure文件,这里我选择下载allure-2.19.0.zip
https://github.com/allure-framework/allure2/releases/
下载完成之后将它放到linux服务器中
3. 将它copy到容器内部docker cp allure-2.19.0.zip jenkins:/var/jenkins_home
4. 进入容器docker exec -it -uroot jenkins bash
[root@iZ2zebqeq8f5murg3r515qZ ~]# cd /tmp
[root@iZ2zebqeq8f5murg3r515qZ tmp]# ll
total 19548
-rw------- 1 root root        0 Sep 10 22:38 AliyunAssistClientSingleLock.lock
-rw-r--r-- 1 root root 20013824 Sep 11 17:19 allure-2.19.0.zip
drwx------ 3 root root       17 Sep 10 22:38 systemd-private-96338f2495e6416083ad06934489e90b-chronyd.service-d2ol4i
drwx------ 3 root root       17 Sep 10 22:38 systemd-private-96338f2495e6416083ad06934489e90b-postfix.service-f7buYh
-rw------- 1 root root        0 Sep  6 00:21 tmp.11yf2khtHn
-rw------- 1 root root        0 Sep  1 00:22 tmp.41gXh58o8Q
-rw------- 1 root root        0 Sep  2 00:21 tmp.a6z4D5yoQi
-rw------- 1 root root        0 Sep  5 00:21 tmp.eErIIzgl0b
-rw------- 1 root root        0 Sep  4 00:21 tmp.HbfNNdQDE0
-rw------- 1 root root        0 Sep  7 00:21 tmp.IHookw3IF5
-rw------- 1 root root        0 Sep 11 00:21 tmp.l6ld2KeJAY
-rw------- 1 root root        0 Sep  3 00:22 tmp.LagyM19NZE
-rw------- 1 root root        0 Sep  8 00:22 tmp.NuPybv7z4l
-rw------- 1 root root        0 Sep  9 00:22 tmp.pjpSPNXipu
-rw------- 1 root root        0 Sep 10 00:21 tmp.xg52kZq1Fg
[root@iZ2zebqeq8f5murg3r515qZ tmp]# docker cp allure-2.19.0.zip jenkins:/var/jenkins_home
[root@iZ2zebqeq8f5murg3r515qZ tmp]# docker exec -it -uroot jenkins bash
bash-5.1# cd /var/jenkins_home
bash-5.1# ls
allure-2.19.0.zip
解压allure
unzip allure-2.19.0.zip
bash-5.1# unzip allure-2.19.0.zip
Archive:  allure-2.19.0.zip
   creating: allure-2.19.0/
   creating: allure-2.19.0/config/
  inflating: allure-2.19.0/config/allure-junit.yml
  inflating: allure-2.19.0/config/allure.yml
  inflating: allure-2.19.0/config/allure-cucumber.yml
   creating: allure-2.19.0/lib/
   creating: allure-2.19.0/lib/config/
...
...
赋予文件夹所有内容最高权限
mv allure-2.19.0 allure
chmod -R 777 allure
bash-5.1# mv allure-2.19.0  allure
bash-5.1# ls
allure
allure-2.19.0.zip
...
bash-5.1# chmod -R 777 allure
配置allure 环境变量
记得一行一个回车哦
cat >> /root/.bashrc << "EOF"
export PATH=/var/jenkins_home/allure/bin:$PATH
EOF

更新环境变量配置文件
source /root/.bashrc

验证环境变量
allure --version

8. 配置 JDK 环境变量
cat >> /root/.bashrc<< "EOF"
export PATH=$JAVA_HOME/bin:$PATH
EOF
更新环境变量配置文件
source /root/.bashrc
准备项目代码
[root@iZ2zebqeq8f5murg3r515qZ ~]# cd auto
[root@iZ2zebqeq8f5murg3r515qZ auto]# ll
total 0
drwxr-xr-x 10 root root 247 Dec 24  2021 api-auto
[root@iZ2zebqeq8f5murg3r515qZ auto]# git clone https://gitee.com/shisuiyi/pytest-auto-api2.git
Cloning into 'pytest-auto-api2'...
remote: Enumerating objects: 5311, done.
remote: Counting objects: 100% (5311/5311), done.
remote: Compressing objects: 100% (1983/1983), done.
remote: Total 5311 (delta 3115), reused 5151 (delta 3021), pack-reused 0
Receiving objects: 100% (5311/5311), 14.13 MiB | 1.60 MiB/s, done.
Resolving deltas: 100% (3115/3115), done.
[root@iZ2zebqeq8f5murg3r515qZ auto]# ll
total 0
drwxr-xr-x 10 root root 247 Dec 24  2021 api-auto
drwxr-xr-x  9 root root 207 Sep 10 16:40 pytest-auto-api2
若未安装git 需
yum -y install git
第一次使用需要输入git账号的用户名与密码
Dockerfile
FROM python:3.8.13-slim-bullseye  # base镜像
WORKDIR /app            # 工作目录 存在就切换,不存在就创建
COPY . .                # 把宿主机当前目录的所有文件拷贝到/app
RUN pip install -r requirements.txt -i https://pypi.douban.com/simple  # 执行命令安装依赖
CMD ["python3", "run.py"] # 启动容器时需要运行的命令
构建镜像
将requirements.txt和Dockerfile都放在项目根目录下,然后在目录中运行命令
docker build -t pytest-auto-api2 .
[root@iZ2zebqeq8f5murg3r515qZ pytest-auto-api2]# docker build -t pytest-auto-api2 .
Sending build context to Docker daemon  19.48MB
Step 1/5 : FROM python:3.8.13-slim-bullseye
 ---> bdd3315885d4
Step 2/5 : WORKDIR /app
 ---> Running in 7582f5c00b99
Removing intermediate container 7582f5c00b99
 ---> 5c16e4129b21
Step 3/5 : COPY . .
 ---> 1a697e82a49e
Step 4/5 : RUN pip install -r requirements.txt -i https://pypi.douban.com/simple
 ---> Running in 661e634d2dfe
Looking in indexes: https://pypi.douban.com/simple
Collecting aiofiles==0.8.0
  Downloading https://pypi.doubanio.com/packages/ca/e4/b78d049f7cc7ed053ddbfdd59b2dcc7bd387458e2c2869b602975685d65e/aiofiles-0.8.0-py3-none-any.whl (13 kB)
Collecting allure-pytest==2.9.45
....
....
 ---> f7468a244b3c
Step 5/5 : CMD ["python3", "run.py"]
 ---> Running in 6d0cc5b2ba2e
Removing intermediate container 6d0cc5b2ba2e
 ---> 85b0a526b781
Successfully built 85b0a526b781
Successfully tagged pytest-auto-api2:latest
[root@iZ2zebqeq8f5murg3r515qZ pytest-auto-api2]#
运行后删除刚才的镜像文件
[root@iZ2zebqeq8f5murg3r515qZ pytest-auto-api2]# docker run --rm pytest-auto-api2
[2022-09-11 06:38:41,533] [/app/logs/info-2022-09-11.log] [INFO]:
                             _    _         _      _____         _
              __ _ _ __ (_)  / \  _   _| |_ __|_   _|__  ___| |_
             / _` | '_ \| | / _ \| | | | __/ _ \| |/ _ \/ __| __|
            | (_| | |_) | |/ ___ \ |_| | || (_) | |  __/\__ \ |_
             \__,_| .__/|_/_/   \_\__,_|\__\___/|_|\___||___/\__|
                  |_|
                  开始执行xxx项目名称项目...

============================= test session starts ==============================
platform linux -- Python 3.8.13, pytest-7.1.3, pluggy-1.0.0
rootdir: /app, configfile: pytest.ini, testpaths: test_case/
plugins: Faker-9.8.3, allure-pytest-2.9.45, forked-1.3.0, xdist-2.4.0
collected 26 items

test_case/Add_loan/test_add_loan.py [2022-09-11 06:38:43,010] [/app/logs/info-2022-09-11.log] [INFO]:
======================================================
用例标题: 注册普通融资用户
请求路径: http://xxxxx/futureloan/member/register
请求方式: POST
请求头:   {'User-Agent': 'python-requests/2.26.0', 'Accept-Encoding': 'gzip, deflate, br', 'Accept': '*/*', 'Connection': 'keep-alive', 'Content-Length': '50', 'Content-Type': 'application/json'}
请求内容: {'mobile_phone': '13093218696', 'pwd': '12345678'}
接口响应内容:
接口响应时长: 130 ms
Http状态码: 200
=====================================================
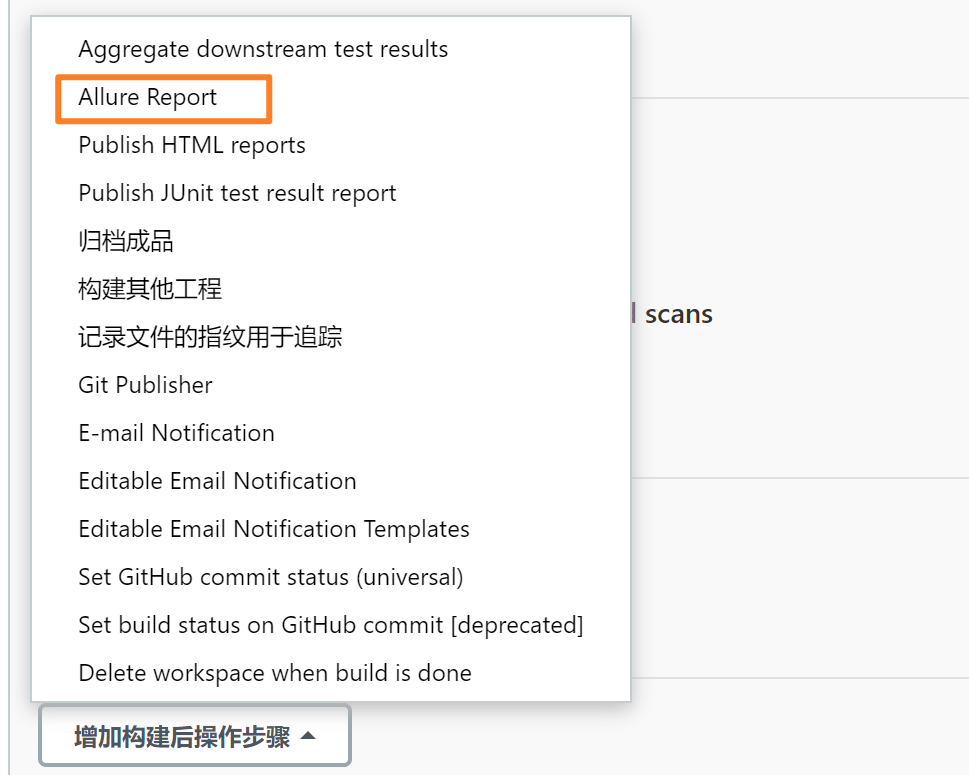
jenkins 新建项目
配置allure
先安装allure插件,安装好之后我们重启jenkins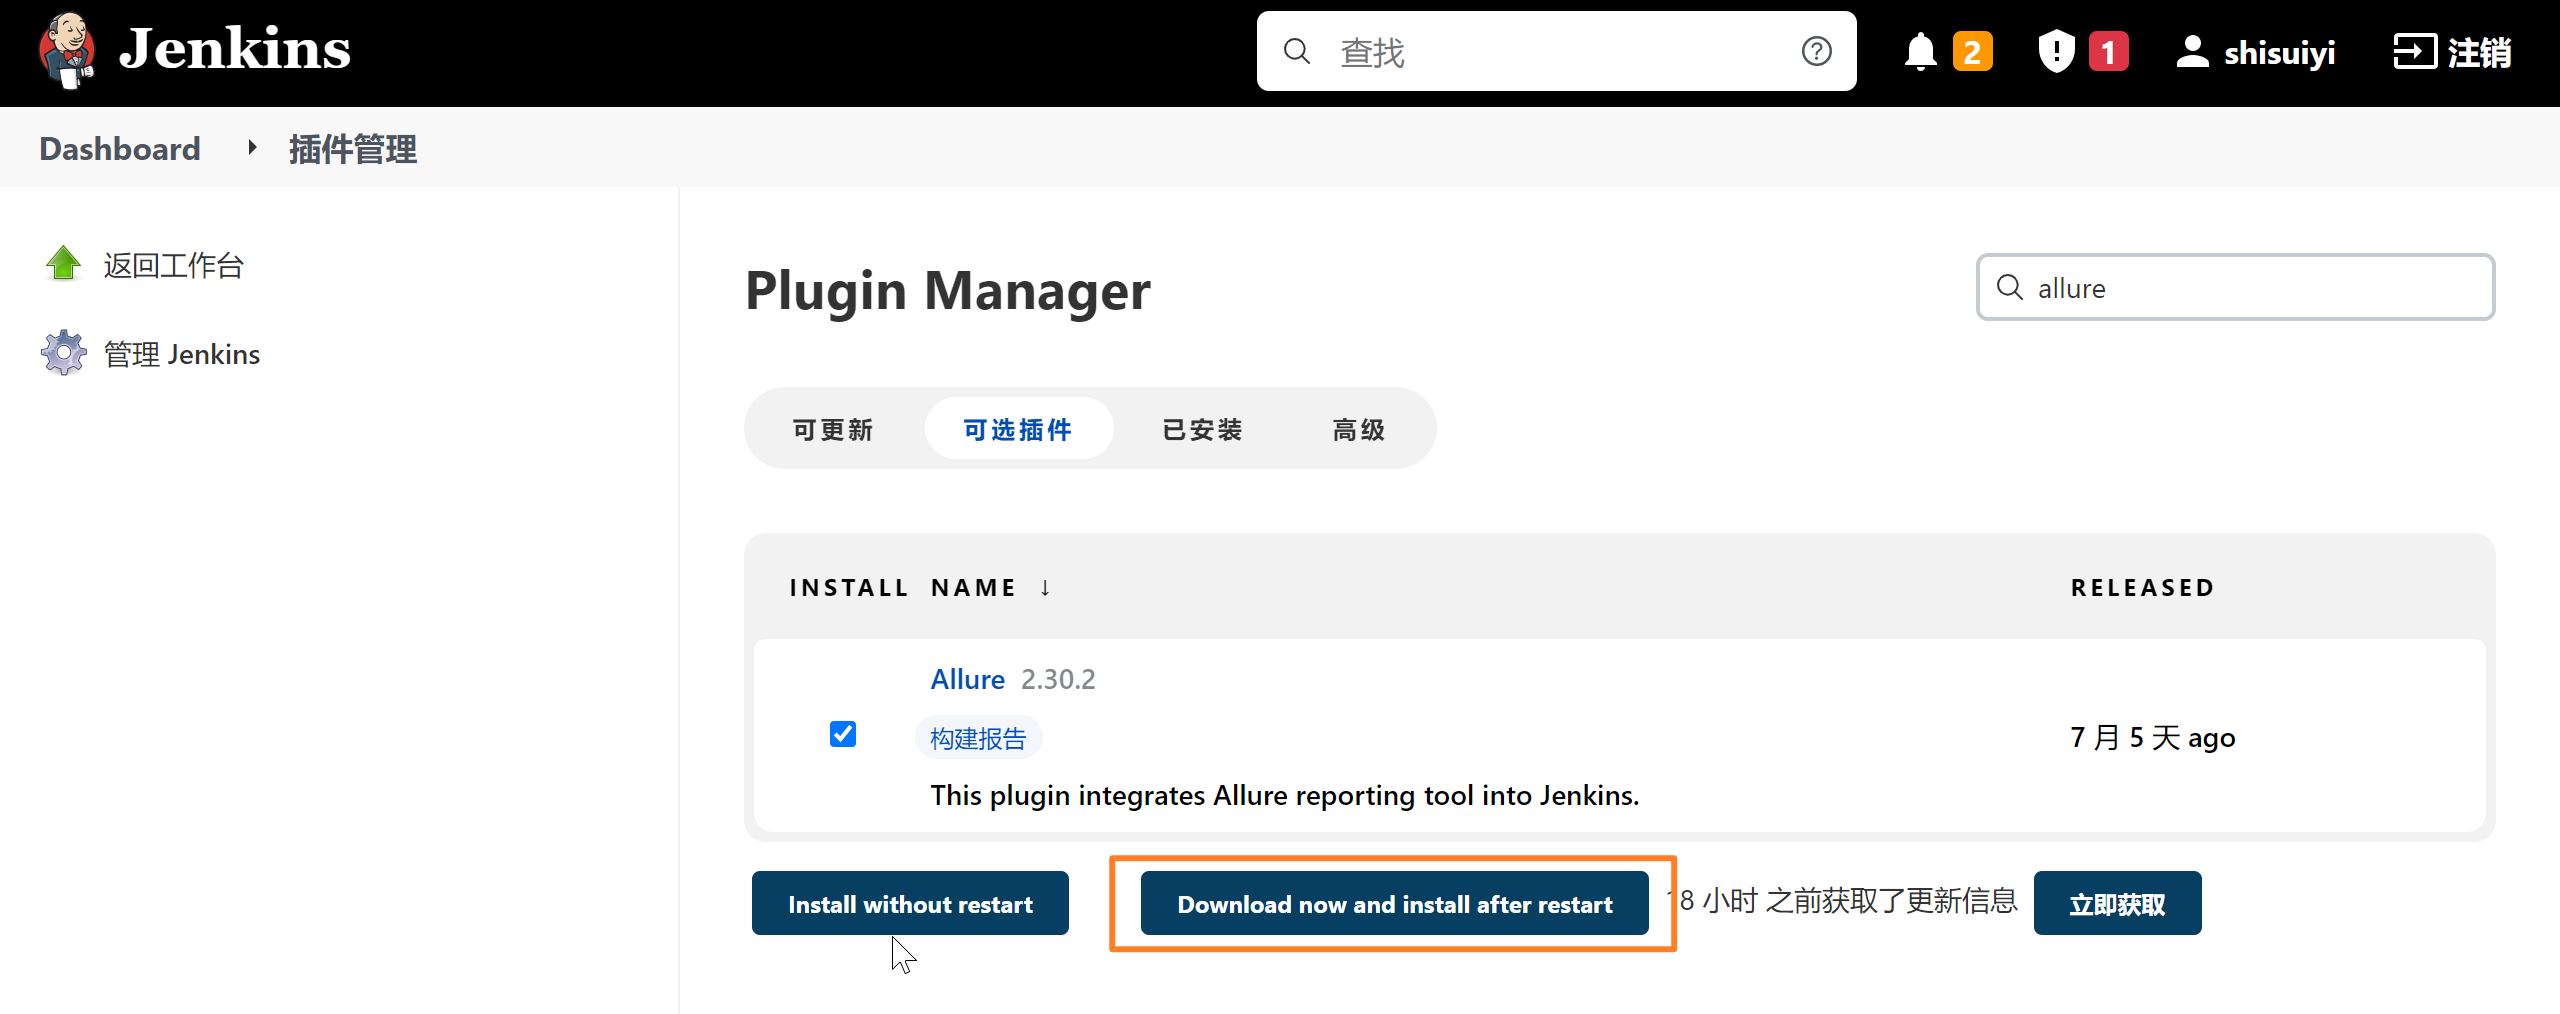
我们重启jenkins容器就行:docker restart e125ba10d609
在Global Tool Configuration中配置allure的环境变量
先选择Global Tool Configuration进入页面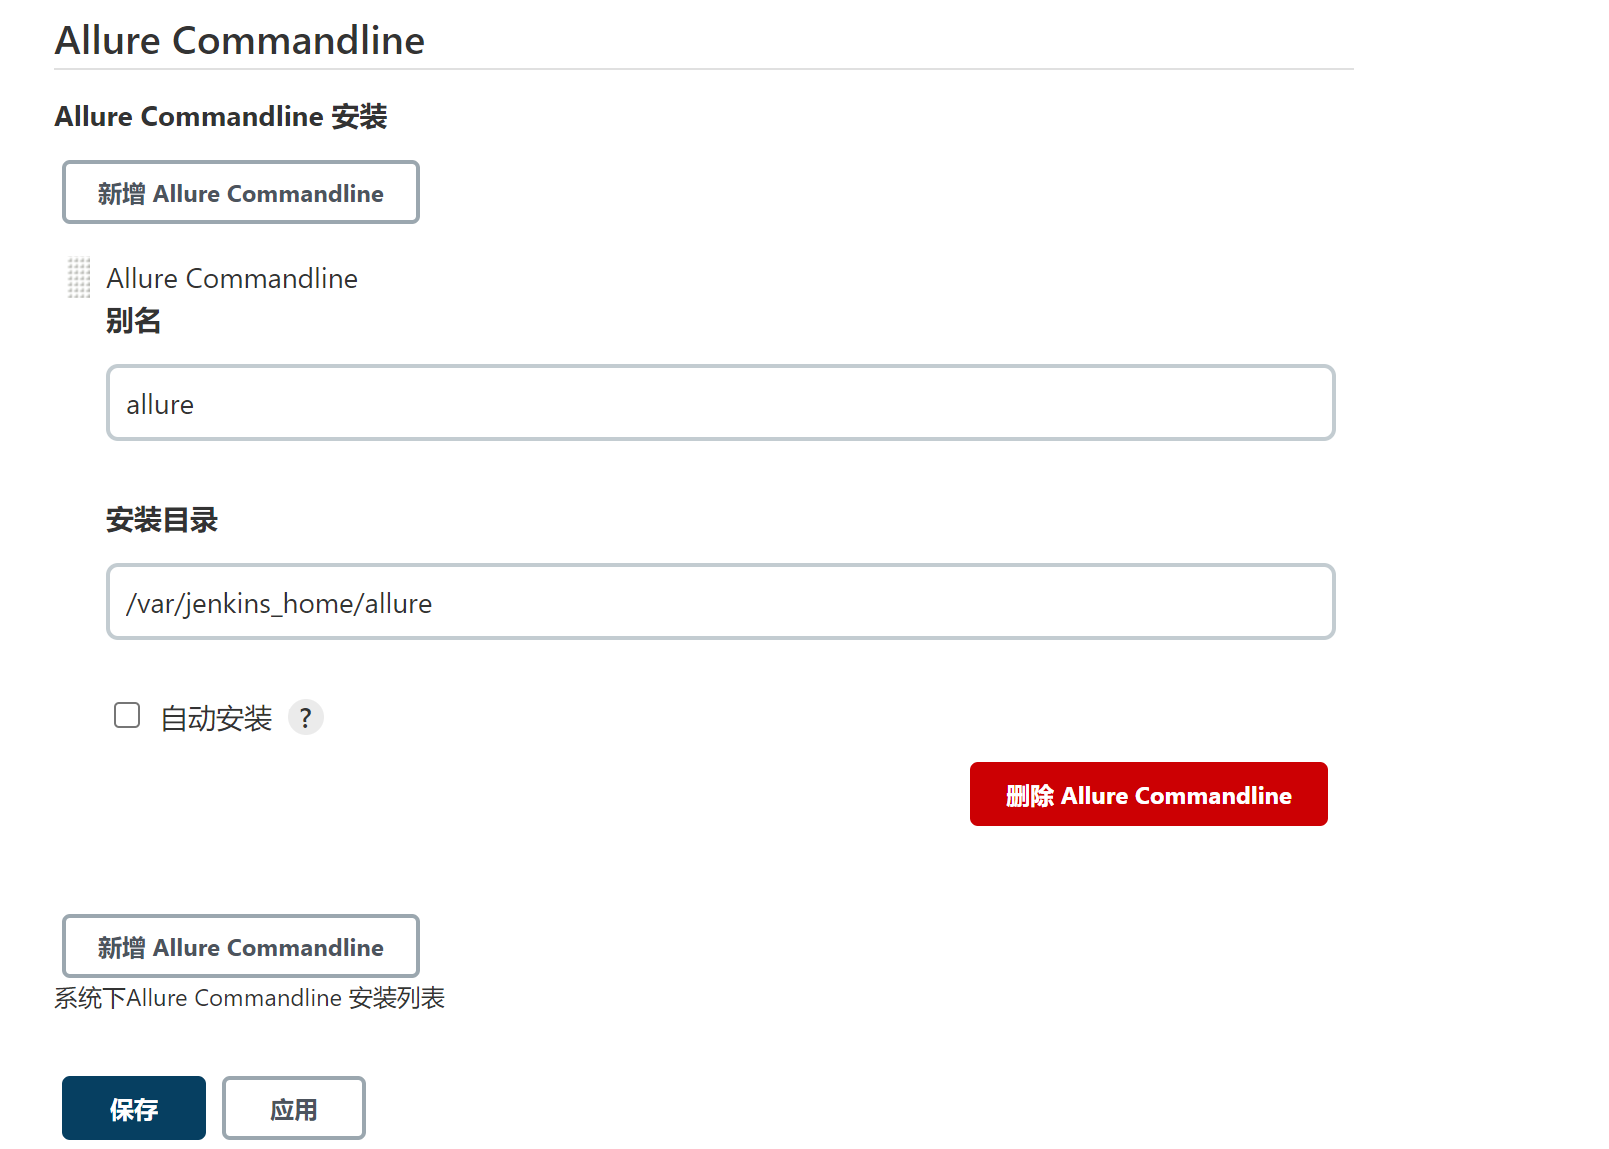
设置好之后,点击「应用」,在点击「保存」
设置allure的版本
新建项目
点击 jenkins 首页面的新建 Item
自定义项目名称,选择构建一个自由风格的软件项目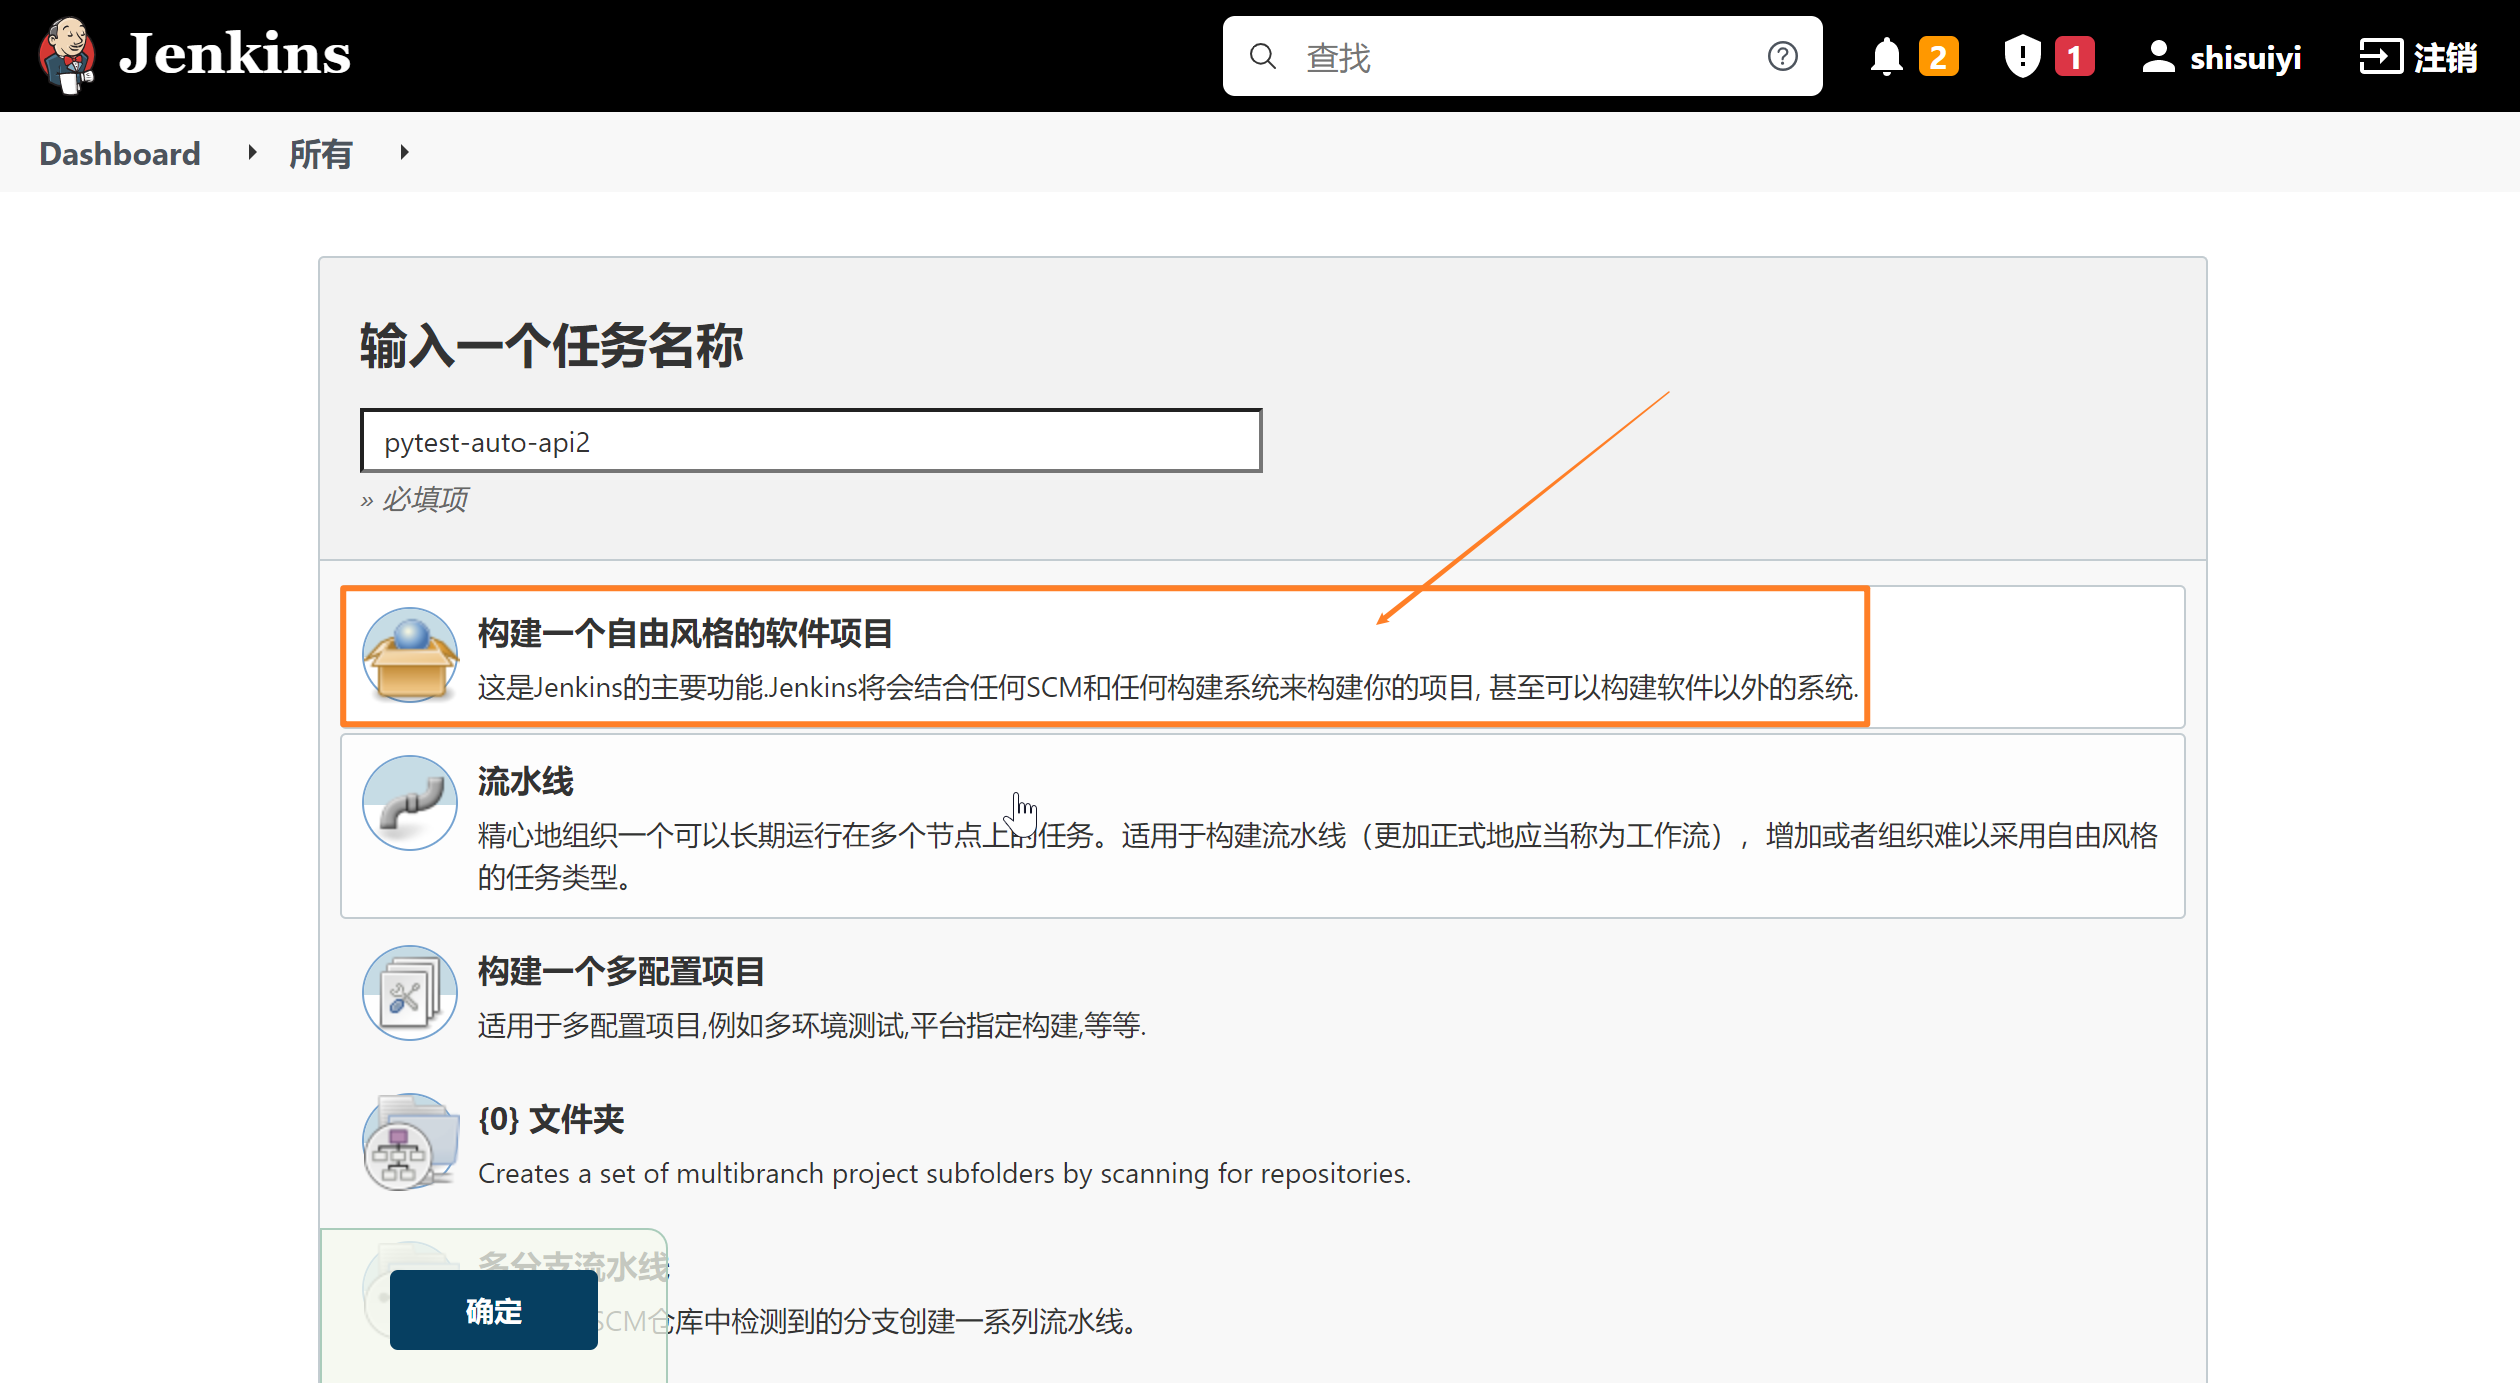
项目配置
选择git源码管理配置源码管理中仓库地址,Credentials中添加输入码云账号密码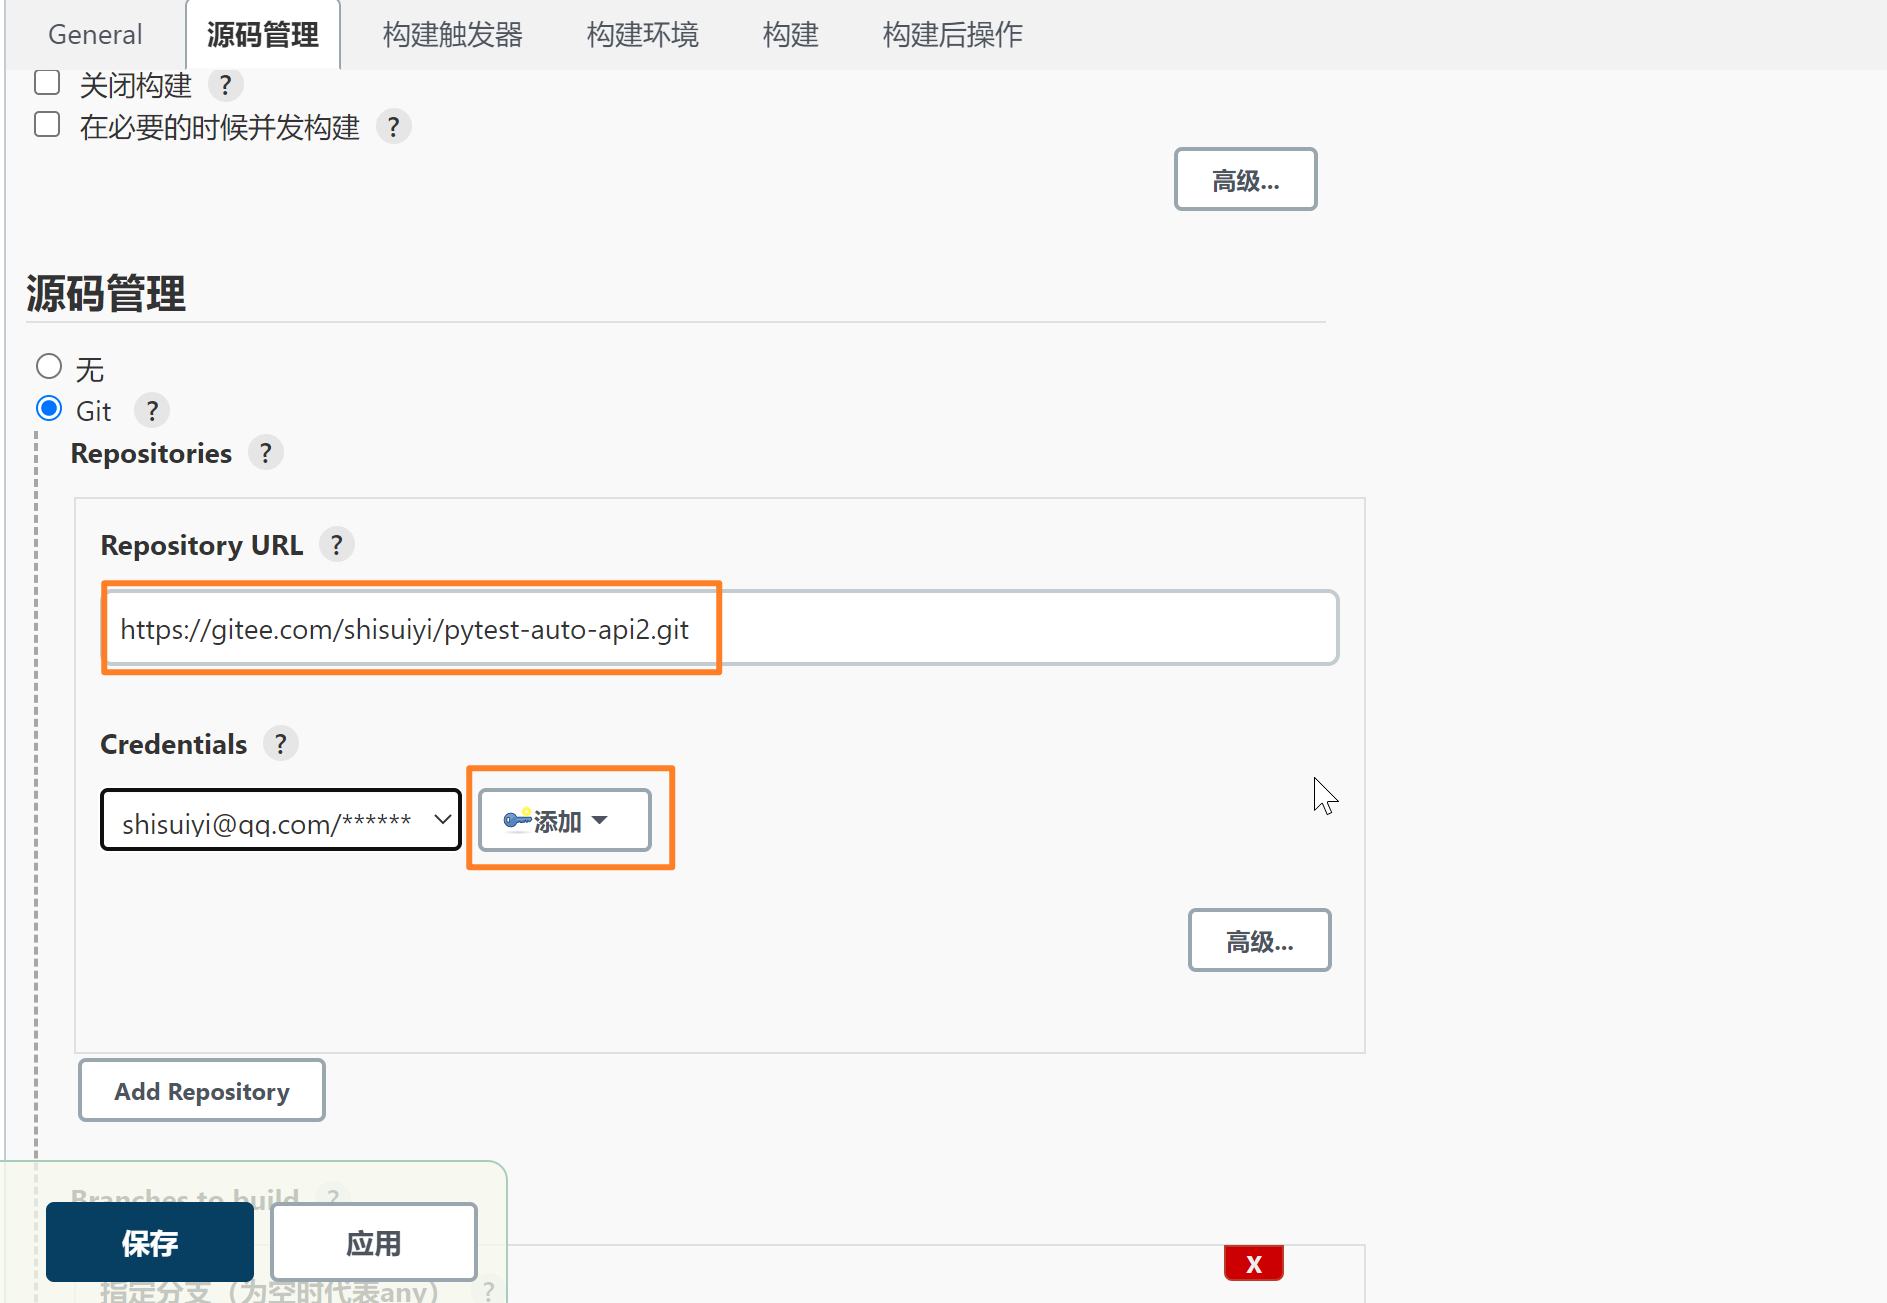
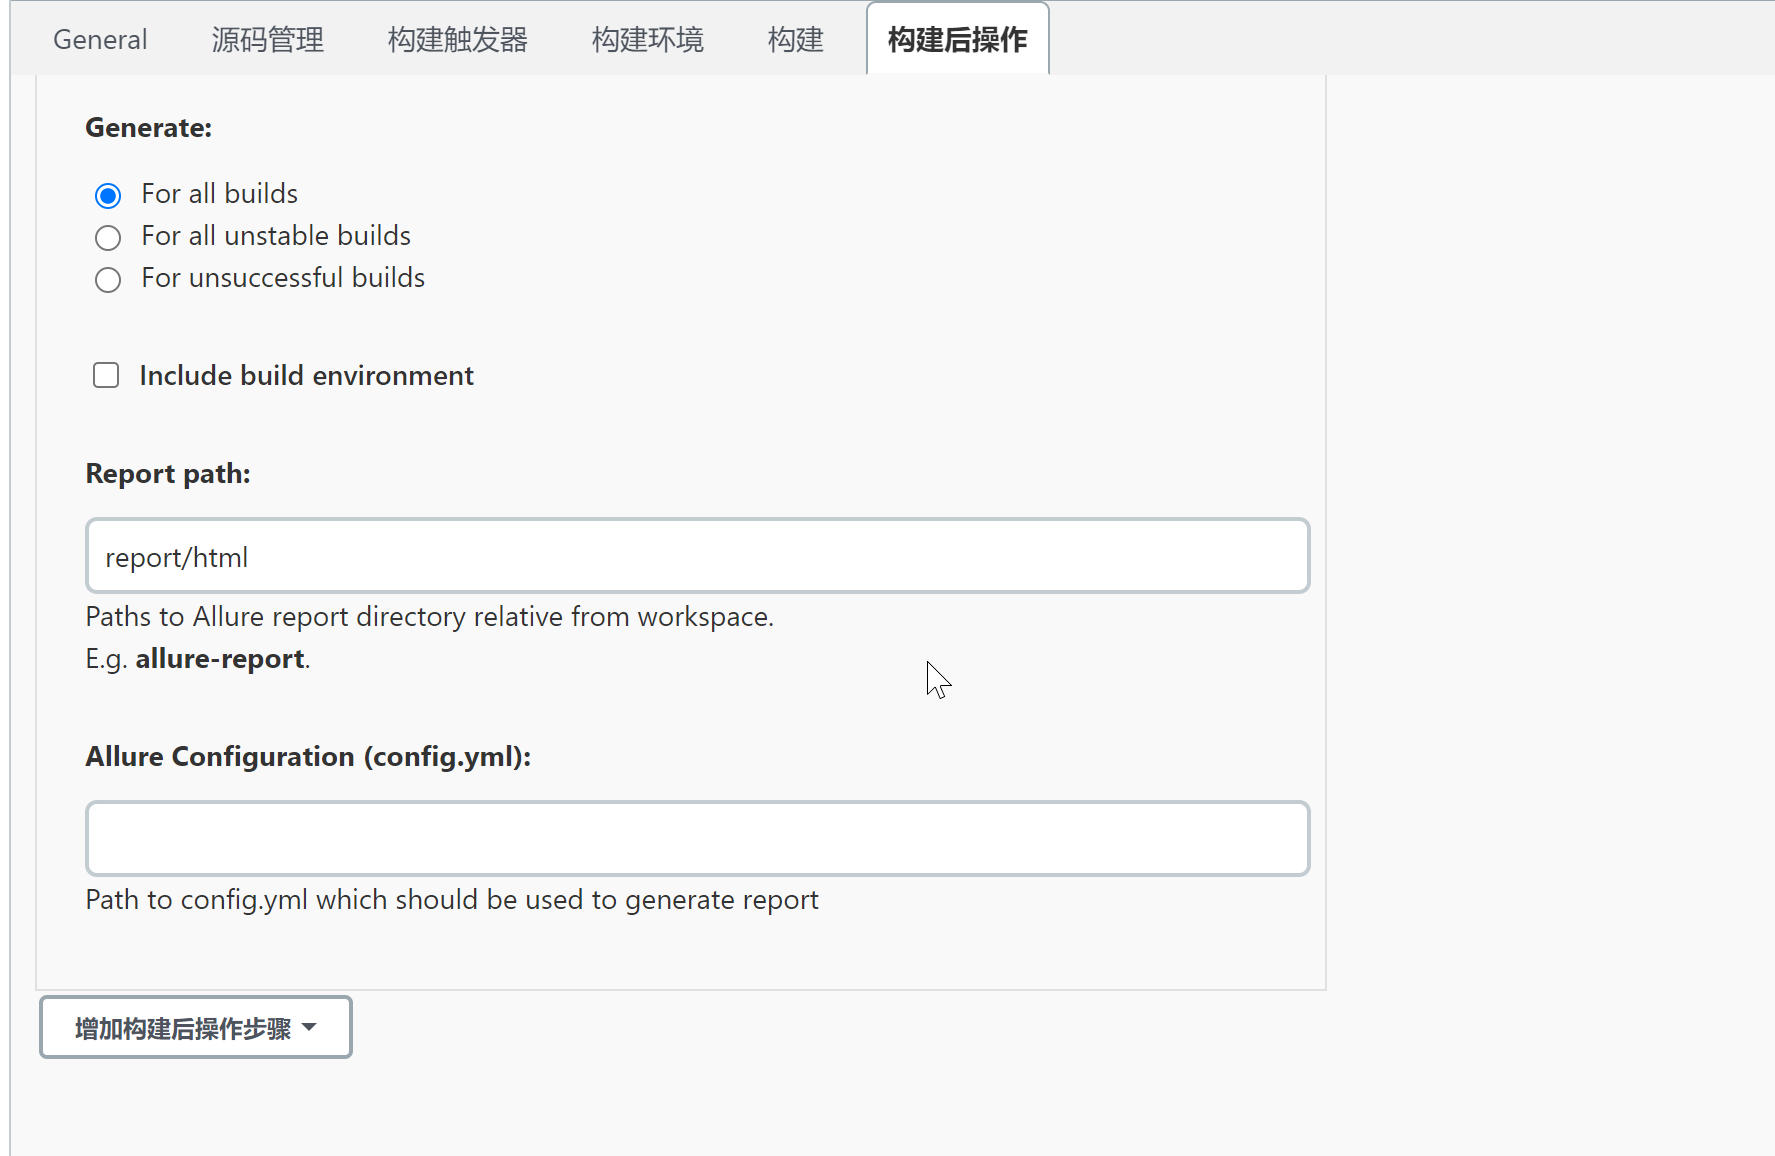
项目里面设置了配置allure
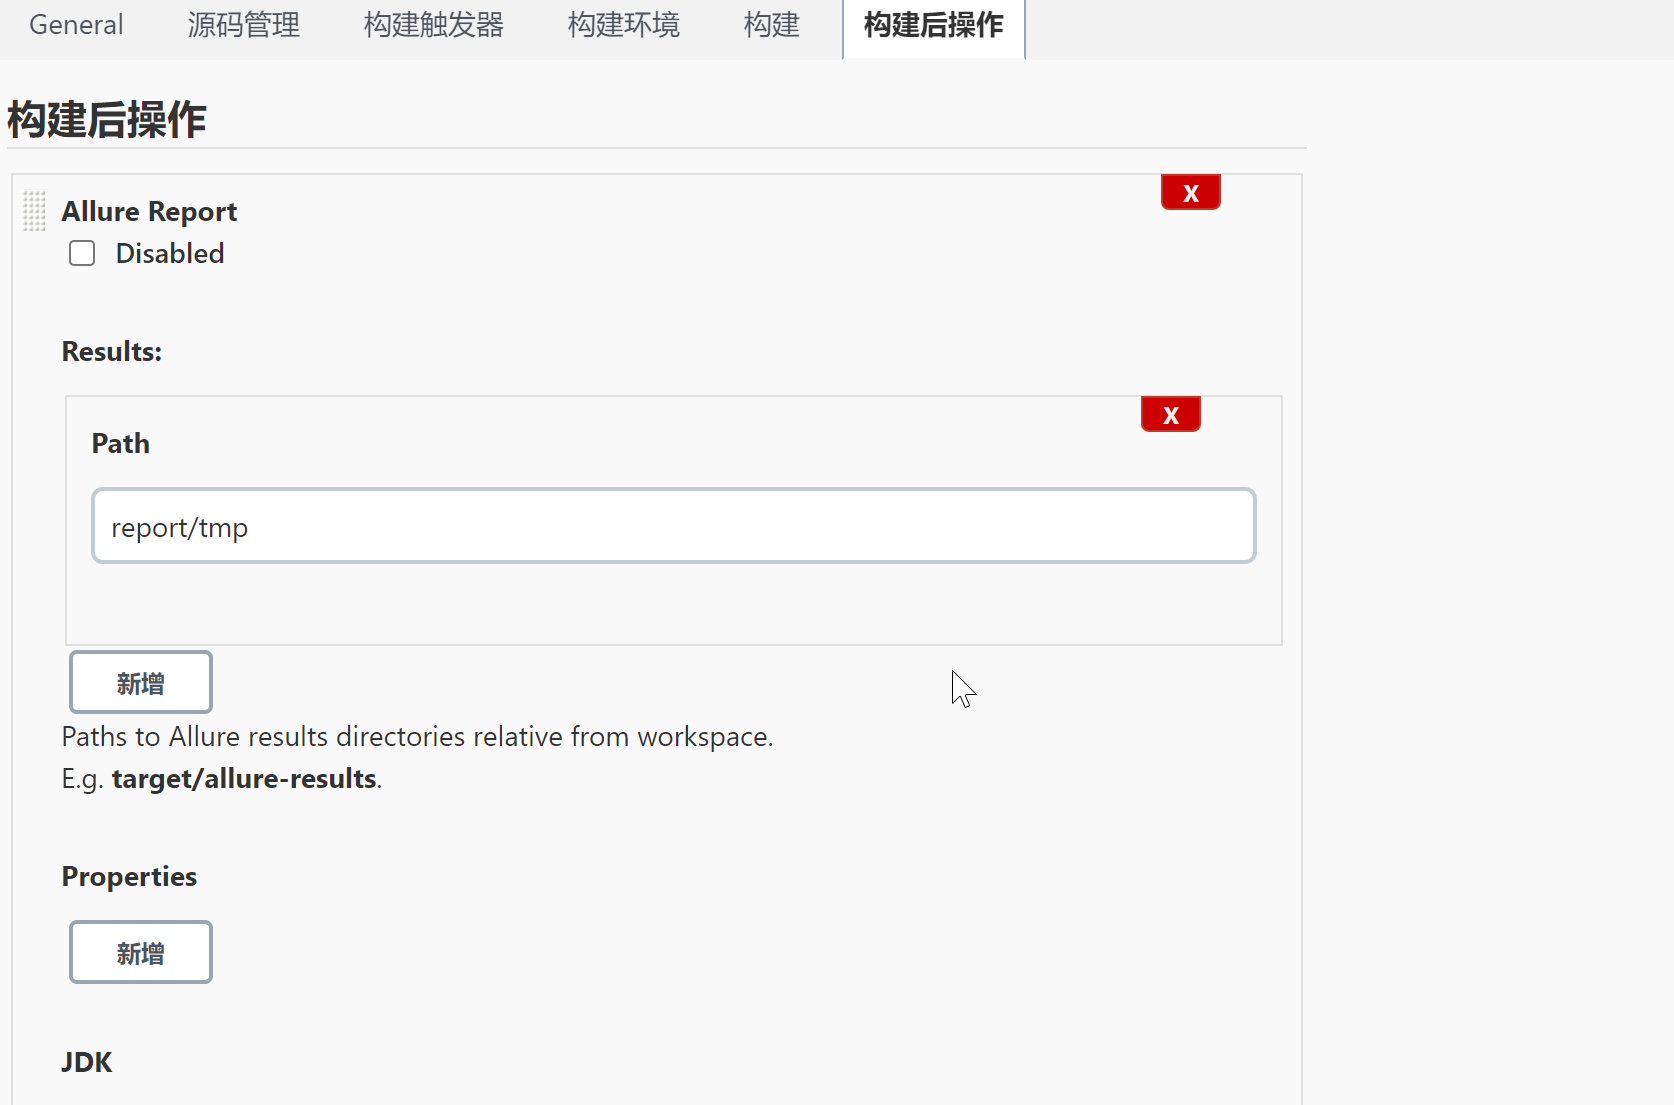
注意上面的Path 要和我们配置的路径是同一个
构建运行
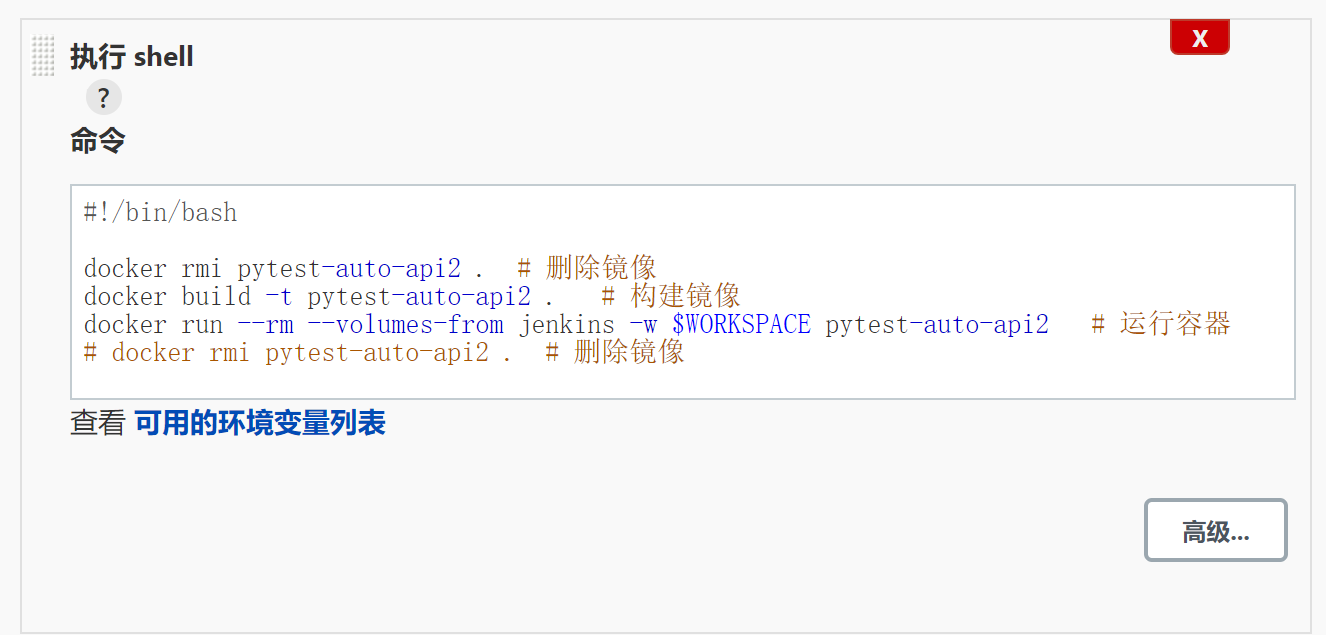
为解决在删除镜像后执行生成报告的失败,而镜像不删除就正常了的问题(蠢办法)
#!/bin/bash

docker rmi pytest-auto-api2 .  # 删除镜像
docker build -t pytest-auto-api2 .   # 构建镜像
docker run --rm --volumes-from jenkins -w $WORKSPACE pytest-auto-api2   # 运行容器
# docker rmi pytest-auto-api2 .  # 删除镜像
allure报告


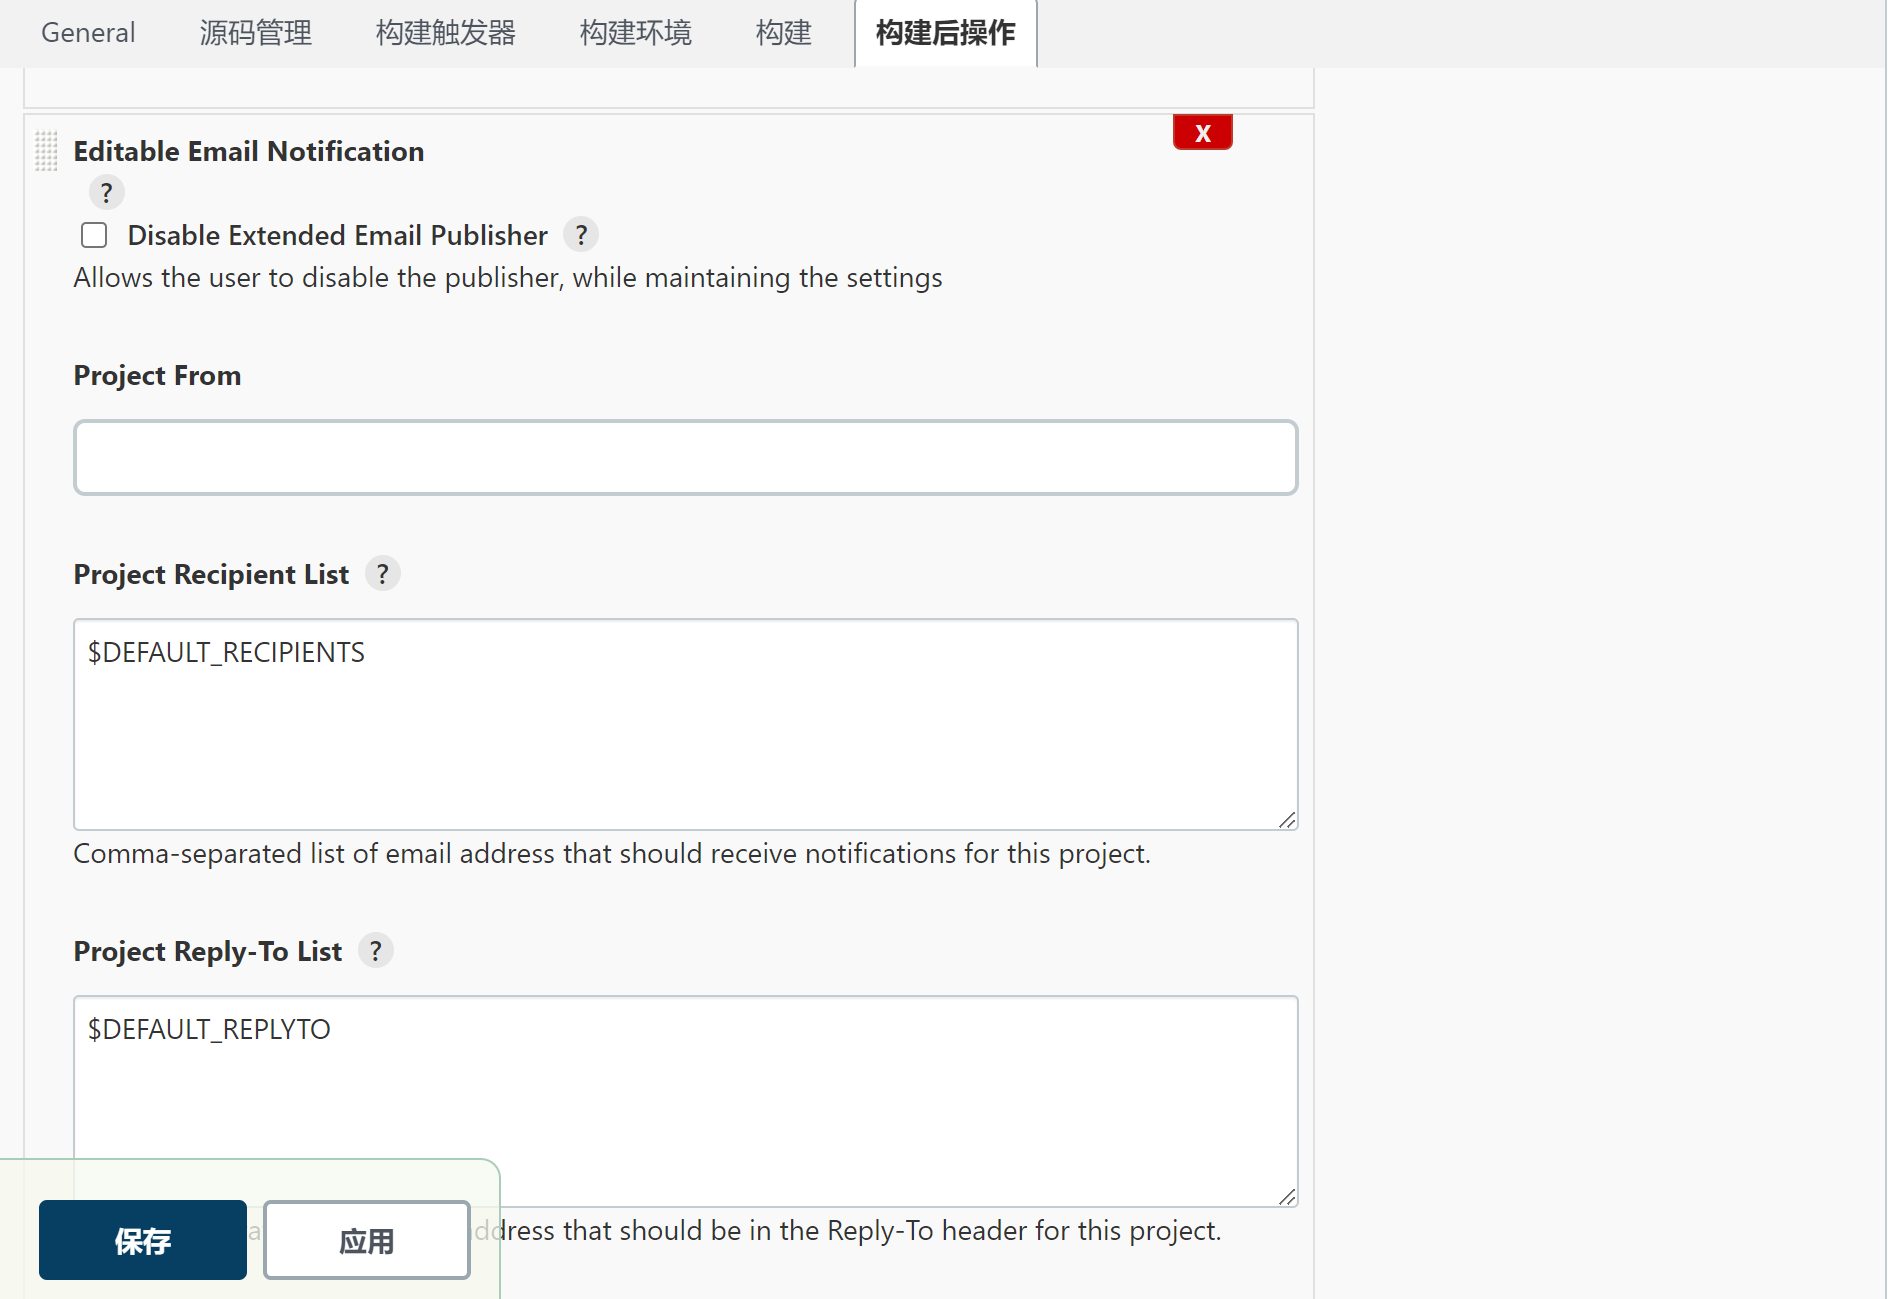
邮件发送配置
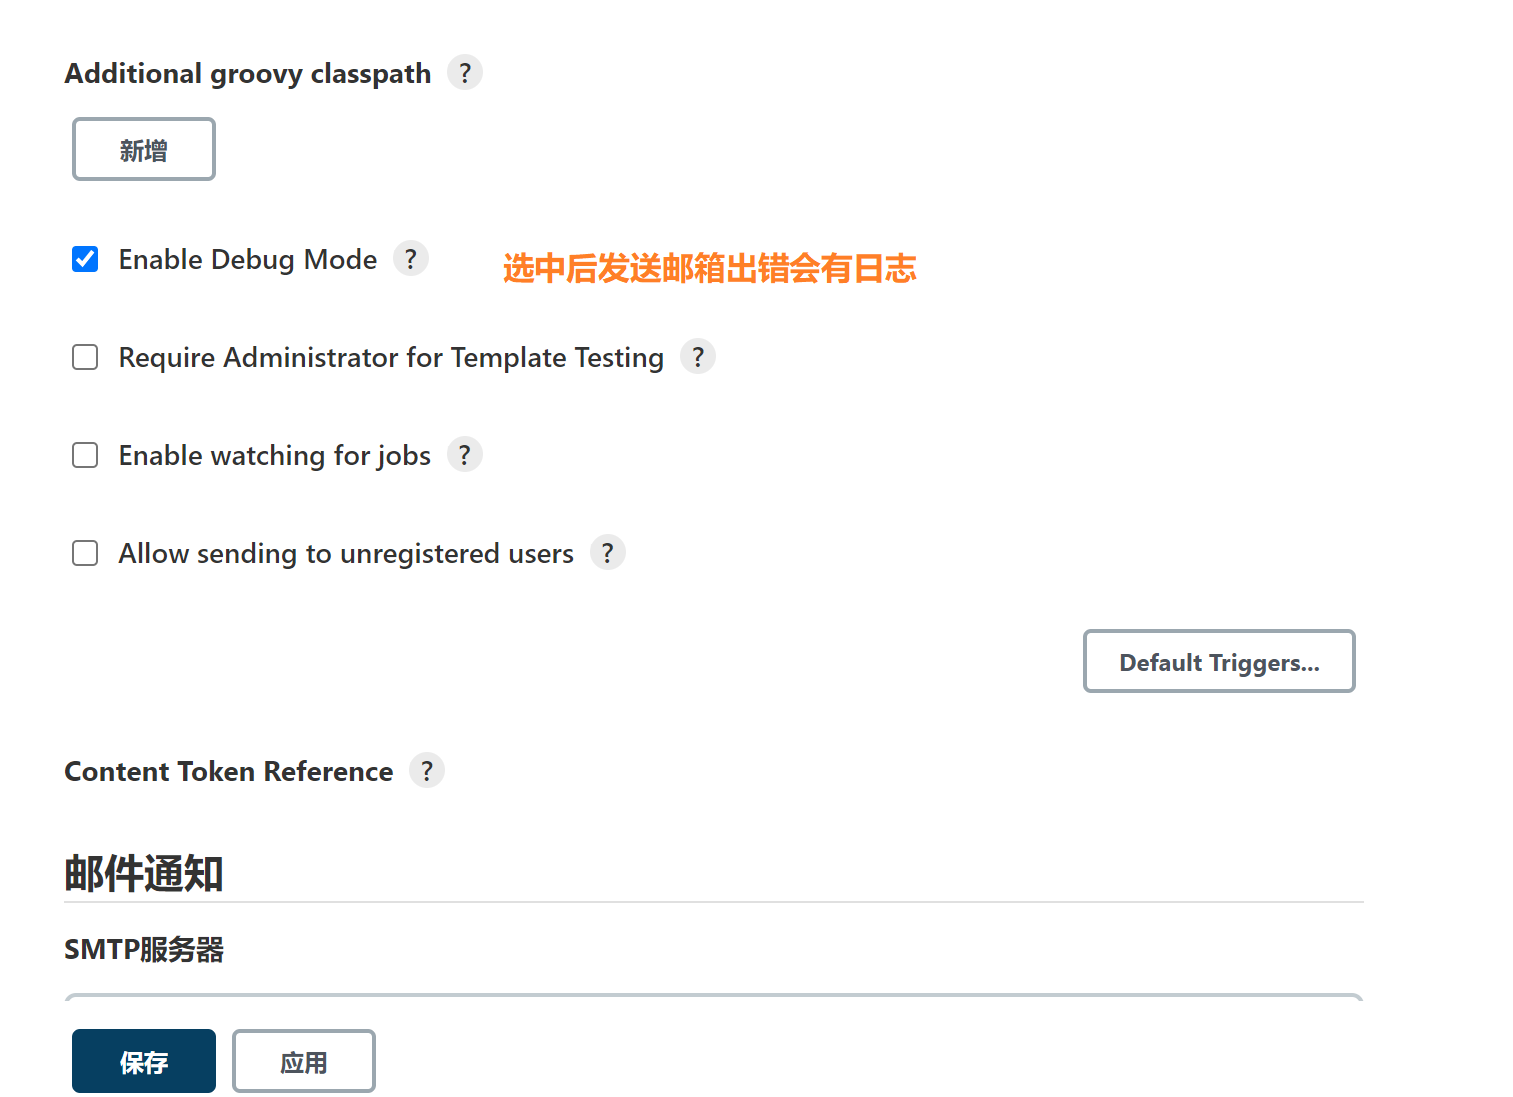
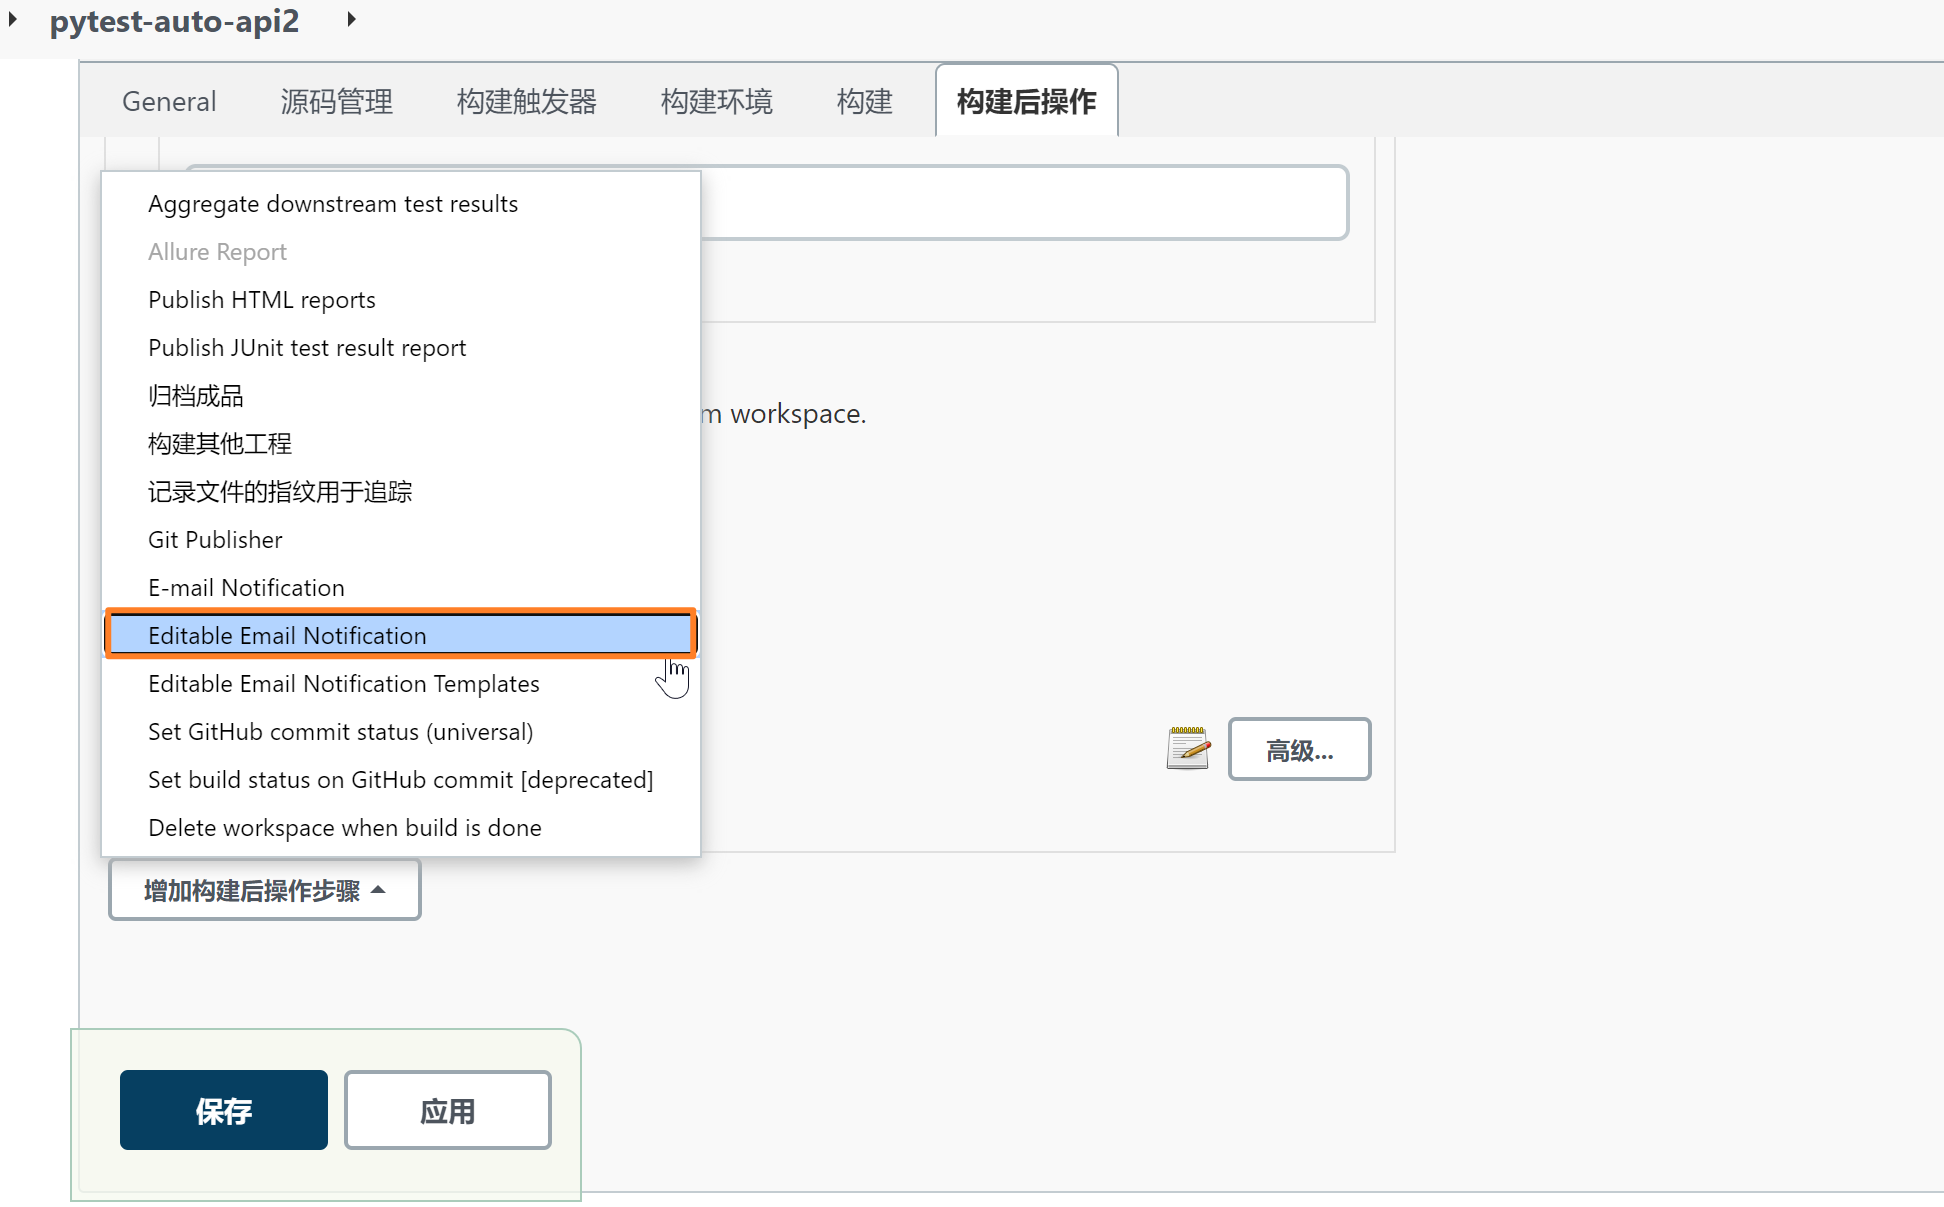
进入 【系统管理】 --> 【插件管理】 --> 【可选插件】
我这是已经装过了,安装过的话在已安装确认下,安装完成需要重启Jenkins让插件生效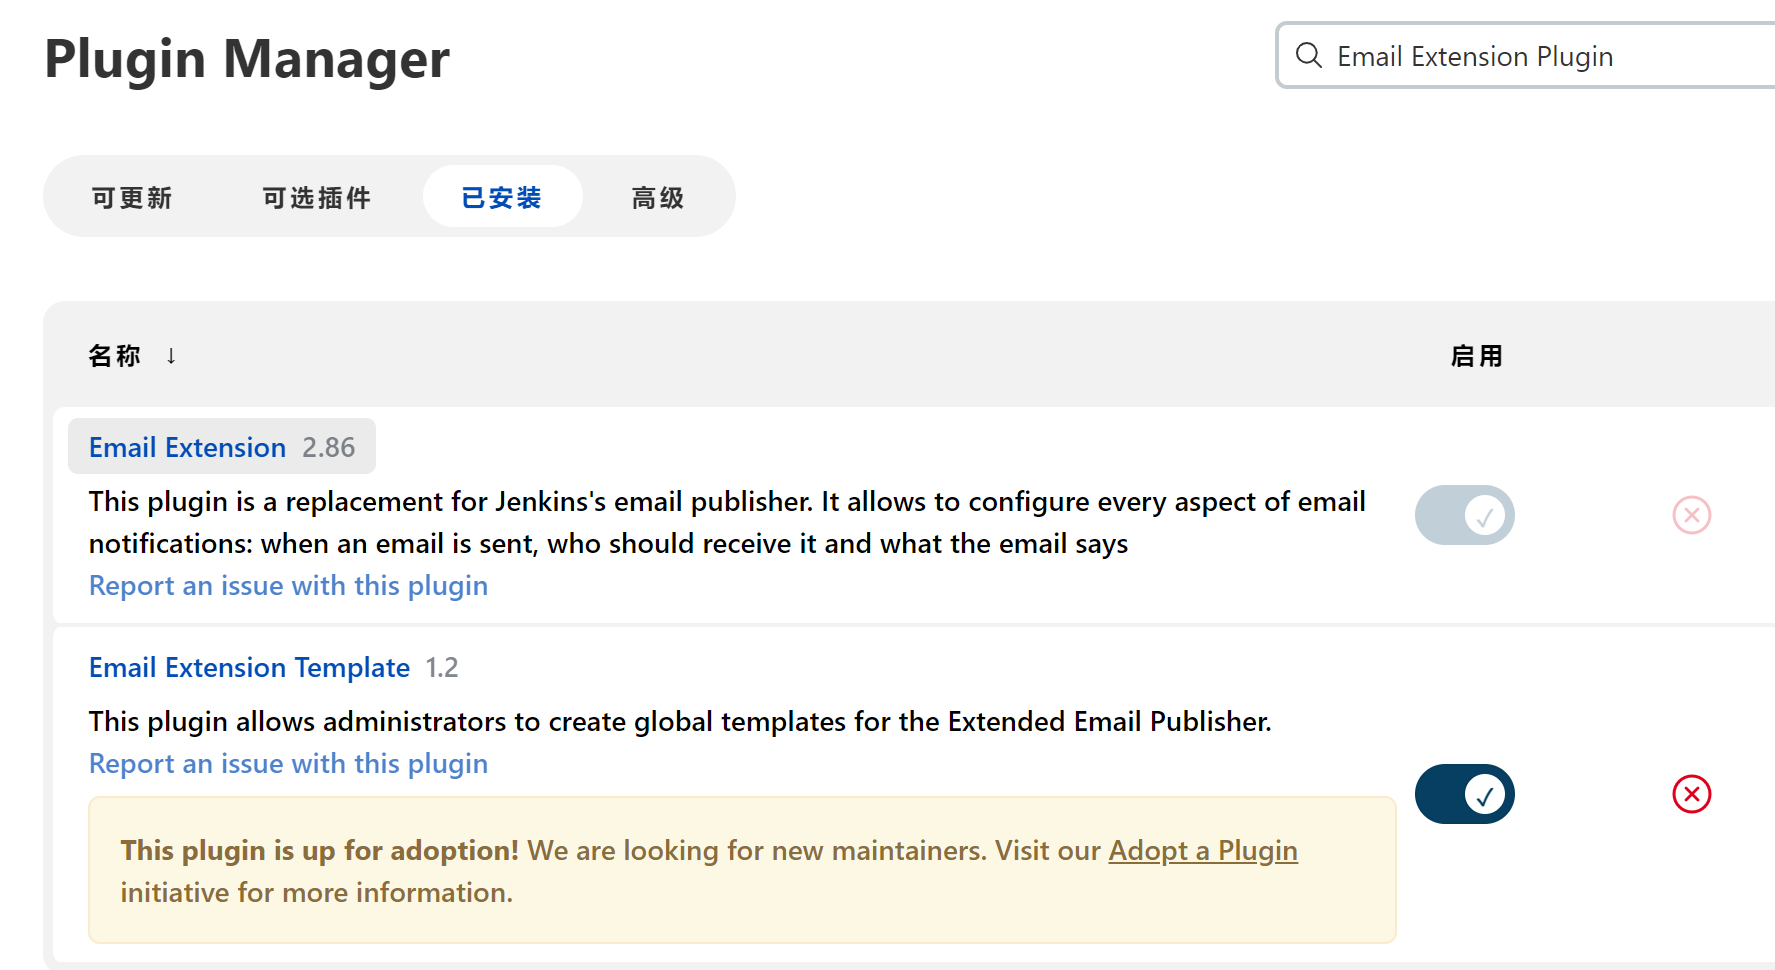
配置好后继续,找【Extended E-mail Notification】 这一项,这个是安装完插件后,重启Jenkins就会有的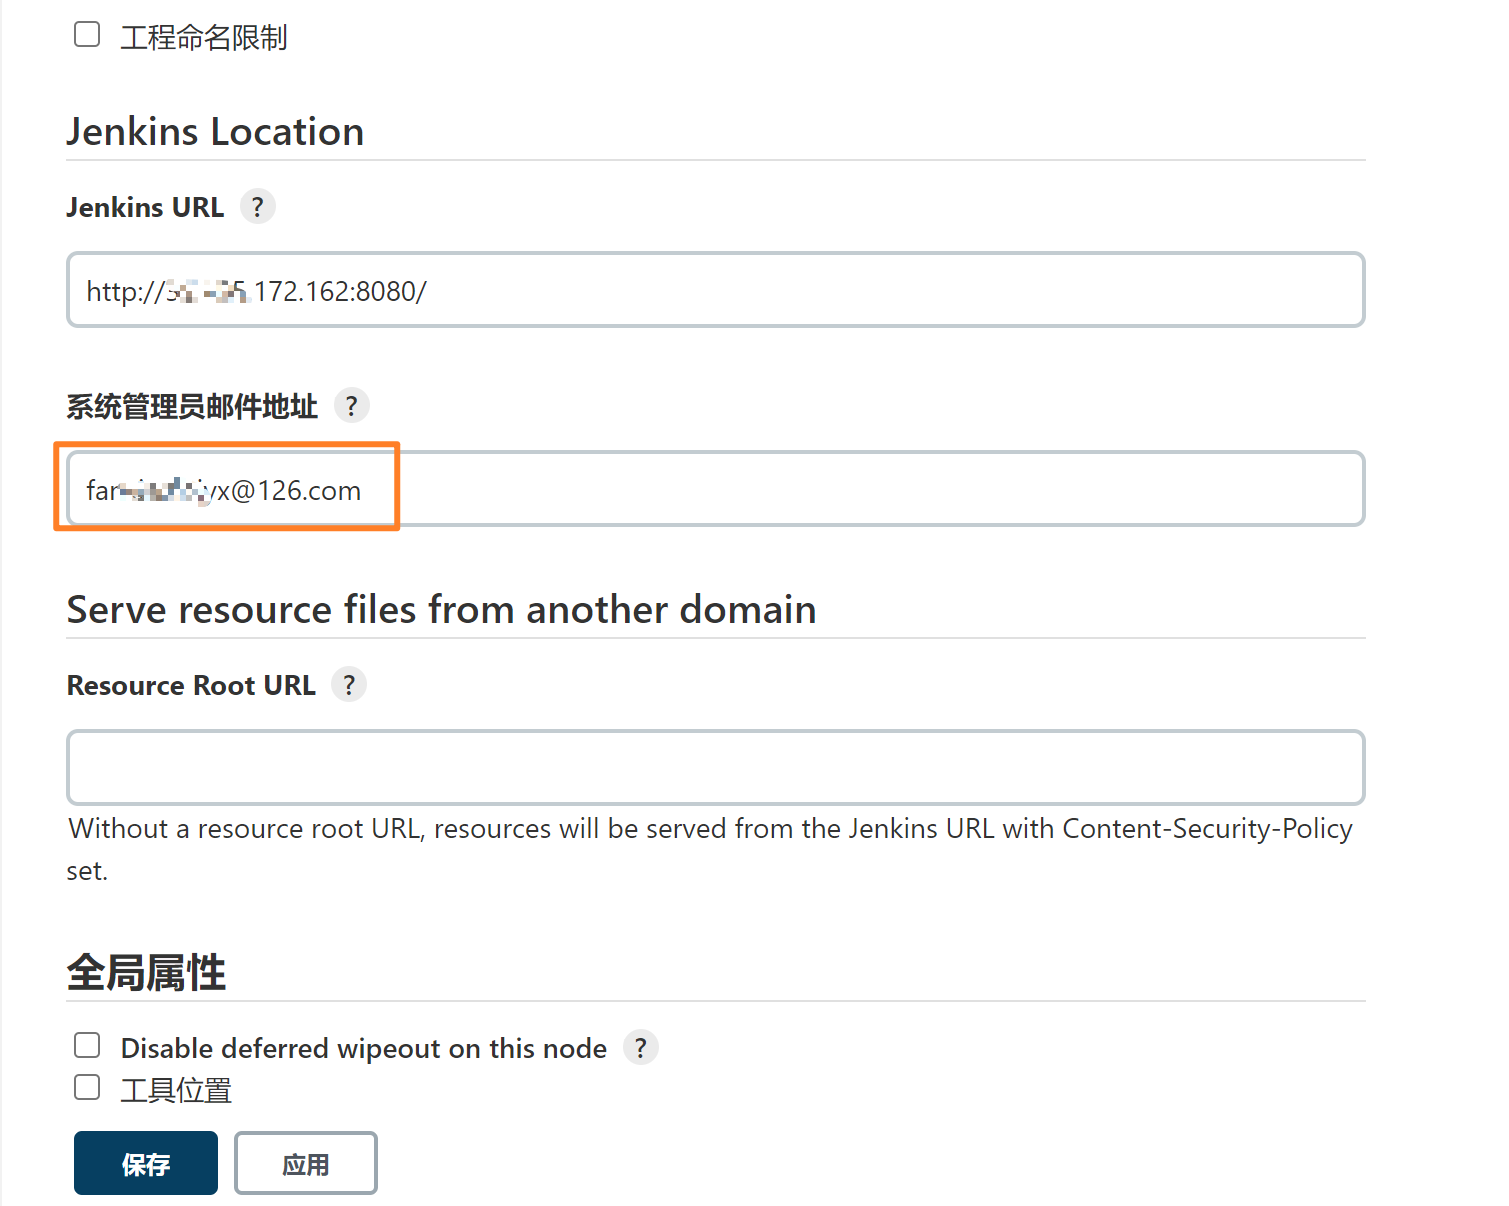
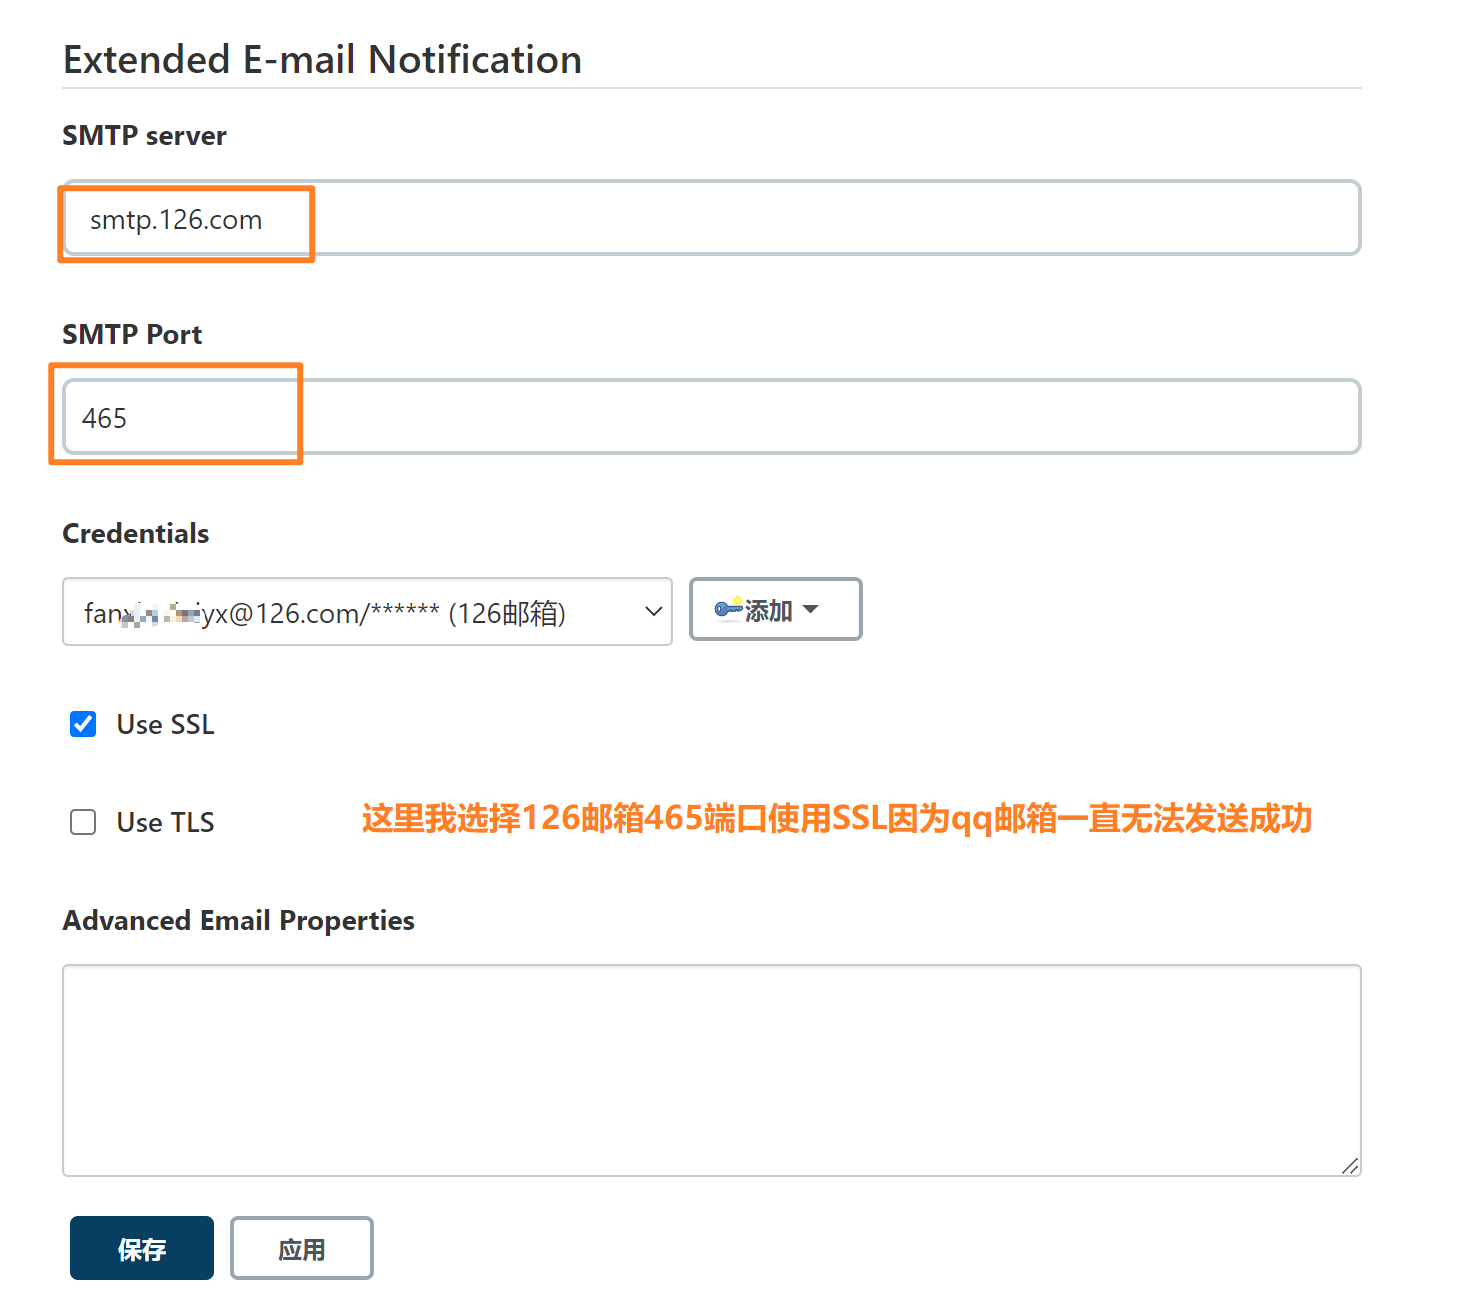
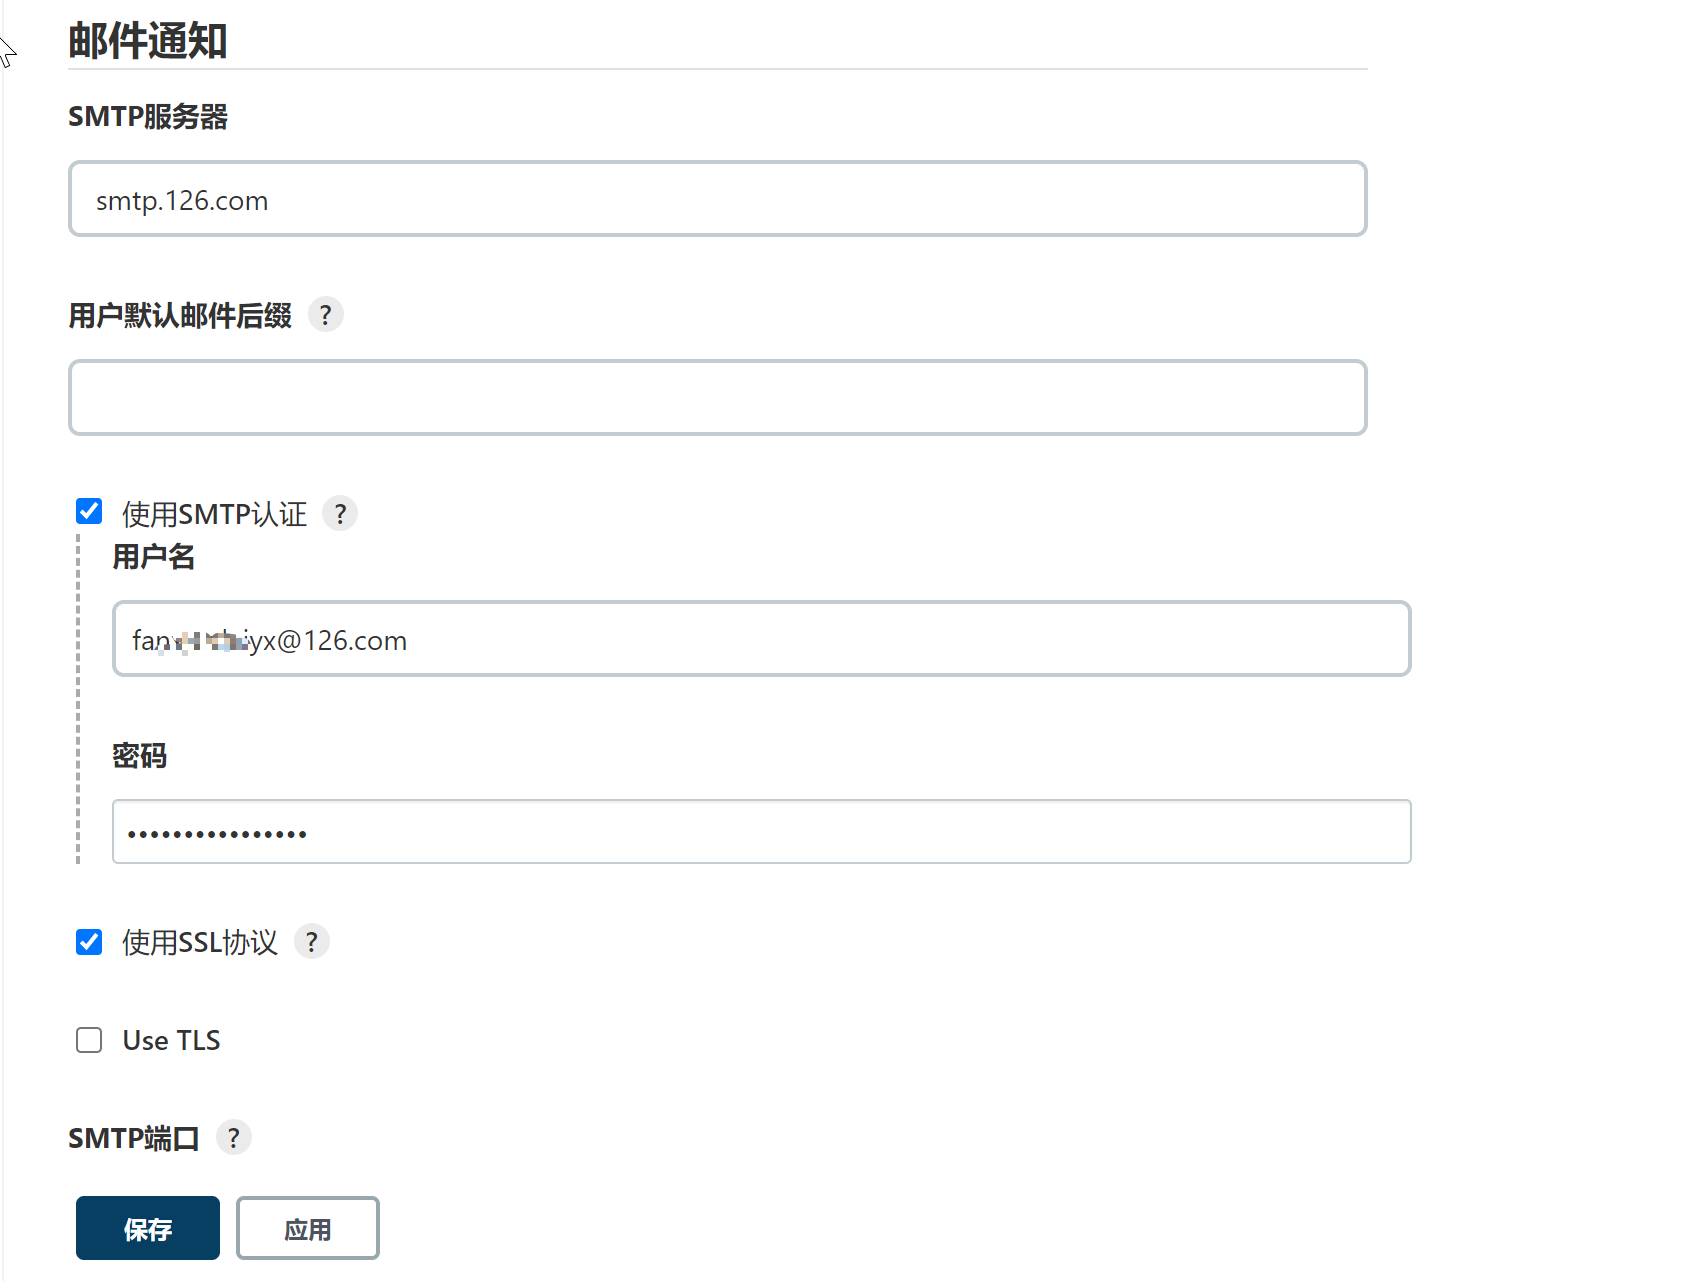
测试后邮件发送成功,证明账号密码及邮件服务器没问题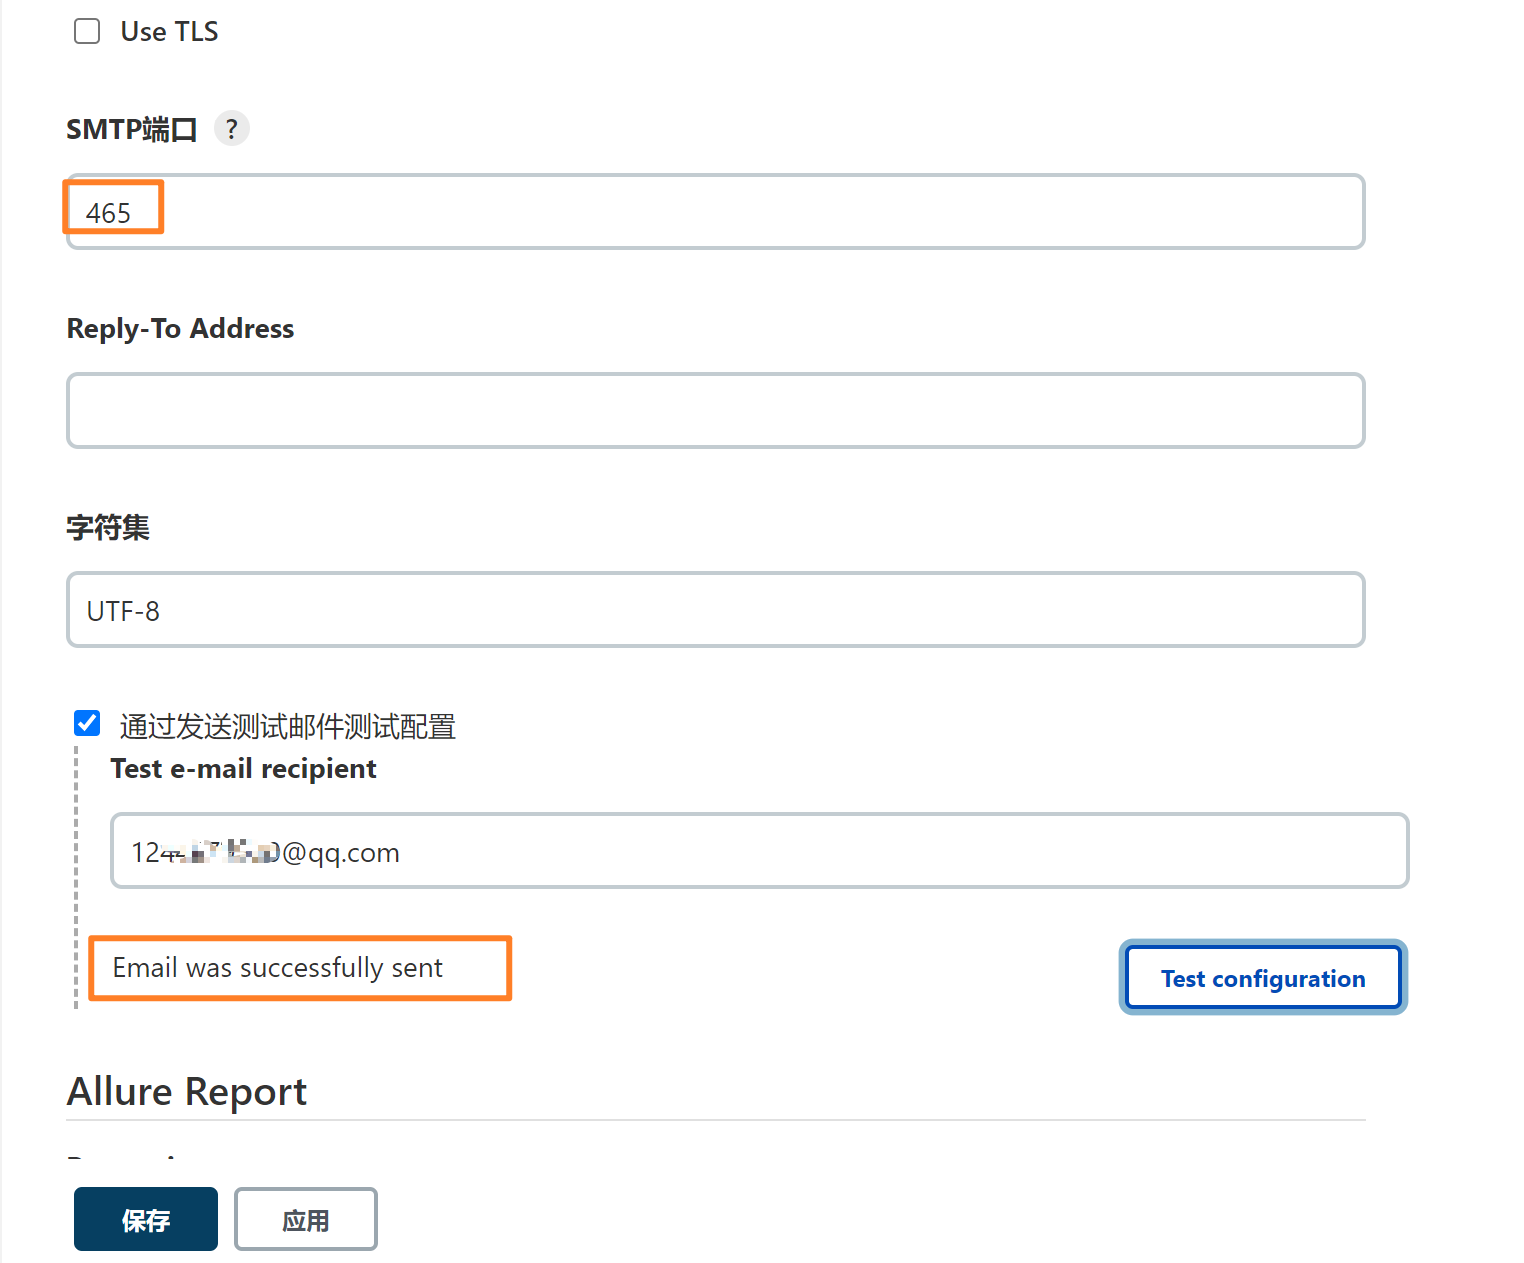
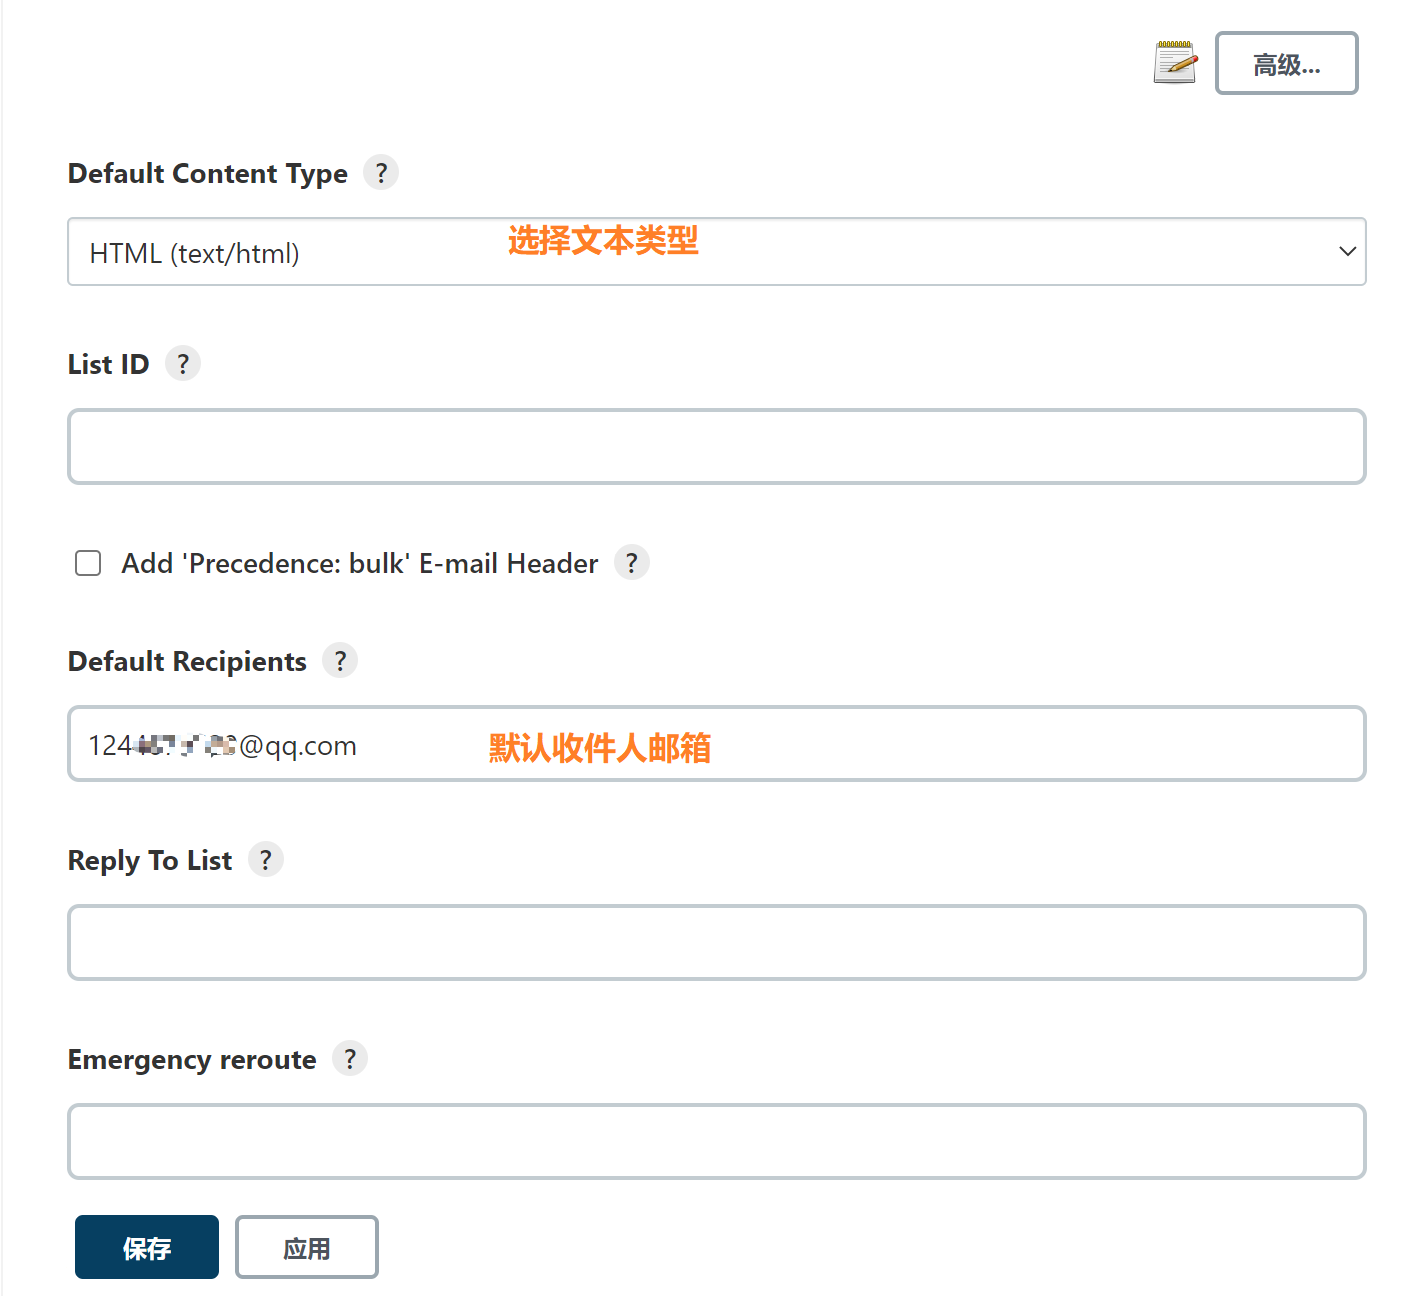
以上操作完成后点击保存,继续配置任务里面的配置项
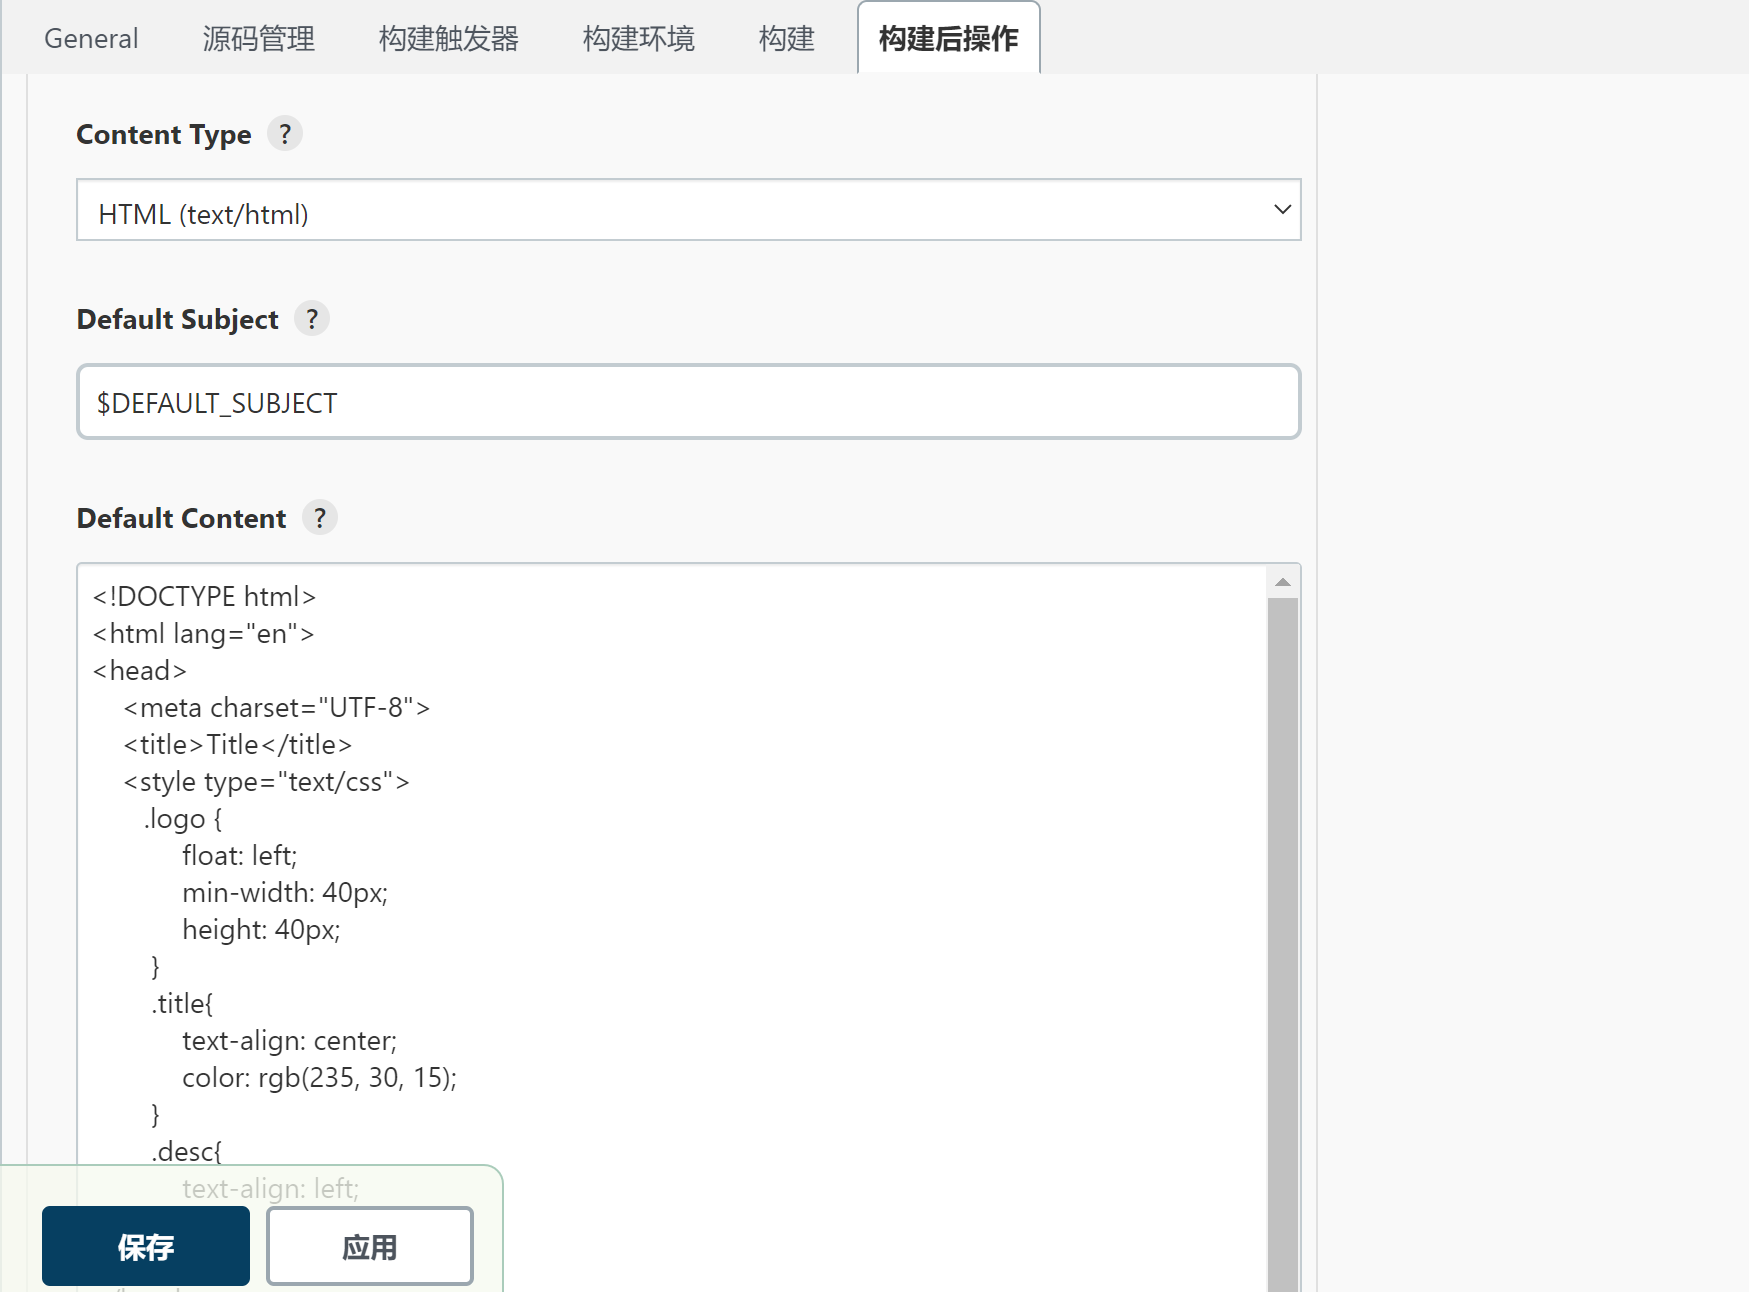
这是邮件的内容,参考的网上
<!DOCTYPE html>
<html lang="en">
<head>
<meta charset="UTF-8">
<title>Title</title>
<style type="text/css">
.logo {
float: left;
min-width: 40px;
height: 40px;
}
.title{
text-align: center;
color: rgb(235, 30, 15);
}
.desc{
text-align: left;
}
</style>
</head>
<body>
<div>
<h1 class="title">pytest-auto-api2自动化测试报告</h1>
</div>
<div class="desc">
<p><font color="red"> Jenkins自动发送的测试报告邮件,无需回复!</font></p>
<h4> 各位同事,大家好,以下为${PROJECT_NAME}自动化测试构建信息</br><h4/>
<h4> 在线测试报告直达链接:<a href="${PROJECT_URL}/${BUILD_NUMBER}/allure">${PROJECT_URL}/${BUILD_NUMBER}/allure</a></h4>
</div>
<br/>
<div>
<table width="900" cellpadding="8px" cellspacing="8px" class="table">
<tbody>
<tr>
<td><br/>
<b><font color="#0B610B">项目描述:${JOB_DESCRIPTION}<br></font></b>
<hr size="2" width="100%" align="center" /></td>
</tr>
<tr>
<td>项目名称 : ${PROJECT_NAME}</td>
</tr>
<tr>
<td>构建编号 : 第${BUILD_NUMBER}次构建</td>
</tr>
<tr>
<td>触发原因: ${CAUSE}</td>
</tr>
<tr>
<td>构建状态: ${BUILD_STATUS}</td>
</tr>
<tr>
<td>构建日志: <a href="${PROJECT_URL}${BUILD_NUMBER}/console">${PROJECT_URL}${BUILD_NUMBER}/console</a></td>
</tr>
<tr>
<td>构建Url : <a href="${BUILD_URL}">${BUILD_URL}</a></td>
</tr>
<tr>
<td>工作目录 : <a href="${PROJECT_URL}ws">${PROJECT_URL}ws</a></td>
</tr>
<tr>
<td>项目Url : <a href="${PROJECT_URL}">${PROJECT_URL}</a></td>
</tr>
<tr>
<td>allure在线测试报告:<a href="${PROJECT_URL}/${BUILD_NUMBER}/allure">${PROJECT_URL}/${BUILD_NUMBER}/allure</a></td>
</tr>
</tbody>
</table>
</div>
</body>

3. 运行项目后邮件发送成功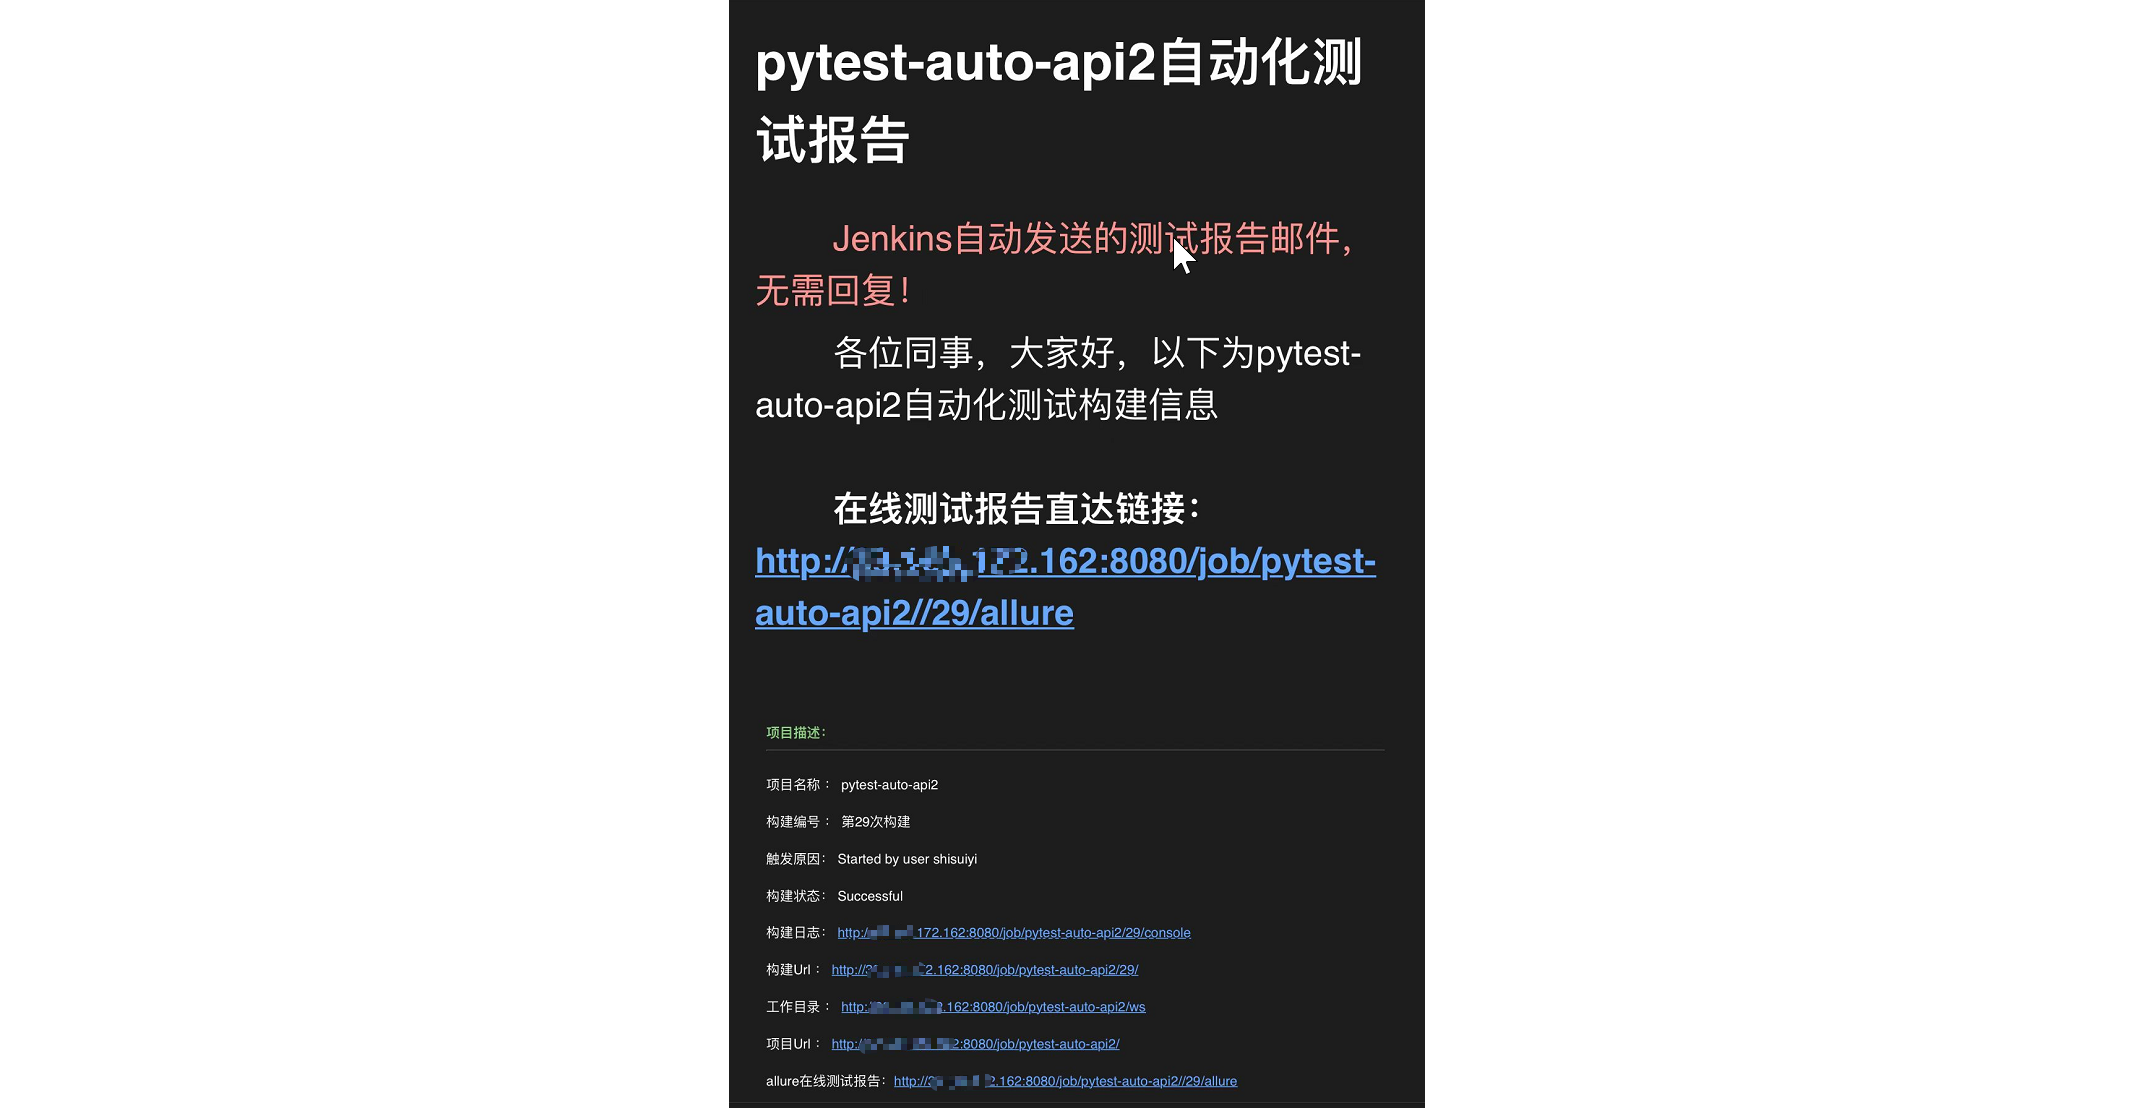
jenkins 容器时间与宿主机时间不一致问题

复制主机的localtime
docker cp /etc/localtime 【容器ID或者NAME】:/etc/localtime
如
[root@iZ2zebqeq8f5murg3r515qZ ~]# docker cp /etc/localtime e125ba10d609:/etc/localtime
处理好之后重启容器
docker restart 容器ID
可以看到容器的时间也正常啦
[root@iZ2zebqeq8f5murg3r515qZ ~]# docker exec -it -uroot jenkins bash
bash-5.1# date
Thu Sep 15 19:49:00 CST 2022
评论