


介绍
Allure框架是一个灵活的轻量级多语言测试报告工具,它不仅以web的方式展示了简洁的测试结果,而且允许参与开发过程的每个人从日常执行的测试中最大限度的提取有用信息。
从dev/qa的角度来看,Allure报告简化了常见缺陷的统计:失败的测试可以分为bug和被中断的测试,还可以配置日志、步骤、fixture、附件、计时、执行历史以及与TMS和BUG管理系统集成,所以,通过以上配置,所有负责的开发人员和测试人员可以尽可能的掌握测试信息。
从管理者的角度来看,Allure提供了一个清晰的“大图”,其中包括已覆盖的特性、缺陷聚集的位置、执行时间轴的外观以及许多其他方便的事情。allure的模块化和可扩展性保证了您总是能够对某些东西进行微调,使Allure更适合您。
环境准备
allure下载
-
下载allure.zip 找到对应版本,并下载
-
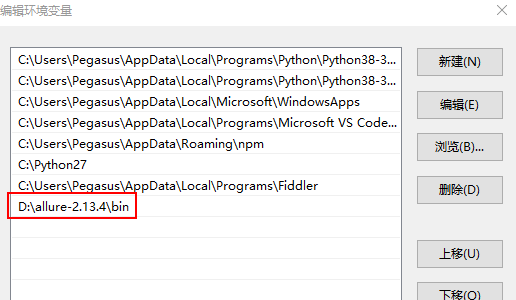
解压allure.zip,将路径添加环境变量,path中,记得需要重启电脑
-
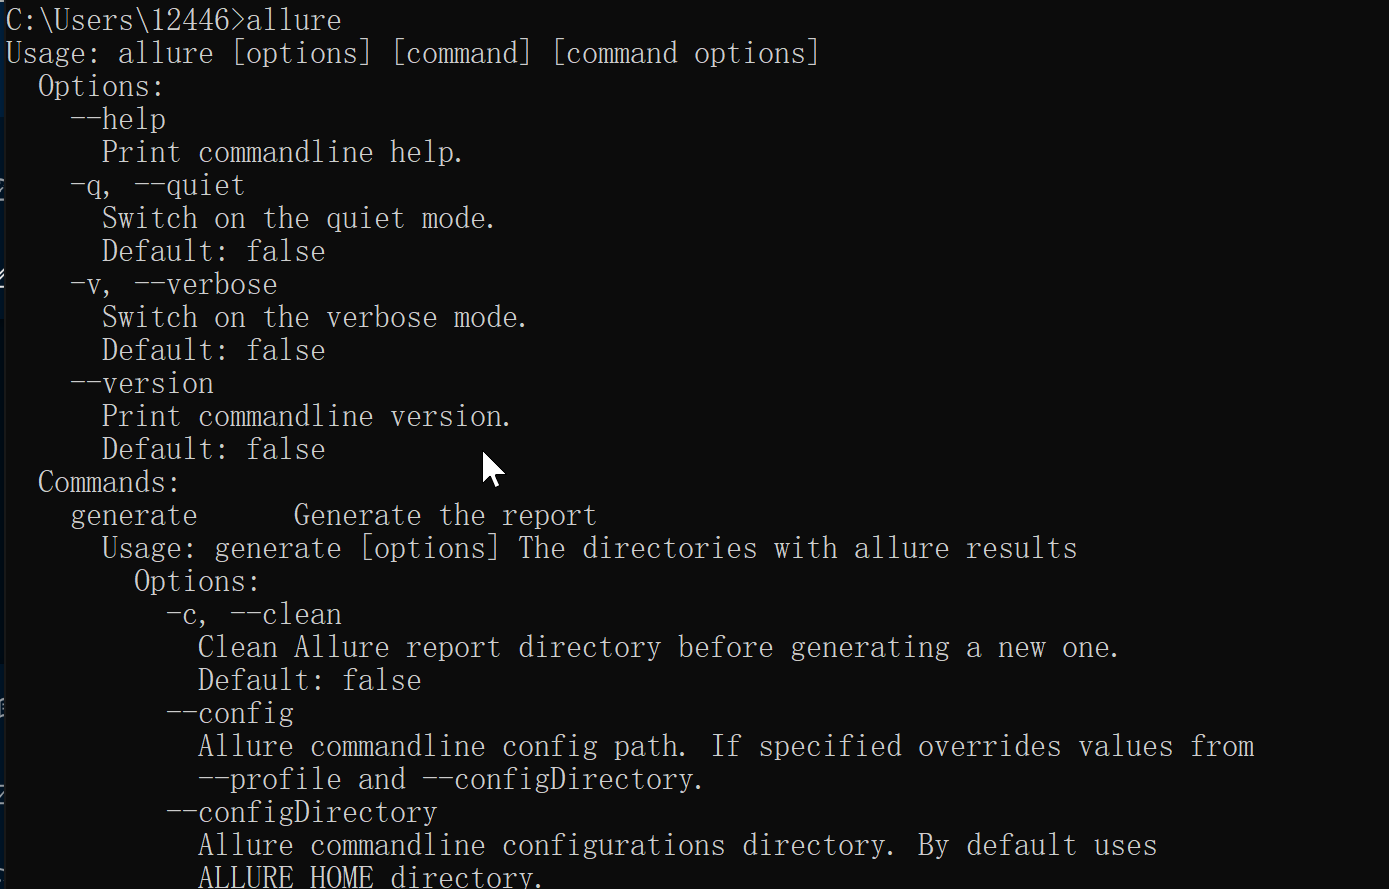
验证allure,在cmd中输入allure,然后回车,如果可以看到一下,说明配置完成
-
运行测试用例
要启用 Allure 侦听器在测试执行期间收集结果,只需添加–alluredir选项并提供应存储结果的文件夹的路径。例如:
pytest.main(["-m","login","-s","-q","--alluredir=./report"])要在测试完成后查看实际报告,您需要使用 Allure 命令行实用程序从结果中生成报告。
allure serve /tmp/my_allure_results
"-m": 标记用例

"login": 被标记需要执行用例

"-s":允许终端在测试运行时输出某些结果,例如你想输入print的内容,可以加上-s

"-q"简化输出结果

"--alluredir": 生成allure指定语法

"./report":生成报告的路径

"--clean-alluredir" :因为这个插件库allure-pytest生成的报告文件,你第二次运行时候不会清理掉里面的东西,所以你需要删除这个report文件夹,然后运行重新新建reoprt文件夹

说明:运行后,会在report文件夹里面生成文件
如:
#!/usr/bin/env python
# -*- coding: utf-8 -*-
# @Time    : 2022/6/19 14:34
# @Author  : shisuiyi
# @File    : main.py
# @Software: win10 Tensorflow1.13.1 python3.9
import os

import pytest


def run(web: bool = True):
    pytest.main(['--alluredir=allure_result_files/data'])
    if web:
        # 自动以服务形式打开报告
        os.system('allure serve allure_result_files/data')
    else:
        os.system(
            'allure generate allure_result_files/data -o allure_result_files/html --clean'
        )


"""
allure generate :命令语法
allure_result_files/data:找到json的临时报告
-o allure_result_files/html:在report目录下生成allure报告
–clean:每次运行都删除点之前的
"""

if __name__ == "__main__":
    run()
安装allure-pytest
Pytest 可用于从PyPI安装,因此建议使用 pip 安装。要安装最新版本,请从命令行执行:
pip install allure-pytest
Environment
可以理解成环境变量参数,没有什么实际作用,个人觉得只是为了让别人知道本次测试的运行环境参数而已,显示啥都是自己定的
注意!!默认是没有的哦
添加Environment
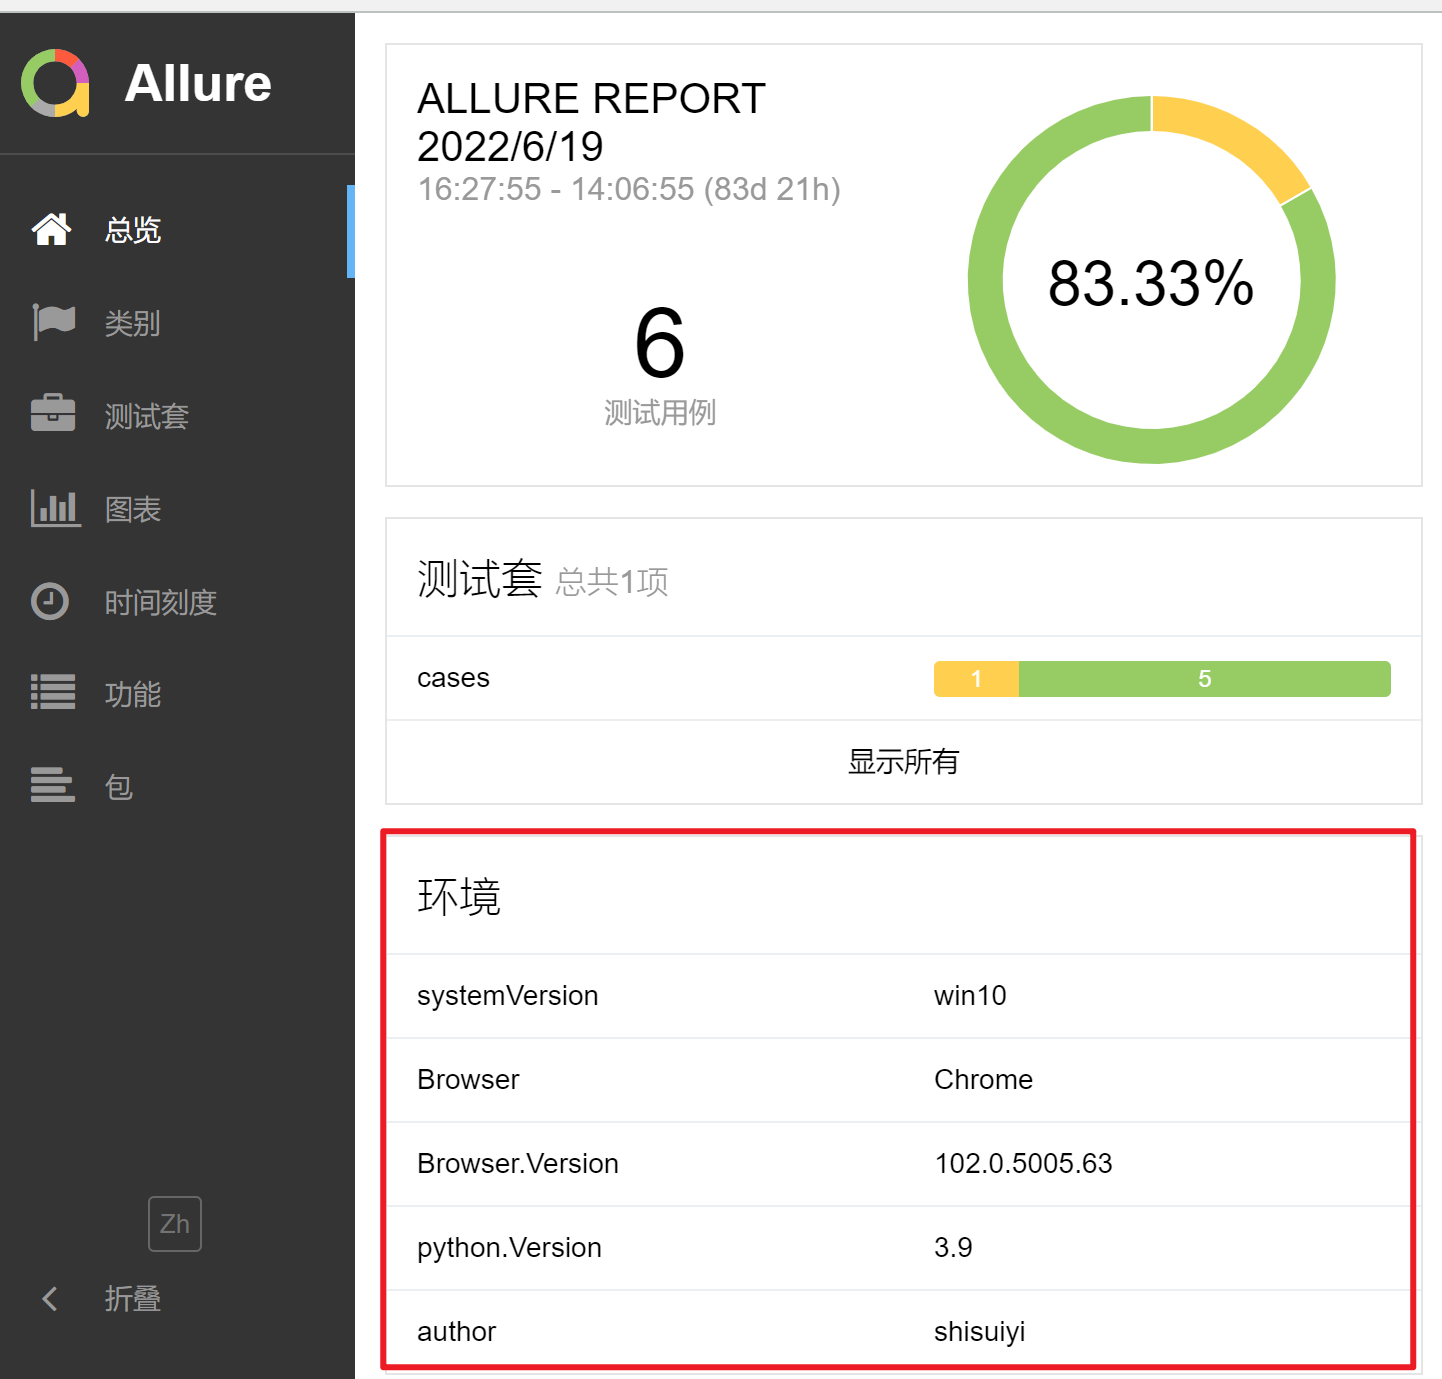
新版本的allure需要在allure报告的根目录创建environment.properties文件,创建文件:
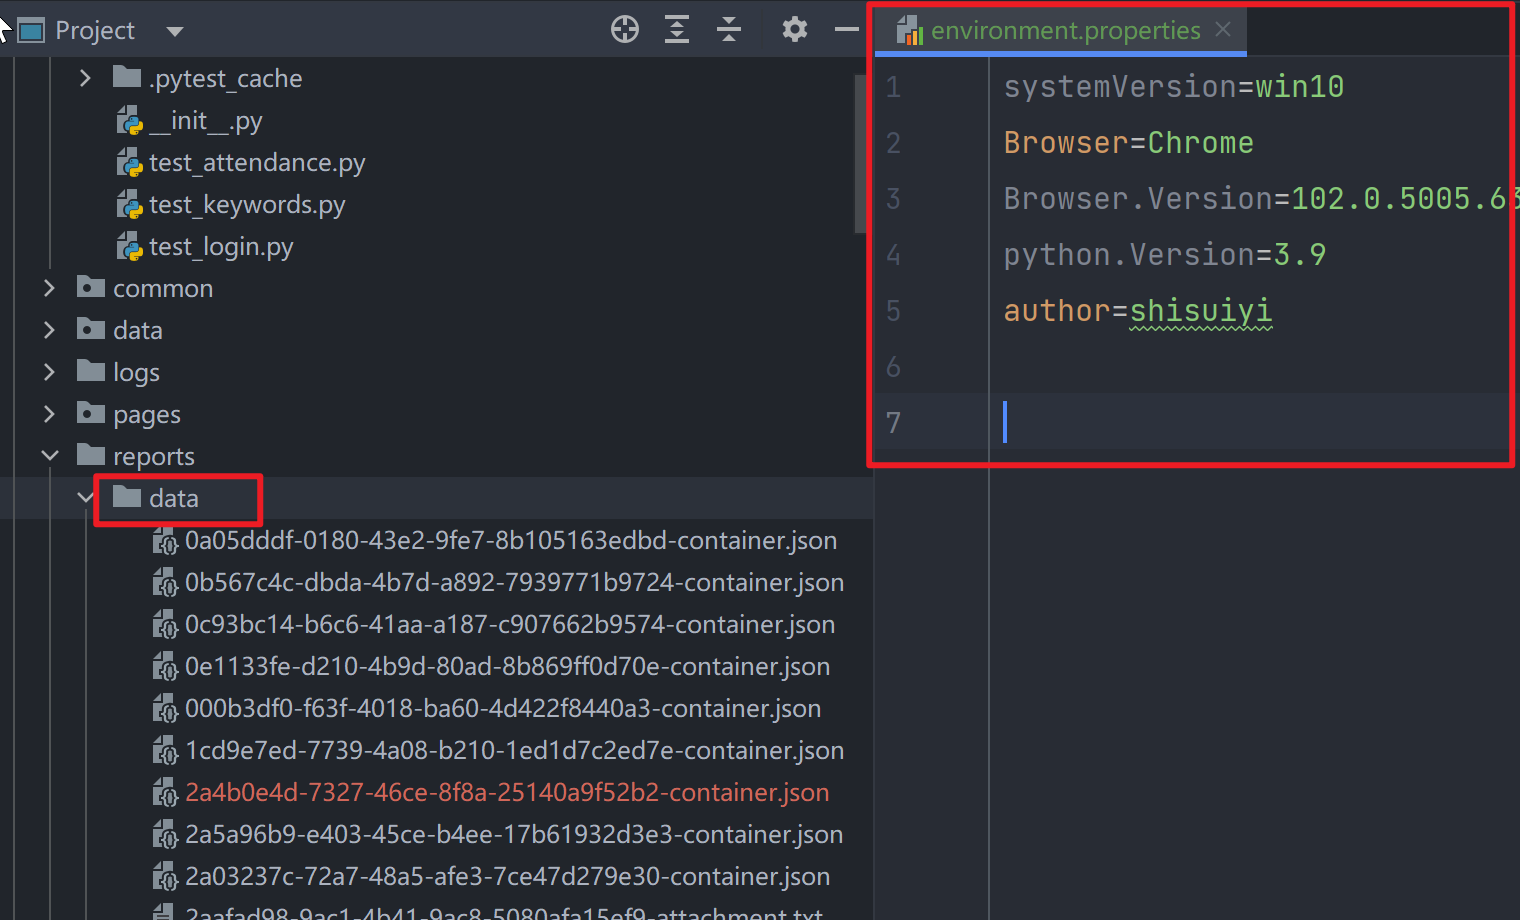
systemVersion=win10
Browser=Chrome
Browser.Version=102.0.5005.63
python.Version=3.9
author=shisuiyi
注意!不可以写中文,可能会乱码
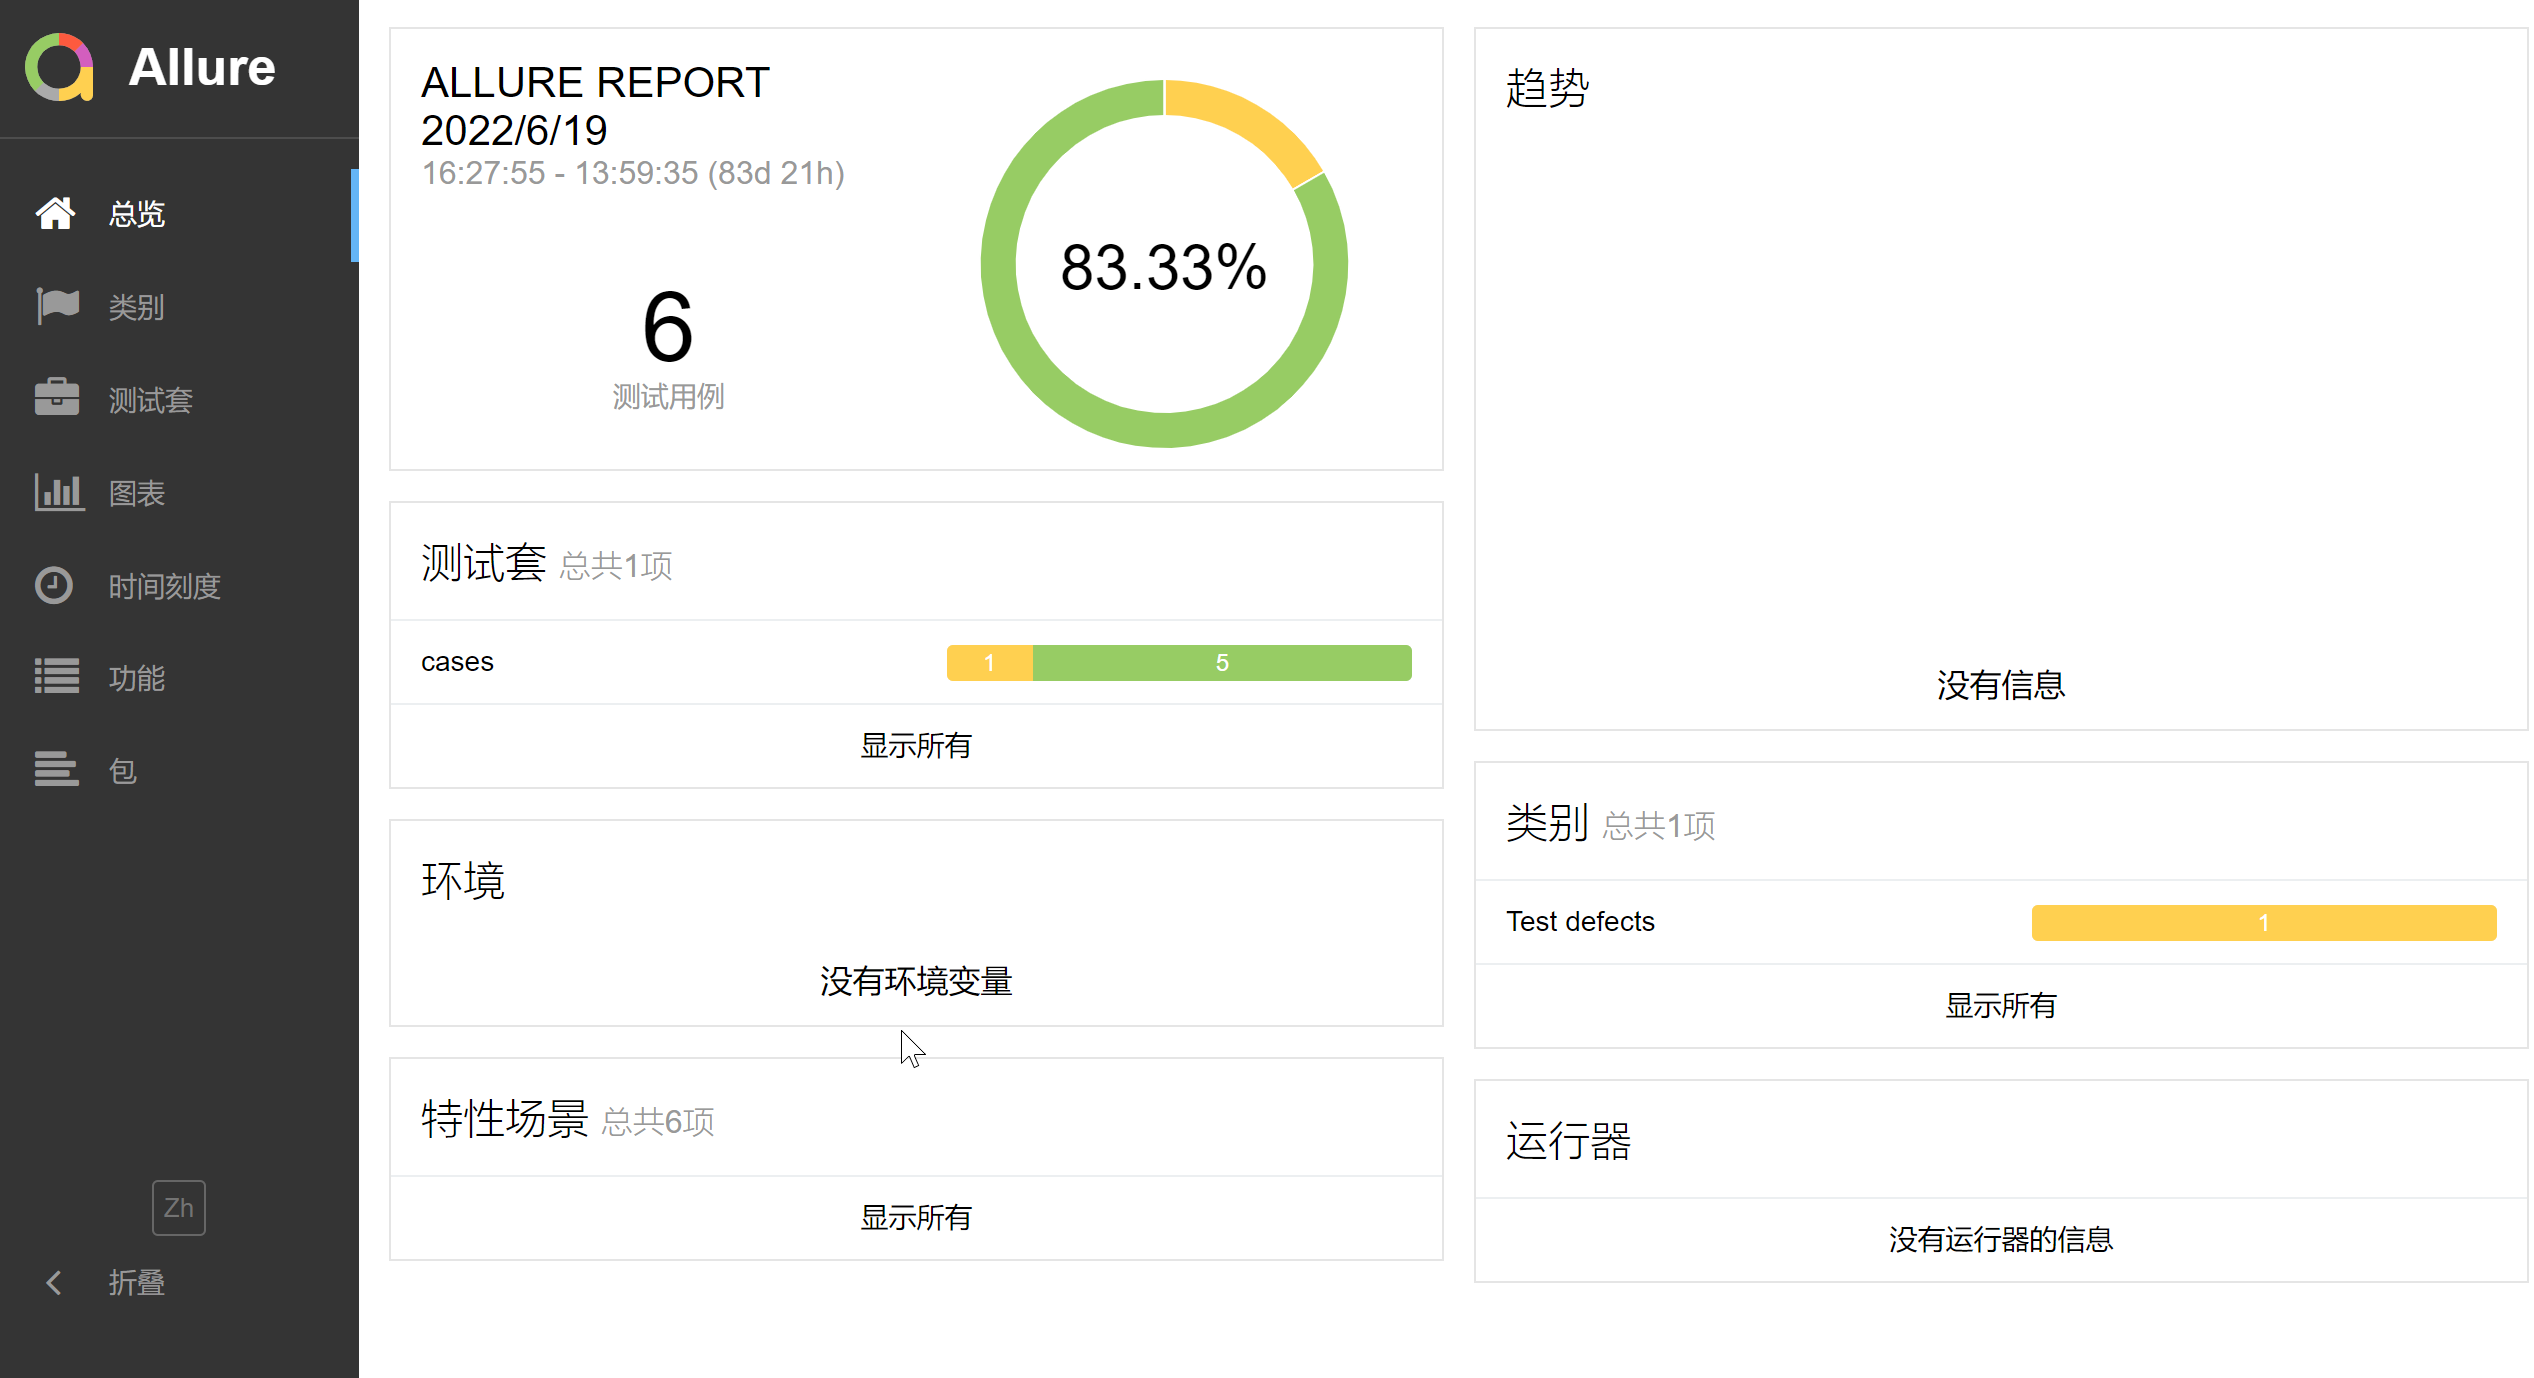
运行之后,我们看看allure报告的environment
allure特性
Allure相关的内容:
| Allure用例描述 | ||
|---|---|---|
| 使用方法 | 参数值 | 参数说明 |
| @allure.epic() | epic描述 | 定义项目、当有多个项目是使用。往下是feature |
| @allure.feature() | 模块名称 | 用例按照模块区分,有多个模块时给每个起名字 |
| @allure.story() | 用例名称 | 一个用例的描述 |
| @allure.title(用例的标题) | 用例标题 | 一个用例标题 |
| @allure.testcase() | 测试用例的连接地址 | 自动化用例对应的功能用例存放系统的地址 |
| @allure.issue() | 缺陷地址 | 对应缺陷管理系统里边的缺陷地址 |
| @allure.description() | 用例描述 | 对测试用例的详细描述 |
| @allure.step() | 操作步骤 | 测试用例的操作步骤 |
| @allure.severity() | 用例等级 | blocker 、critical 、normal 、minor 、trivial |
| @allure.link() | 定义连接 | 用于定义一个需要在测试报告中展示的连接 |
| @allure.attachment() | 附件 | 添加测试报告附件 |
@allure.step
- allure报告最重要的一点是,它允许对每个测试用例进行非常详细的步骤说明
- 通过 @allure.step() 装饰器,可以让测试用例在allure报告中显示更详细的测试过程

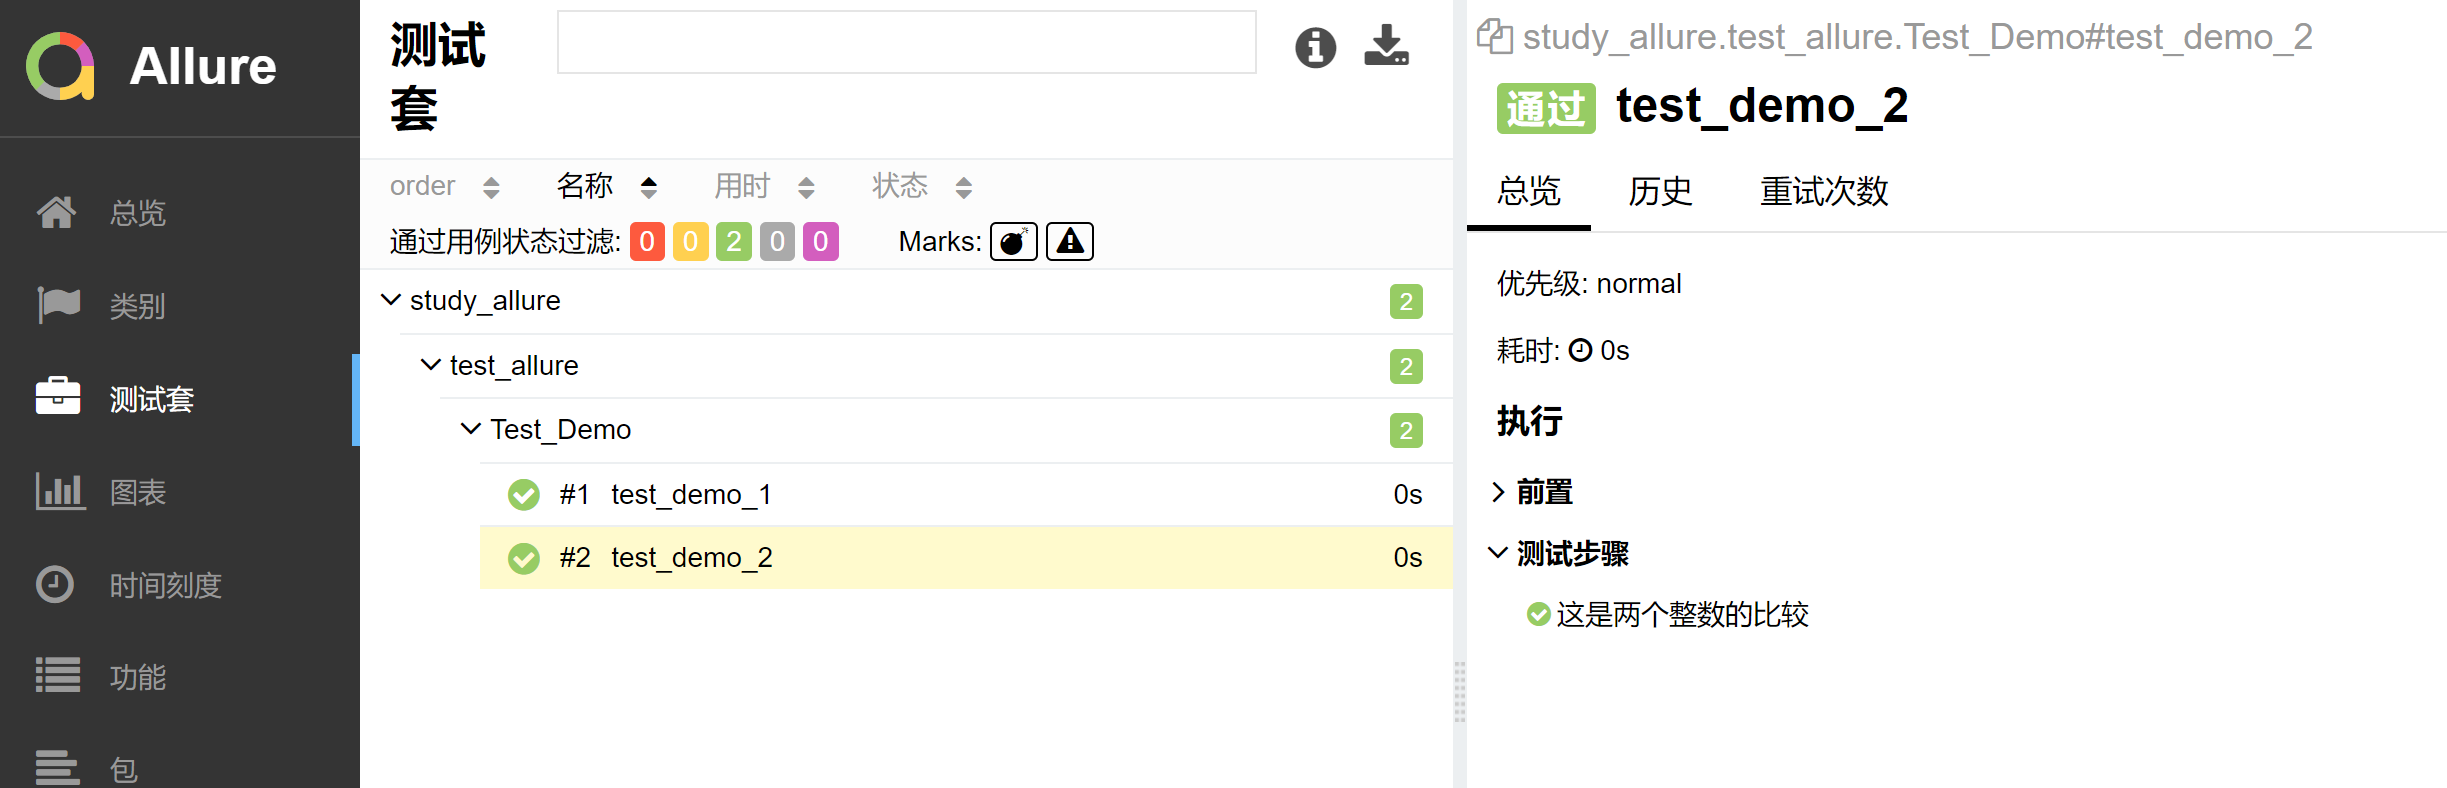
step() 只有一个参数,就是title,你传什么,在allure上就显示什么
with allure.step
with allure.step(“step:步骤”) 这种方式代码可读性更好一点,但不会带上函数里面的传参和对应的值
   @allure.step(title="登录")
   def login(self, *args):
       """登录"""
       # 输入账号
       with allure.step("账号输入"):
           self.write(self.username, '账号输入框', args[0])
       # 输入密码
       with allure.step("密码输入"):
           self.write(self.password, '密码输入框', args[1])
       # 点击登录
       with allure.step("点击登录按钮"):
           self.click(self.send_btn, '登录按钮')
       sleep(0.5)
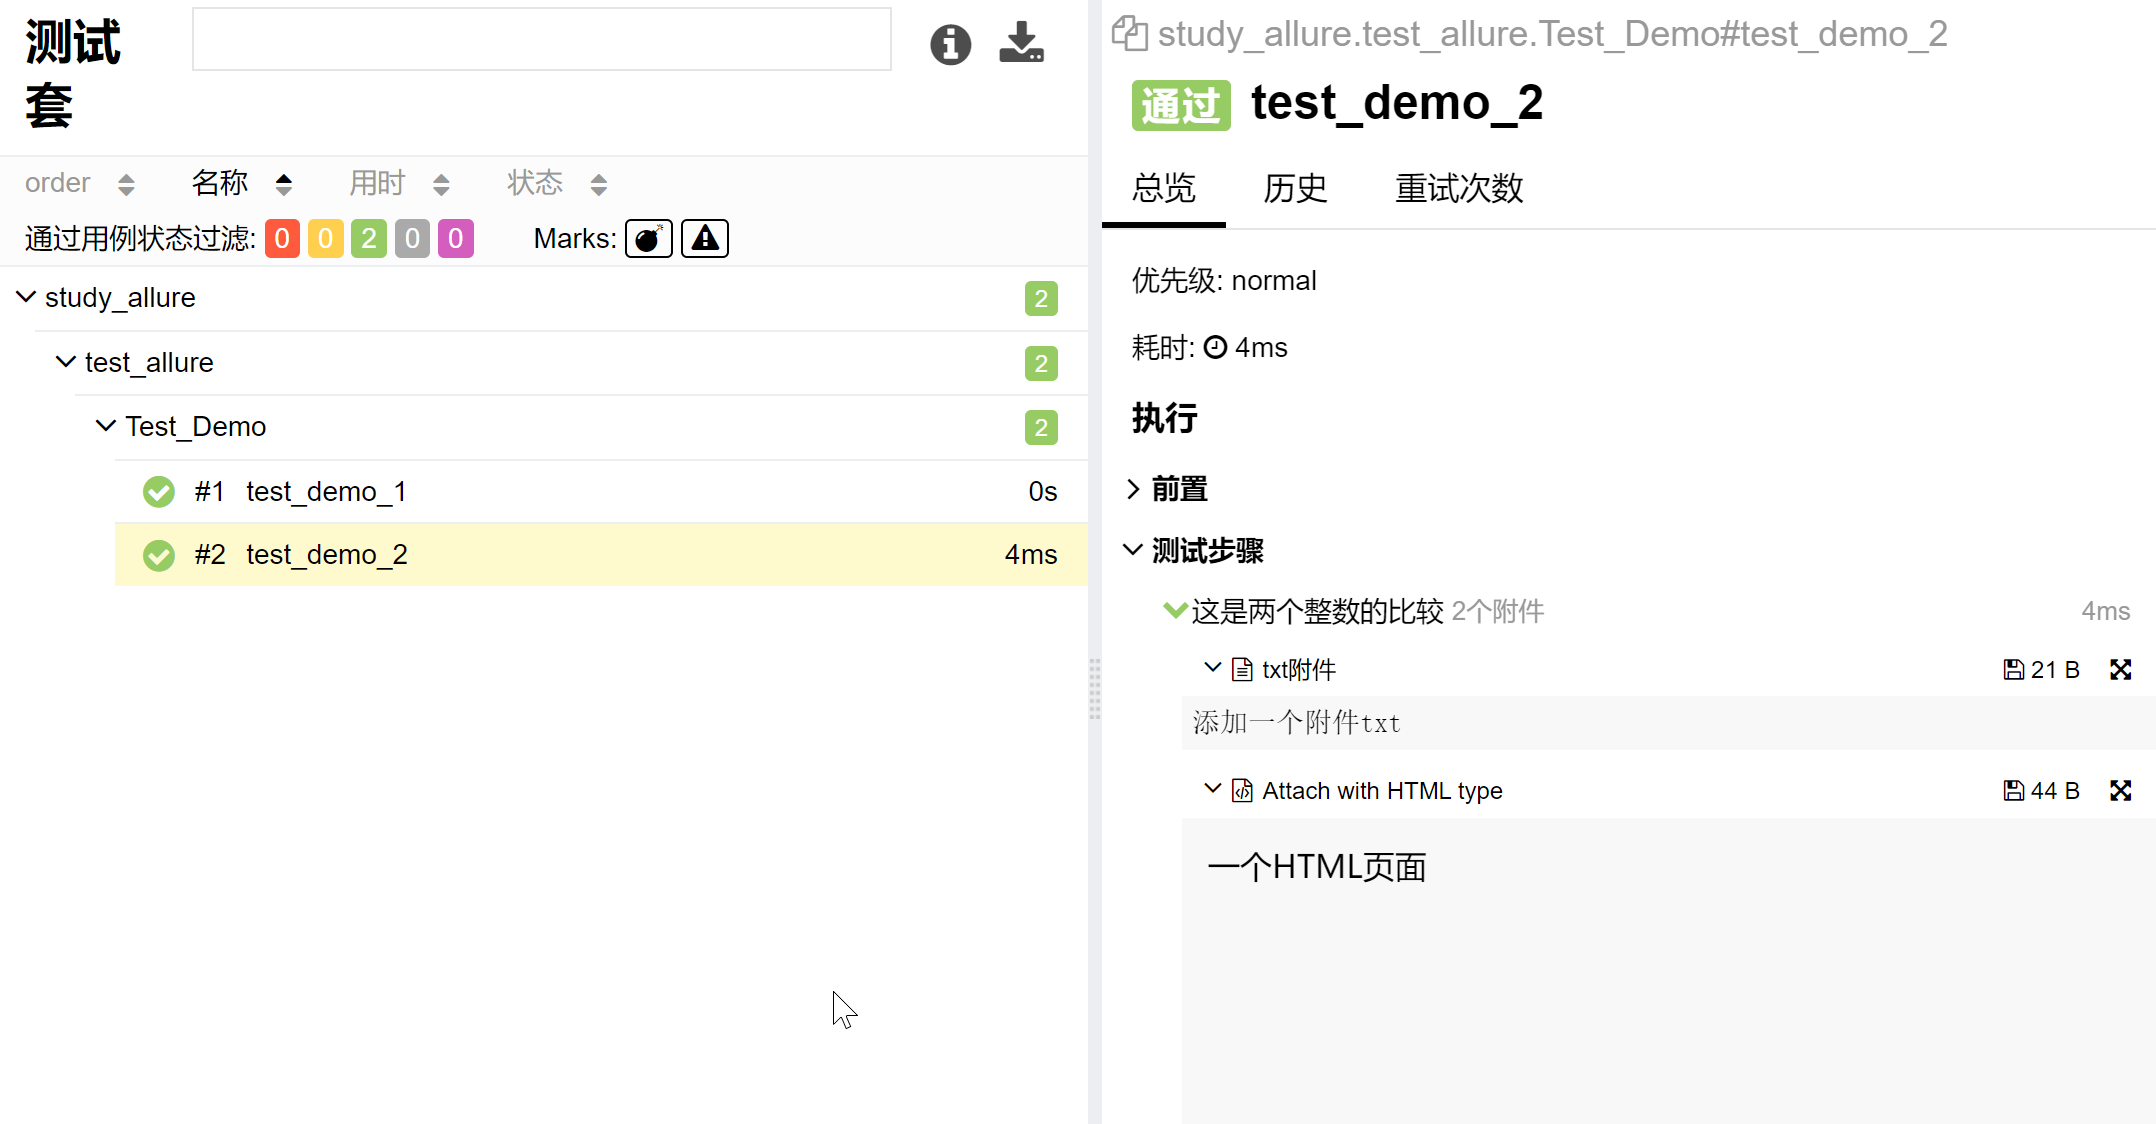
allure.attach()
语法一: allure.attach()
可以添加足够详细的测试用例描述
allure.attach(body, name, attachment_type, extension)
参数列表
- body:要显示的内容(附件)
- name:附件名字
- attachment_type:附件类型,是 allure.attachment_type 里面的其中一种
- extension:附件的扩展名(比较少用)
#!/usr/bin/env python
# -*- coding: utf-8 -*-
# @Time    : 2022/06/19
# @Author  : shisuiyi
# @File    : test_allure.py
# @Software: win10 Tensorflow1.13.1 python3.9
import allure

import pytest, allure


class Test_Demo():

    @allure.step("这是两个负数的比较")  # 标记代码
    def test_demo_1(self):
        assert -1 == -1

    @allure.step("这是两个整数的比较")  # 标记代码
    def test_demo_2(self):
        allure.attach('添加一个附件txt', 'txt附件',
                      allure.attachment_type.TEXT)
        allure.attach('<head></head><body> 一个HTML页面 </body>', 'Attach with HTML type', allure.attachment_type.HTML)
        assert 3 == 3
语法二:
allure.attach.file(source, name, attachment_type, extension)
source:文件路径,相当于传一个文件
其他参数和上面的一致
    def allure_screenshot(self, img_doc):
        """
        页面截屏保存截图
        :param img_doc: 截图说明
        :return:
        """
        file_name = OUTPUTS_DIR + "\\{}_{}.png".format(datetime.strftime(datetime.now(), "%Y%m%d%H%M%S"), img_doc)
        self.driver.allure_screenshot()(file_name)
        with open(file_name, mode='rb') as f:
            file = f.read()
        allure.attach(file, img_doc, allure.attachment_type.PNG)
        logger.info("页面截图文件保存在:{}".format(file_name))
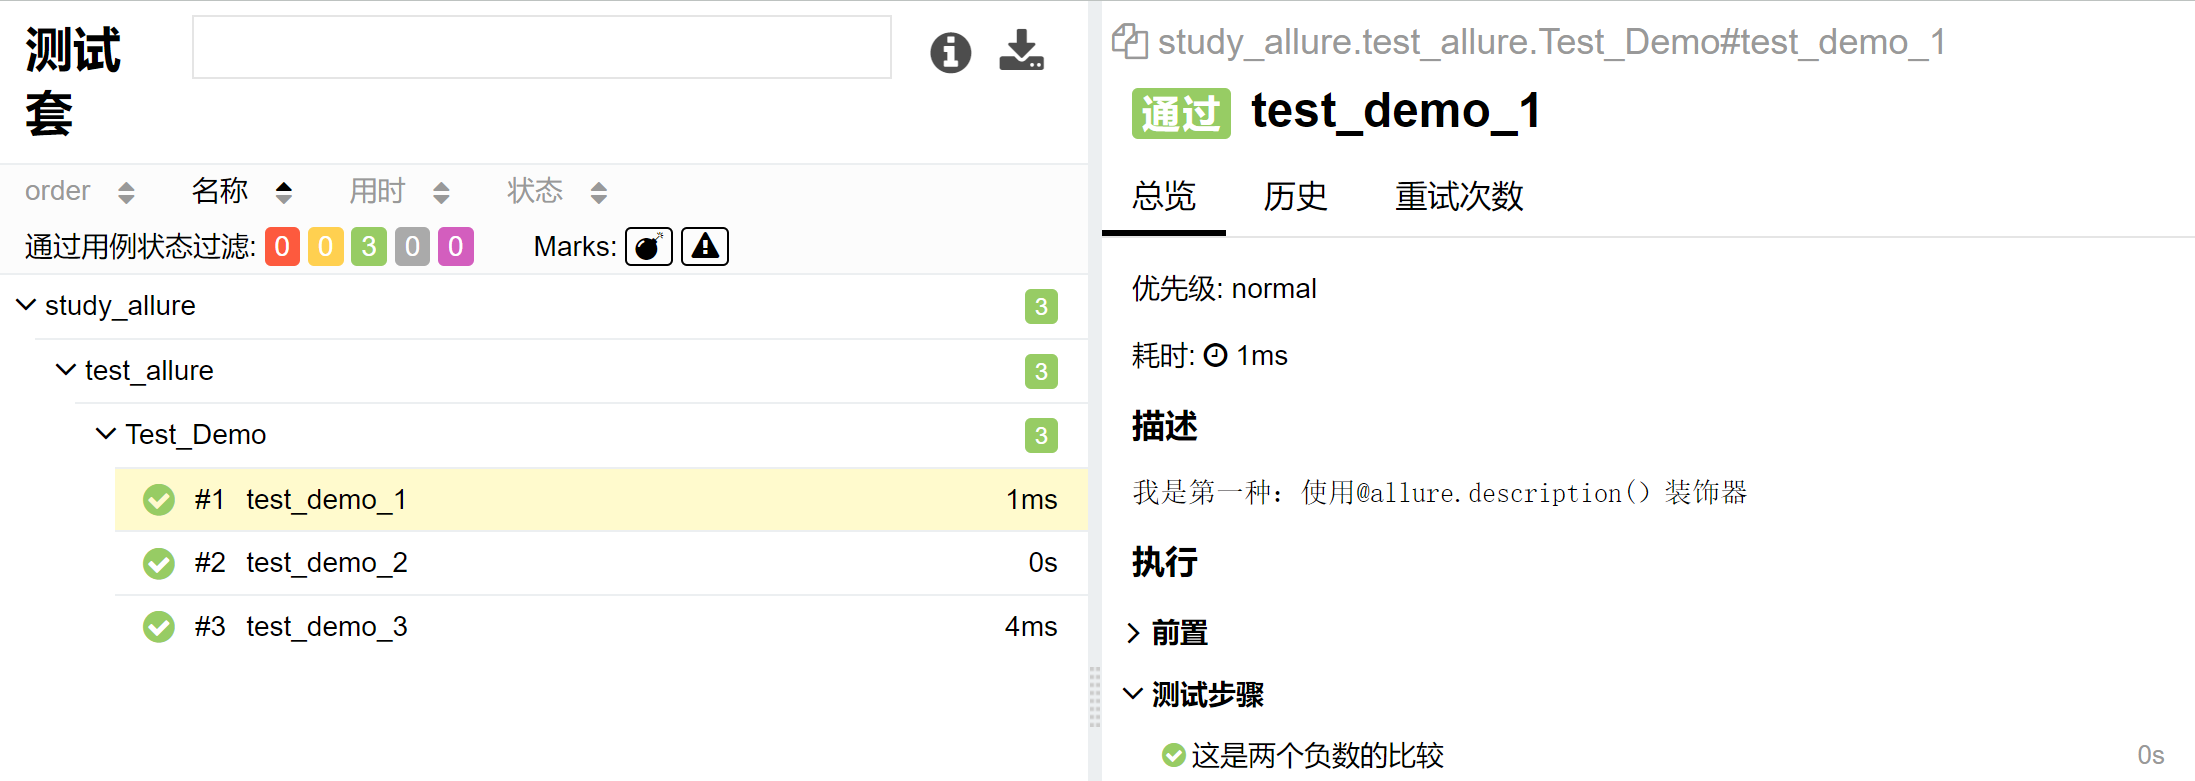
@allure.description()
为测试用例添加详细描述,并展示到测试报告内,可以提高测试报告的可读性,使报告更加直观,通俗易懂
语法格式:
- @allure.description(str)
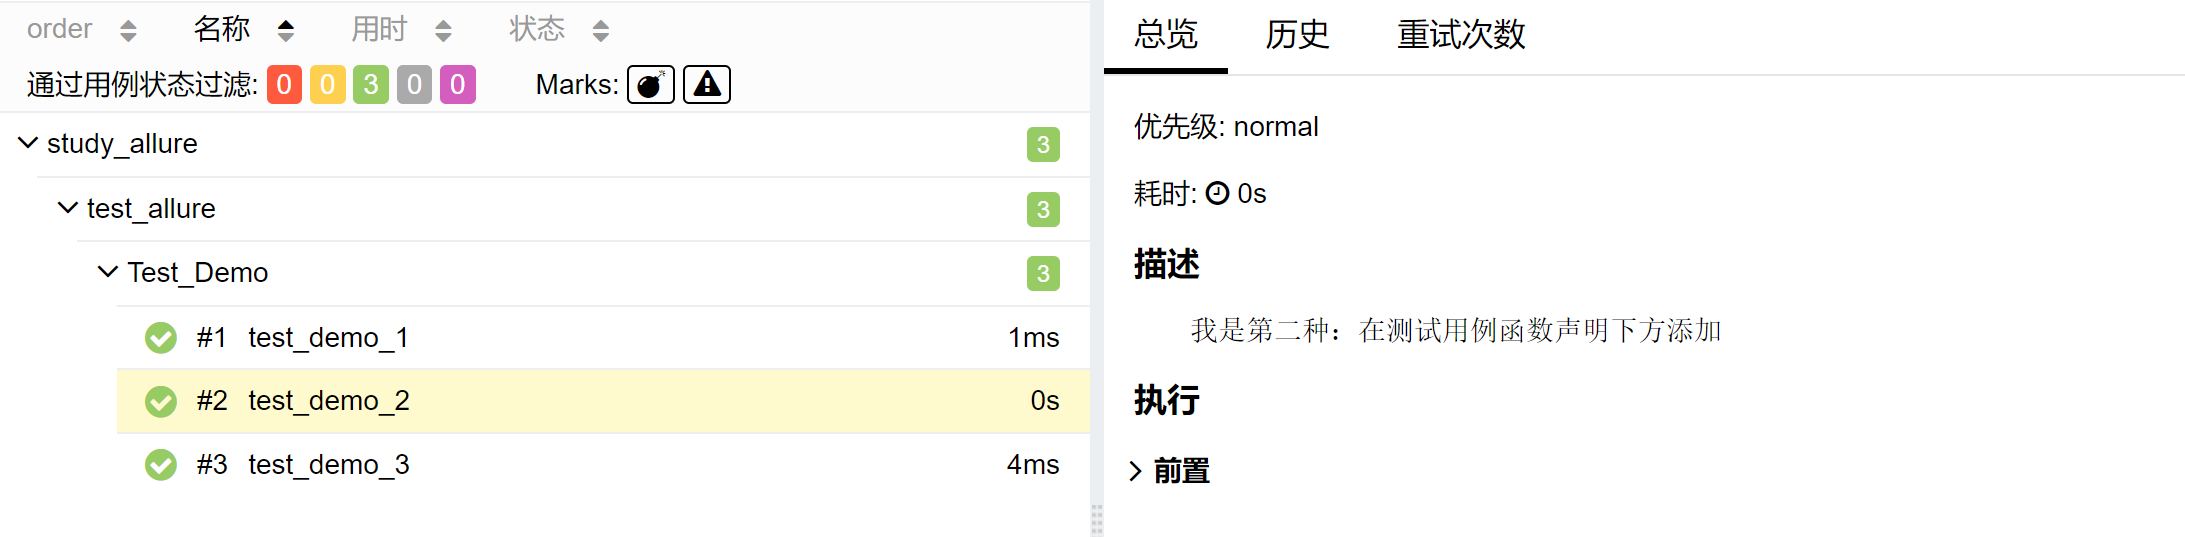
- 在测试用例函数声明下方添加 “”" “”"
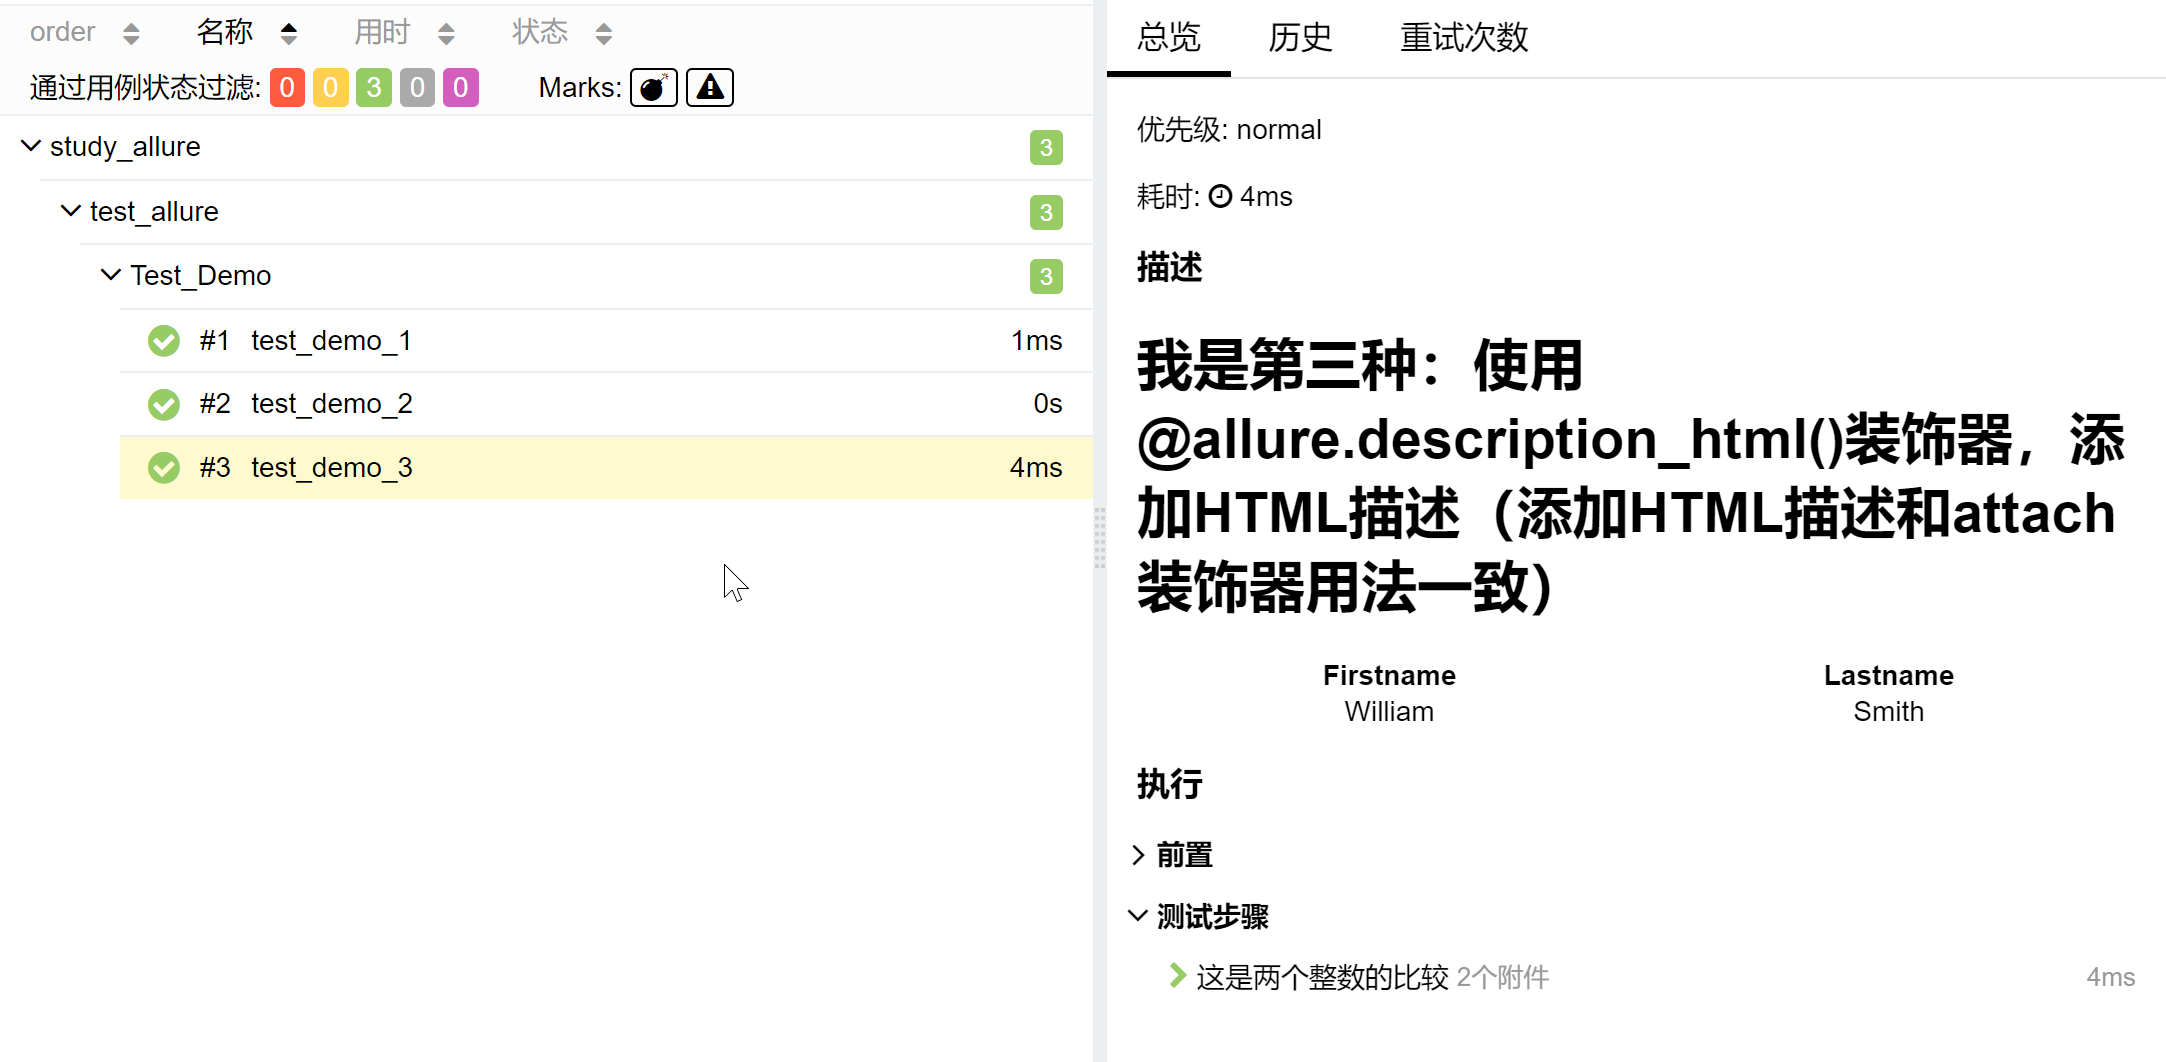
- @allure.description_html(str):相当于传一个HTML代码组成的字符串,类似 allure.attach() 中传HTML
#!/usr/bin/env python
# -*- coding: utf-8 -*-
# @Time    : 2022/06/19
# @Author  : shisuiyi
# @File    : test_allure.py
# @Software: win10 Tensorflow1.13.1 python3.9
import allure

import pytest, allure


class Test_Demo():

    @allure.description("""
    我是第一种:使用@allure.description()装饰器
    """)
    @allure.step("这是两个负数的比较")  # 标记代码
    def test_demo_1(self):
        assert -1 == -1

    def test_demo_2(self):
        """
        我是第二种:在测试用例函数声明下方添加 """ """
        """
        assert -1 == -1

    @allure.description_html("""
    <h1>我是第三种:使用@allure.description_html()装饰器,添加HTML描述(添加HTML描述和attach装饰器用法一致)</h1>
    <table style="width:100%">
      <tr>
        <th>Firstname</th>
        <th>Lastname</th>
      </tr>
      <tr align="center">
        <td>William</td>
        <td>Smith</td>
    </table>
    """)
    @allure.step("这是两个整数的比较")  # 标记代码
    def test_demo_3(self):
        allure.attach('添加一个附件txt', 'txt附件',
                      allure.attachment_type.TEXT)
        allure.attach('<head></head><body> 一个HTML页面 </body>', 'Attach with HTML type', allure.attachment_type.HTML)
        assert 3 == 3
@allure.title()
作用
- 可以使测试用例标题更具可读性(可以为汉字)
- 可以和Parameterize参数化及fixture结合使用
- 用法:@allure.title(“message”)
#!/usr/bin/env python
# -*- coding: utf-8 -*-
# @Time : 2022/1/13 19:46
# @Author : shisuiyi
# @File : test_login.py
# @Software: win10 Tensorflow1.13.1 python3.9
import allure
import pytest
from data.login_data import data_error, data_success
from pages.login_page import LoginPage
from pages.home_page import HomePage
@pytest.mark.login
class TestLogin(object):
"""测试登录功能"""
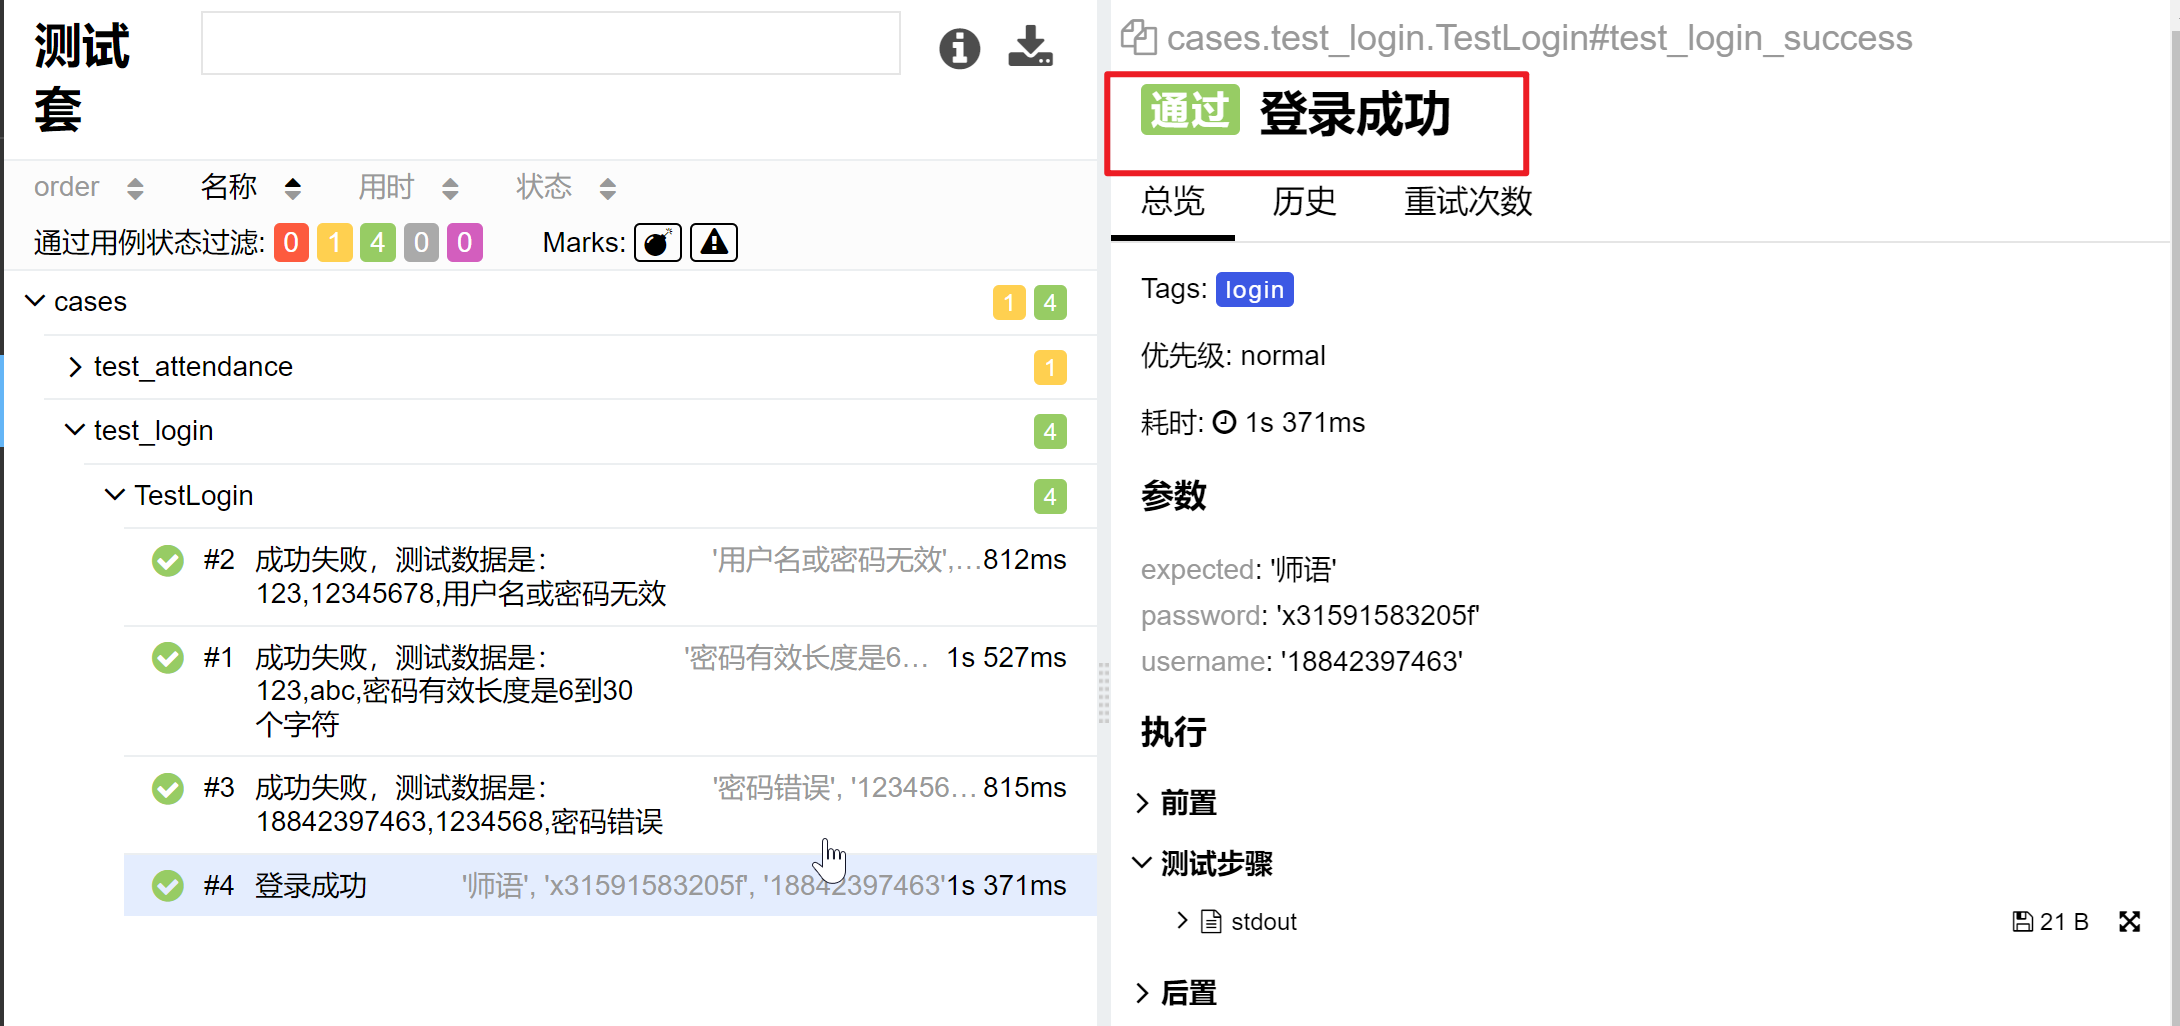
@allure.title("成功失败,测试数据是:{username},{password},{expected}")
@pytest.mark.parametrize('username,password,expected', data_error, ids=['密码过短', '用户名或密码无效', '密码错误'])
def test_login_error(self, username, password, expected, driver):
login_page = LoginPage(driver)
login_page.goto(url=LoginPage.url)
login_page.login(username, password)
actual = login_page.get_error_msg()
assert expected in actual
@allure.title("登录成功")
@pytest.mark.parametrize('username,password,expected', data_success, ids=['登录成功'])
def test_login_success(self, username, password, expected, driver):
login_page = LoginPage(driver)
login_page.goto(url=LoginPage.url)
login_page.login(username, password)
HomePage(driver).get_username(expected)

allure.dynamic 动态生成功能
allure.dynamic 的源代码
class Dynamic(object):

    @staticmethod
    def title(test_title):
        plugin_manager.hook.add_title(test_title=test_title)

    @staticmethod
    def description(test_description):
        plugin_manager.hook.add_description(test_description=test_description)

    @staticmethod
    def description_html(test_description_html):
        plugin_manager.hook.add_description_html(test_description_html=test_description_html)

    @staticmethod
    def label(label_type, *labels):
        plugin_manager.hook.add_label(label_type=label_type, labels=labels)

    @staticmethod
    def severity(severity_level):
        Dynamic.label(LabelType.SEVERITY, severity_level)

    @staticmethod
    def feature(*features):
        Dynamic.label(LabelType.FEATURE, *features)

    @staticmethod
    def story(*stories):
        Dynamic.label(LabelType.STORY, *stories)

    @staticmethod
    def tag(*tags):
        Dynamic.label(LabelType.TAG, *tags)

    @staticmethod
    def link(url, link_type=LinkType.LINK, name=None):
        plugin_manager.hook.add_link(url=url, link_type=link_type, name=name)

    @staticmethod
    def issue(url, name=None):
        Dynamic.link(url, link_type=LinkType.ISSUE, name=name)

    @staticmethod
    def testcase(url, name=None):
        Dynamic.link(url, link_type=LinkType.TEST_CASE, name=name)

    @staticmethod
    def suite(suite_name):
        Dynamic.label(LabelType.SUITE, suite_name)

    @staticmethod
    def parent_suite(parent_suite_name):
        Dynamic.label(LabelType.PARENT_SUITE, parent_suite_name)

    @staticmethod
    def sub_suite(sub_suite_name):
        Dynamic.label(LabelType.SUB_SUITE, sub_suite_name)
以上可修改如下
allure.dynamic.feature
allure.dynamic.link
allure.dynamic.issue
allure.dynamic.testcase
allure.dynamic.story
allure.dynamic.title
allure.dynamic.description
实际演示
@pytest.mark.login
class TestLogin(object):
"""测试登录功能"""
@allure.title("成功失败,测试数据是:{username},{password},{expected}")
@allure.description("测试登录失败的情况")
@pytest.mark.parametrize('username,password,expected', data_error, ids=['密码过短', '用户名或密码无效', '密码错误'])
def test_login_error(self, username, password, expected, driver):
login_page = LoginPage(driver)
login_page.goto(url=LoginPage.url)
login_page.login(username, password)
actual = login_page.get_error_msg()
assert expected in actual
allure.dynamic.title("登录失败动态标题")
allure.dynamic.description("登录失败动态描述")
@allure.title("登录成功")
@allure.description("测试登录失败的情况")
@pytest.mark.parametrize('username,password,expected', data_success, ids=['登录成功'])
def test_login_success(self, username, password, expected, driver):
login_page = LoginPage(driver)
login_page.goto(url=LoginPage.url)
login_page.login(username, password)
HomePage(driver).get_username(expected)
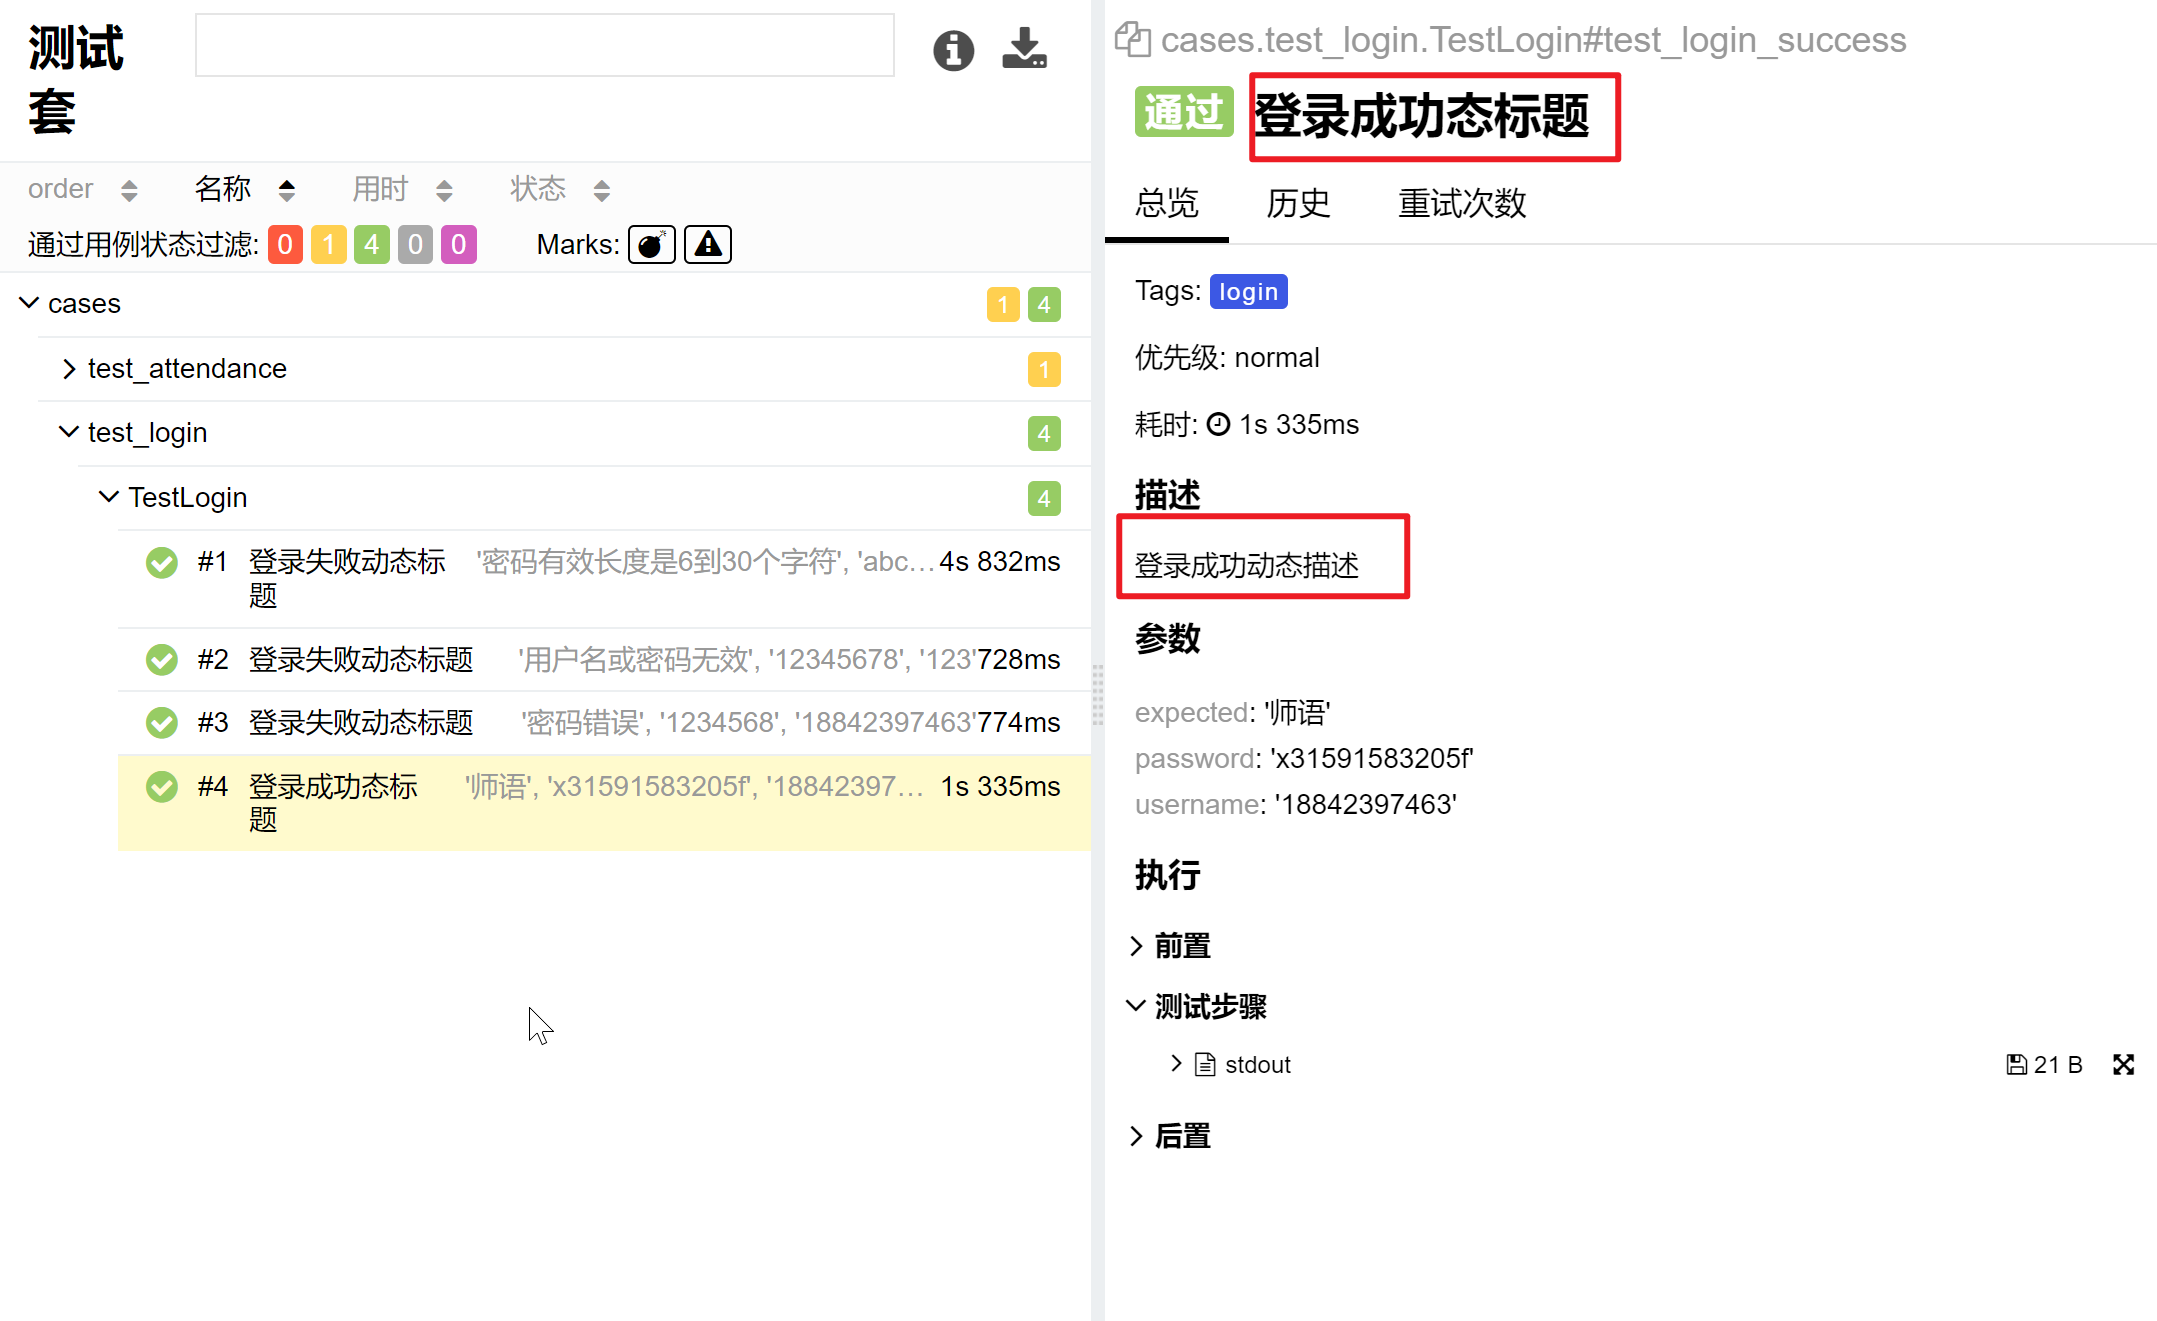
allure.dynamic.title("登录成功态标题")
allure.dynamic.description("登录成功动态描述")
allure 报告链接相关
@allure.link() 、@allure.issue()、@allure.testcase()的使用
相关源代码
def link(url, link_type=LinkType.LINK, name=None):
    return safely(plugin_manager.hook.decorate_as_link(url=url, link_type=link_type, name=name))


def issue(url, name=None):
    return link(url, link_type=LinkType.ISSUE, name=name)


def testcase(url, name=None):
    return link(url, link_type=LinkType.TEST_CASE, name=name)
实际演示
@pytest.mark.login
class TestLogin(object):
    """测试登录功能"""

    @allure.title("成功失败,测试数据是:{username},{password},{expected}")
    @allure.description("测试登录失败的情况")
    @pytest.mark.parametrize('username,password,expected', data_error, ids=['密码过短', '用户名或密码无效', '密码错误'])
    @allure.issue("https://www.shibuyu.fun/", "bug issue连接")
    def test_login_error(self, username, password, expected, driver):
        login_page = LoginPage(driver)
        login_page.goto(url=LoginPage.url)
        login_page.login(username, password)
        actual = login_page.get_error_msg()
        assert expected in actual
        allure.dynamic.title("登录失败动态标题")
        allure.dynamic.description("登录失败动态描述")

    @allure.title("登录成功")
    @allure.description("测试登录失败的情况")
    @pytest.mark.parametrize('username,password,expected', data_success, ids=['登录成功'])
    @allure.link("https://pan.shibuyu.fun/", name="显示在allure报告的名字")
    def test_login_success(self, username, password, expected, driver):
        login_page = LoginPage(driver)
        login_page.goto(url=LoginPage.url)
        login_page.login(username, password)
        HomePage(driver).get_username(expected)
        allure.dynamic.title("登录成功态标题")
        allure.dynamic.description("登录成功动态描述")
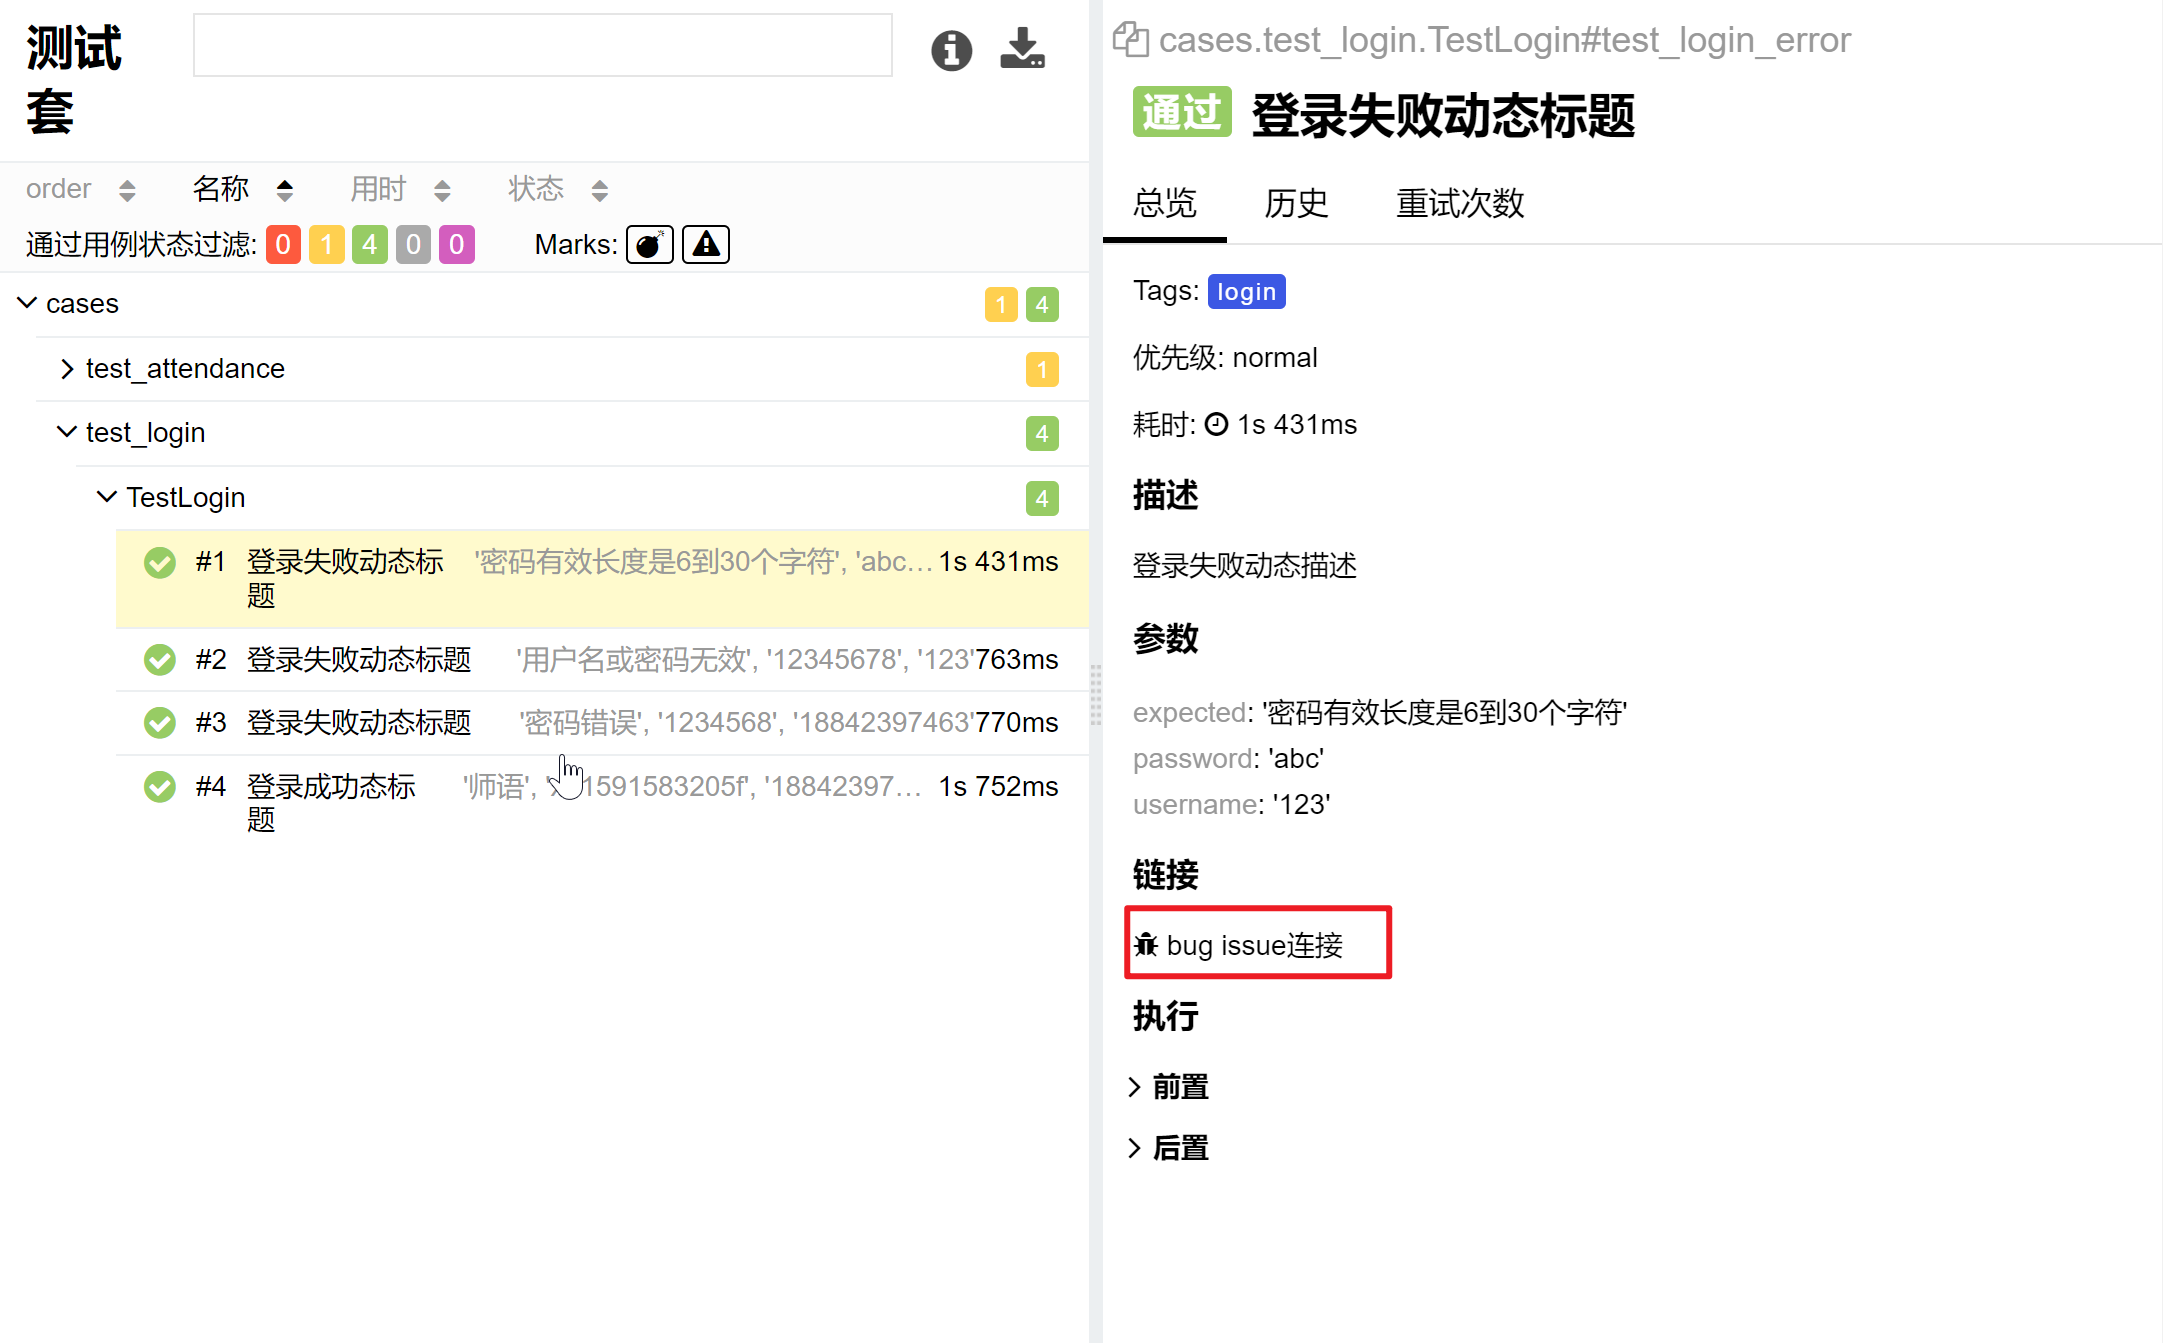
三个装饰器的原因是为了更好地将链接分类【访问链接、Bug链接、测试用例链接】,其实可以只用@allure.link()
BDD标记装饰器
@allure.epic 》 @allure.feature》 @allure.story
@allure.epic("我是用来定义项目的")
@allure.feature("测试模块,如登录模块")
@pytest.mark.login
class TestLogin(object):
    """测试登录功能"""

    @allure.title("成功失败,测试数据是:{username},{password},{expected}")
    @allure.description("测试登录失败的情况")
    @pytest.mark.parametrize('username,password,expected', data_error, ids=['密码过短', '用户名或密码无效', '密码错误'])
    @allure.issue("https://www.shibuyu.fun/", "bug issue连接")
    @allure.story("使用错误的数据去登录")
    def test_login_error(self, username, password, expected, driver):
        login_page = LoginPage(driver)
        login_page.goto(url=LoginPage.url)
        login_page.login(username, password)
        actual = login_page.get_error_msg()
        assert expected in actual
        allure.dynamic.title("登录失败动态标题")
        allure.dynamic.description("登录失败动态描述")

    @allure.title("登录成功")
    @allure.description("测试登录失败的情况")
    @pytest.mark.parametrize('username,password,expected', data_success, ids=['登录成功'])
    @allure.link("https://pan.shibuyu.fun/", name="显示在allure报告的名字")
    @allure.story("使用正确的数据去登录")
    def test_login_success(self, username, password, expected, driver):
        login_page = LoginPage(driver)
        login_page.goto(url=LoginPage.url)
        login_page.login(username, password)
        HomePage(driver).get_username(expected)
        allure.dynamic.title("登录成功态标题")
        allure.dynamic.description("登录成功动态描述")
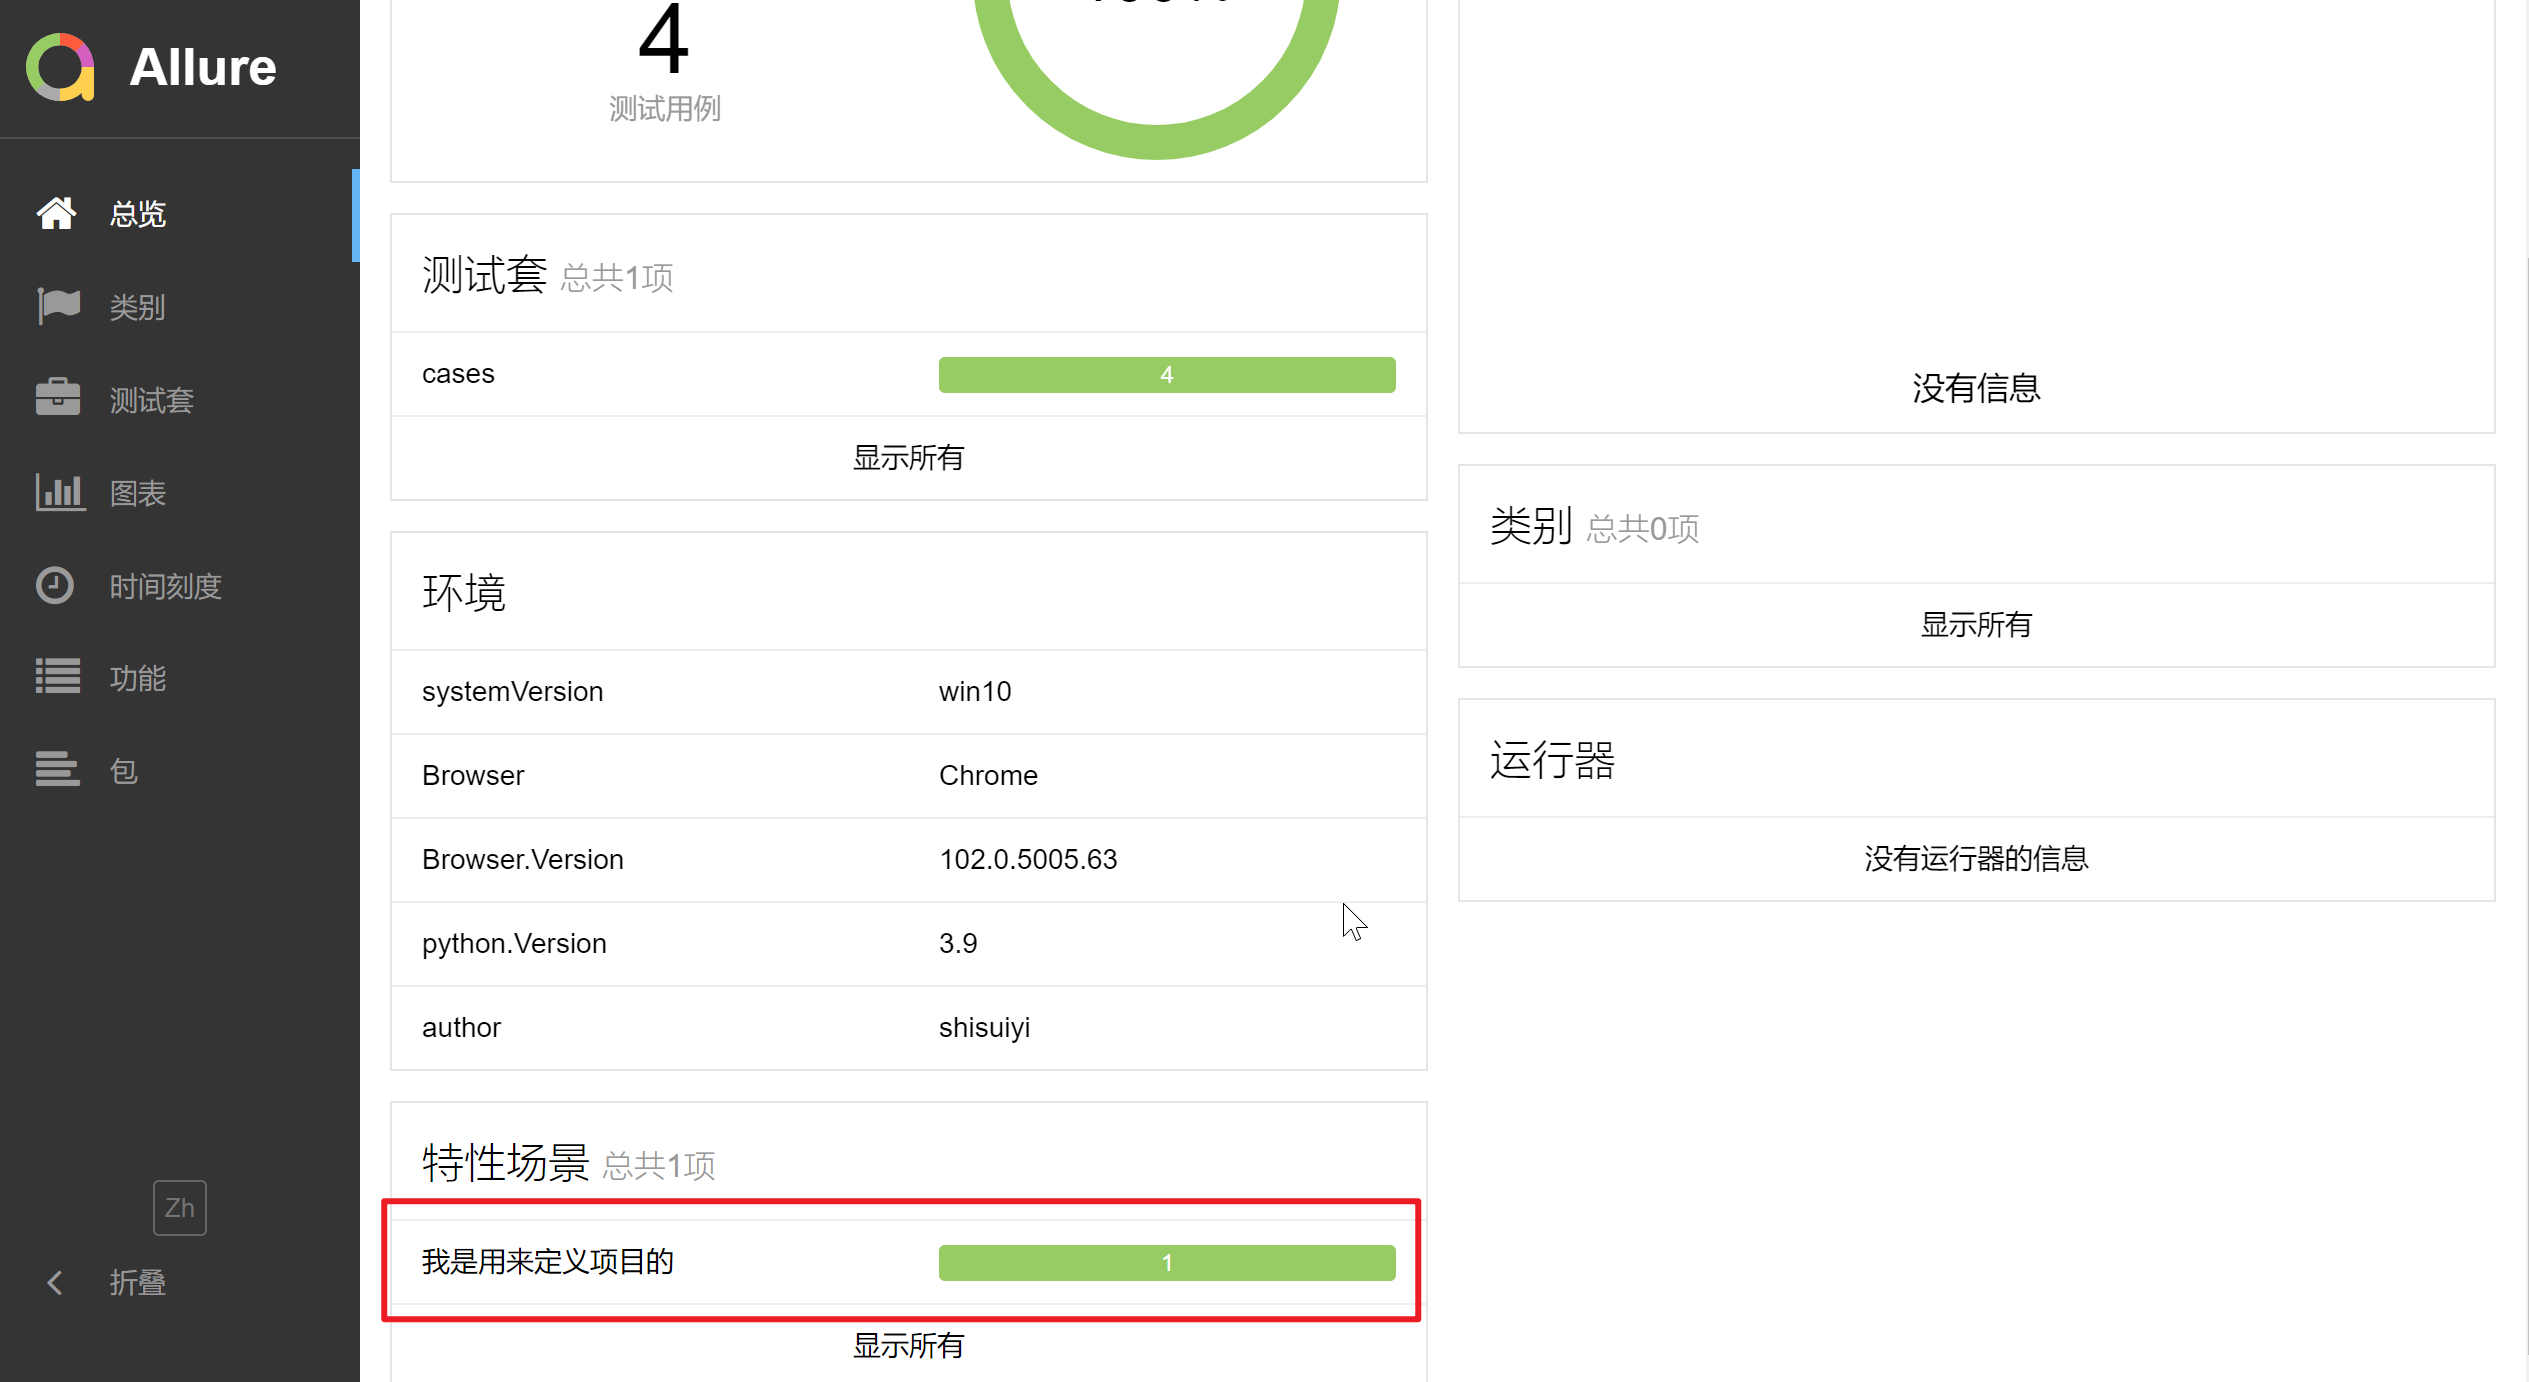
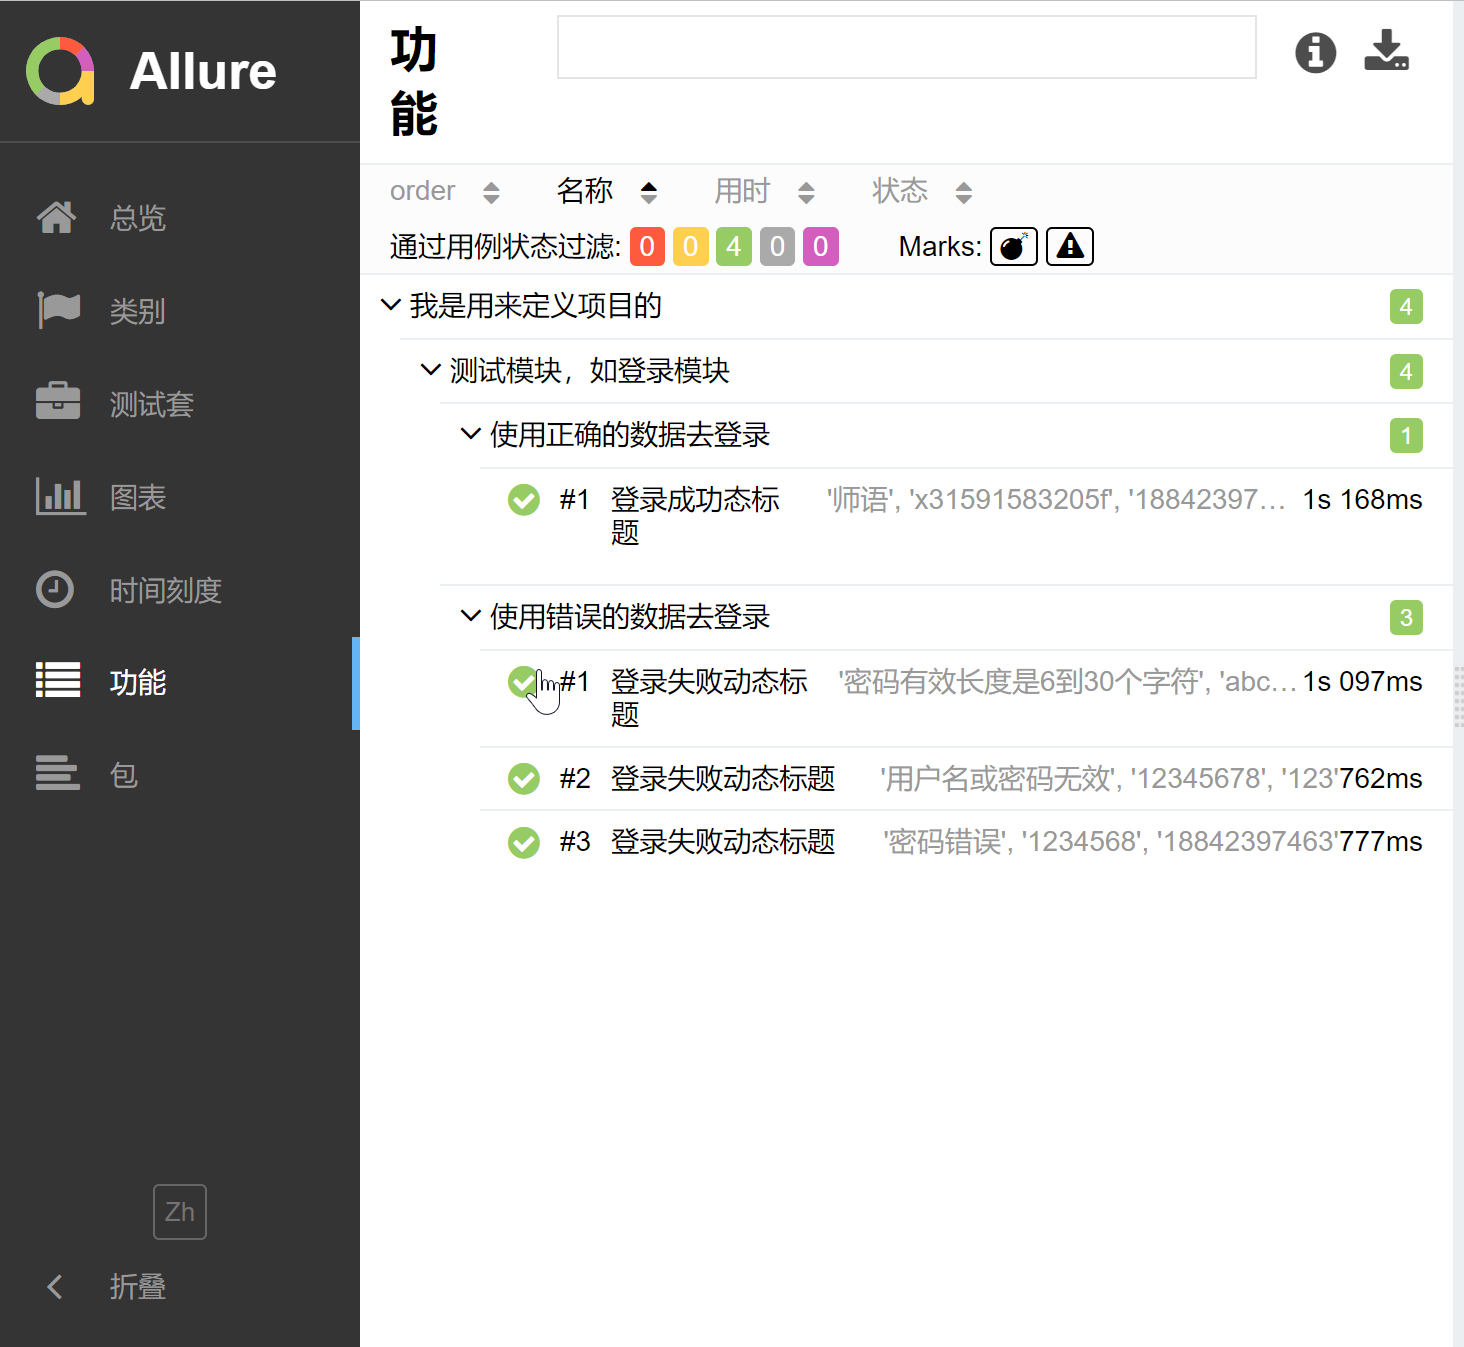
story 是 feature 的子集,当测试用例有 @allure.feature、@allure.story 时,在报告上会先显示 feature,点开之后再显示 story
用命令行方式运行时,运行指定的某个story、feature、epic
当然可以,跟 @pytest.mark.xxx 指定标签运行的方式没啥区别,添加下面的命令行参数就行
--allure-epics
--allure-features
--allure-stories
只运行 epic 名为 test 的测试用例
pytest --alluredir ./report/allure --allure-epics=test
只运行 feature 名为 模块 的测试用例
pytest --alluredir ./report/allure --allure-features=模块
只运行 story1、story2 的测试用例(也可以不用=号 空格就行了哦)
pytest tests.py --allure-stories story1,story2
指定 feature+story
pytest tests.py --allure-features feature2 --allure-stories story2
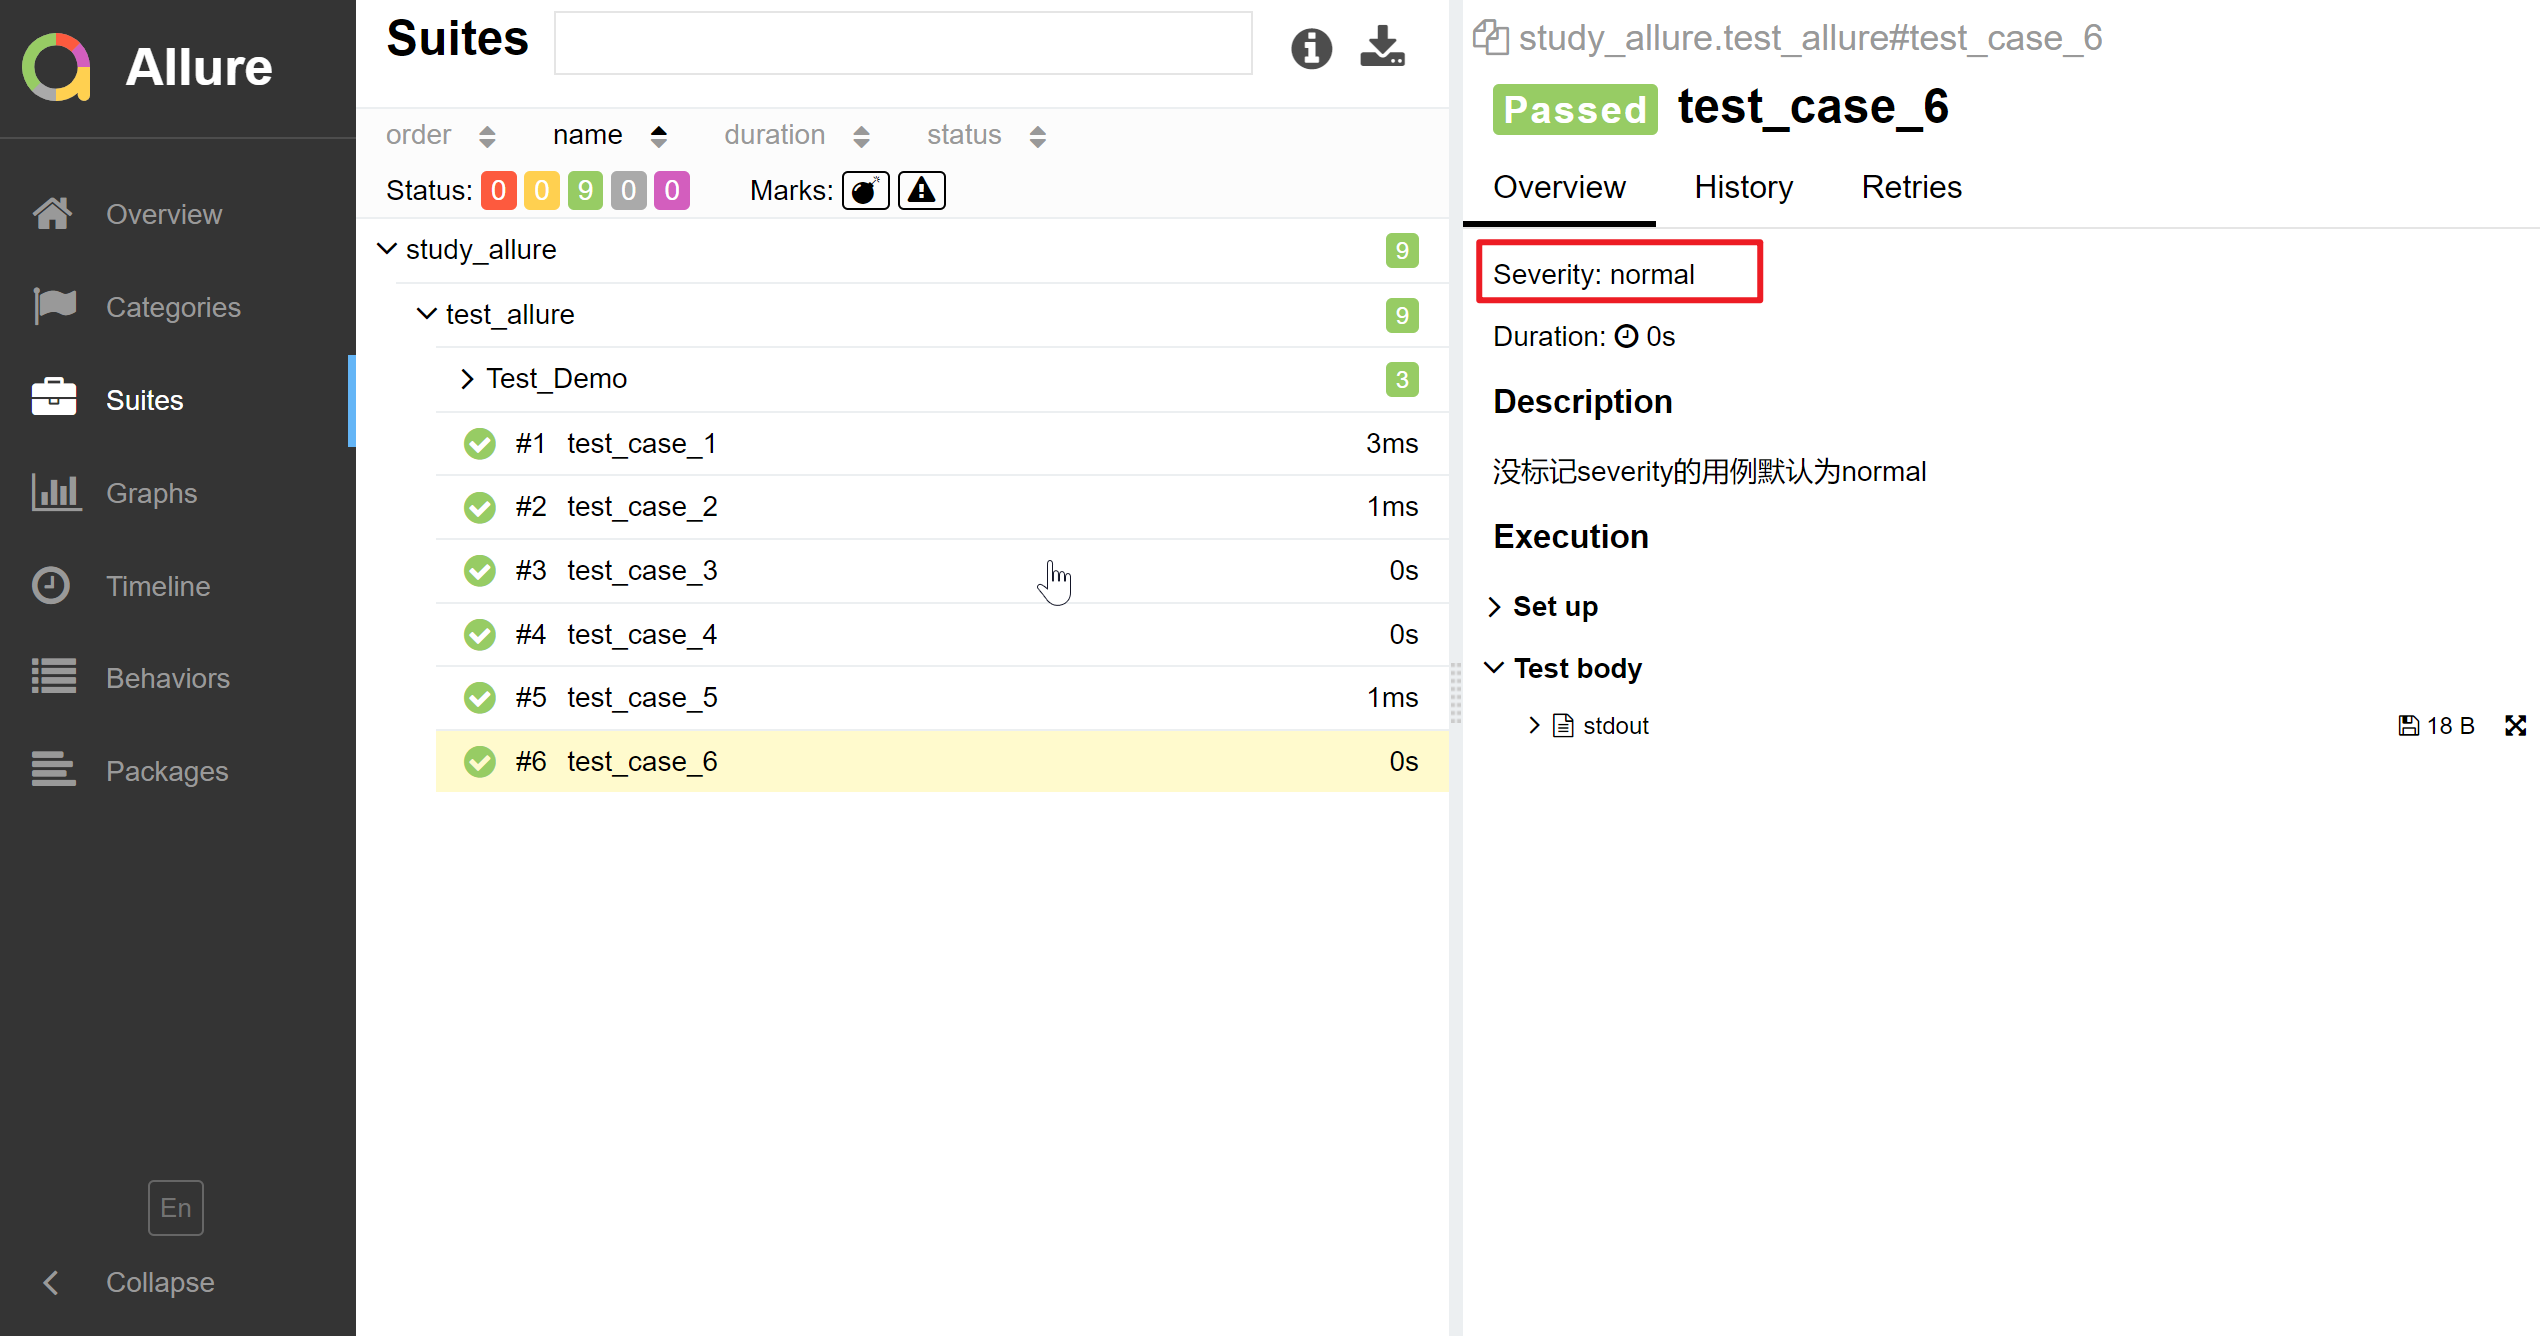
@allure.severity 用例等级
allure对用例的等级划分成五个等级
- blocker 阻塞缺陷(功能未实现,无法下一步)
- critical 严重缺陷(功能点缺失)
- normal 一般缺陷(边界情况,格式错误)
- minor 次要缺陷(界面错误与ui需求不符)
- trivial 轻微缺陷(必须项无提示,或者提示不规范)
#!/usr/bin/env python
# -*- coding: utf-8 -*-
# @Time    : 2022/06/19
# @Author  : shisuiyi
# @File    : test_allure.py
# @Software: win10 Tensorflow1.13.1 python3.9
import allure

'''
@allure.severity装饰器按严重性级别来标记case
执行指定测试用例 --allure-severities blocker
BLOCKER = 'blocker'  阻塞缺陷
CRITICAL = 'critical' 严重缺陷
NORMAL = 'normal'    一般缺陷
MINOR = 'minor'      次要缺陷
TRIVIAL = 'trivial'  轻微缺陷
'''


@allure.severity("blocker")
def test_case_1():
    '''BLOCKER = 'blocker'  阻塞缺陷'''
    print("test case 111111")


@allure.severity("critical")
def test_case_2():
    '''CRITICAL = 'critical' 严重缺陷 '''
    print("test case 222222222")


@allure.severity("normal")
def test_case_3():
    '''NORMAL = 'normal'    一般缺陷'''
    print("test case 333333")


@allure.severity("minor")
def test_case_4():
    '''MINOR = 'minor'      次要缺陷'''
    print("test case 444444")


@allure.severity("trivial")
def test_case_5():
    '''TRIVIAL = 'trivial'  轻微缺陷'''
    print("test case 5555555")


def test_case_6():
    '''没标记severity的用例默认为normal'''
    print("test case 6666666")
allure命令行参数allure-severities
pytest -h可以查看到allure相关的几个命令行参数
—allure-severities=SEVERITIES_SET
                        Comma-separated list of severity names. Tests only
                        with these severities will be run. Possible values
                        are: blocker, critical, normal, minor, trivial.
如果有很多测试用例,现在只想做个快速的回归测试,只测试用例级别为blocker和critical级别的测试用例
pytest —alluredir ./report/allure —allure-severities blocker,critical
也可以这样写
pytest —alluredir=./report/allure —allure-severities=blocker,critical
如果只执行blocker级别的用例
pytest —alluredir=./report/allure —allure-severities=blocker
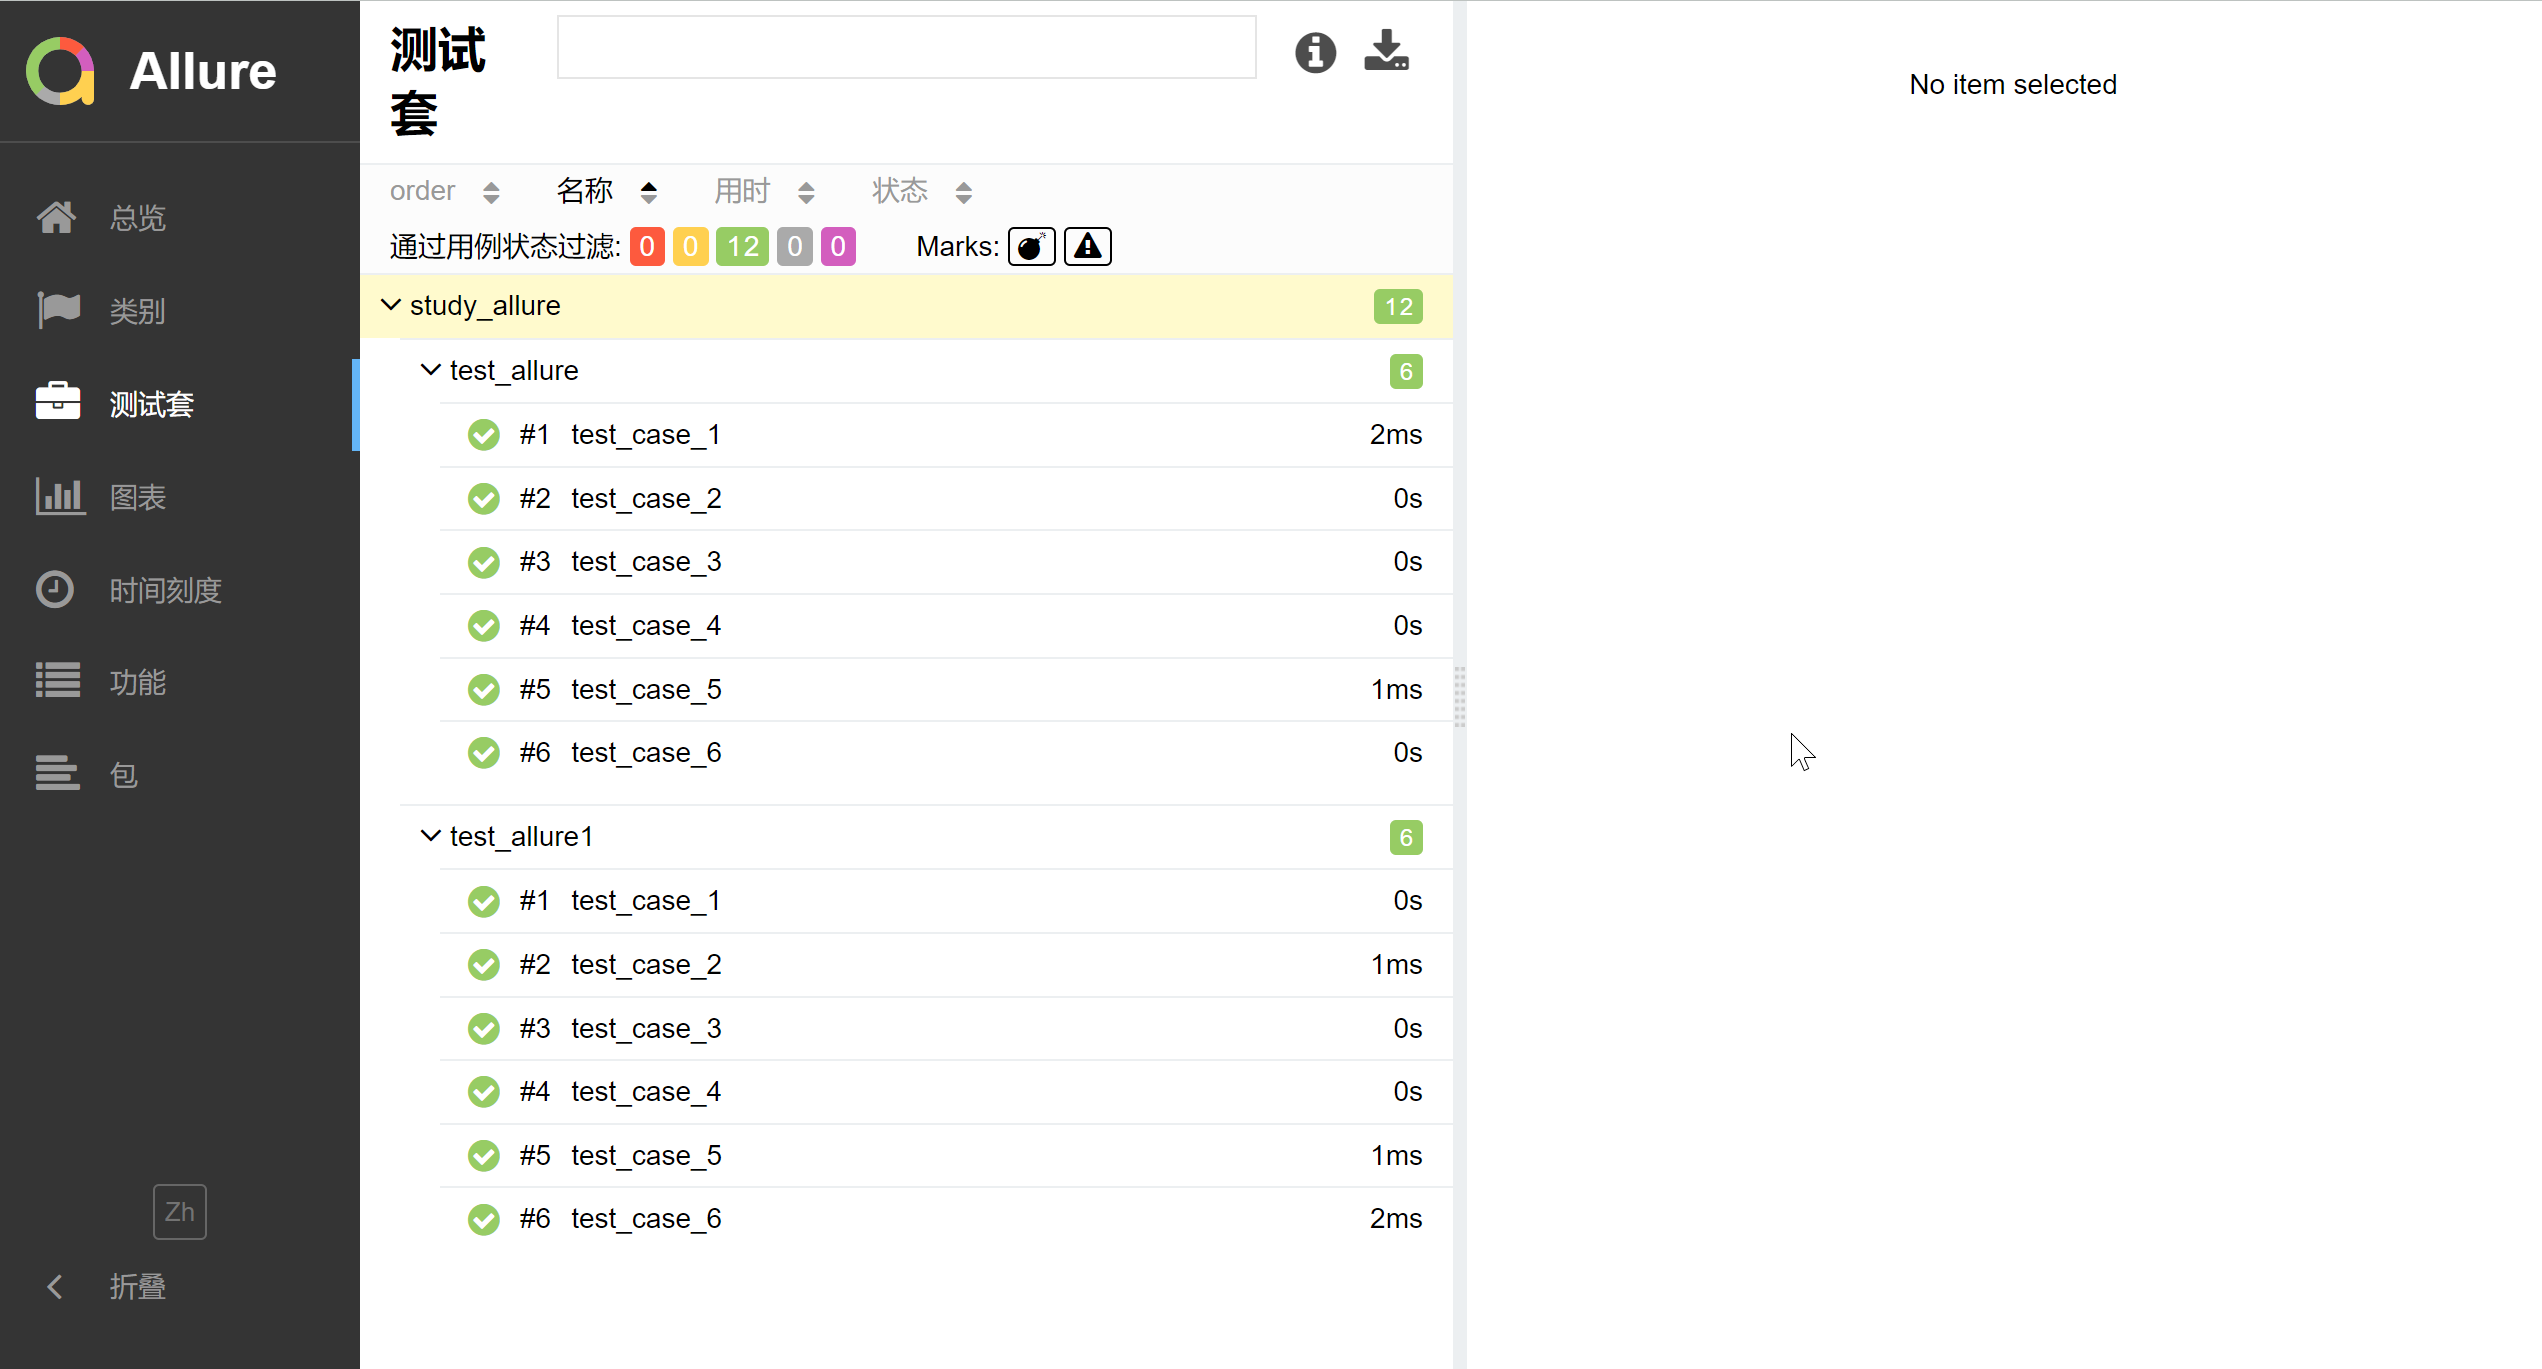
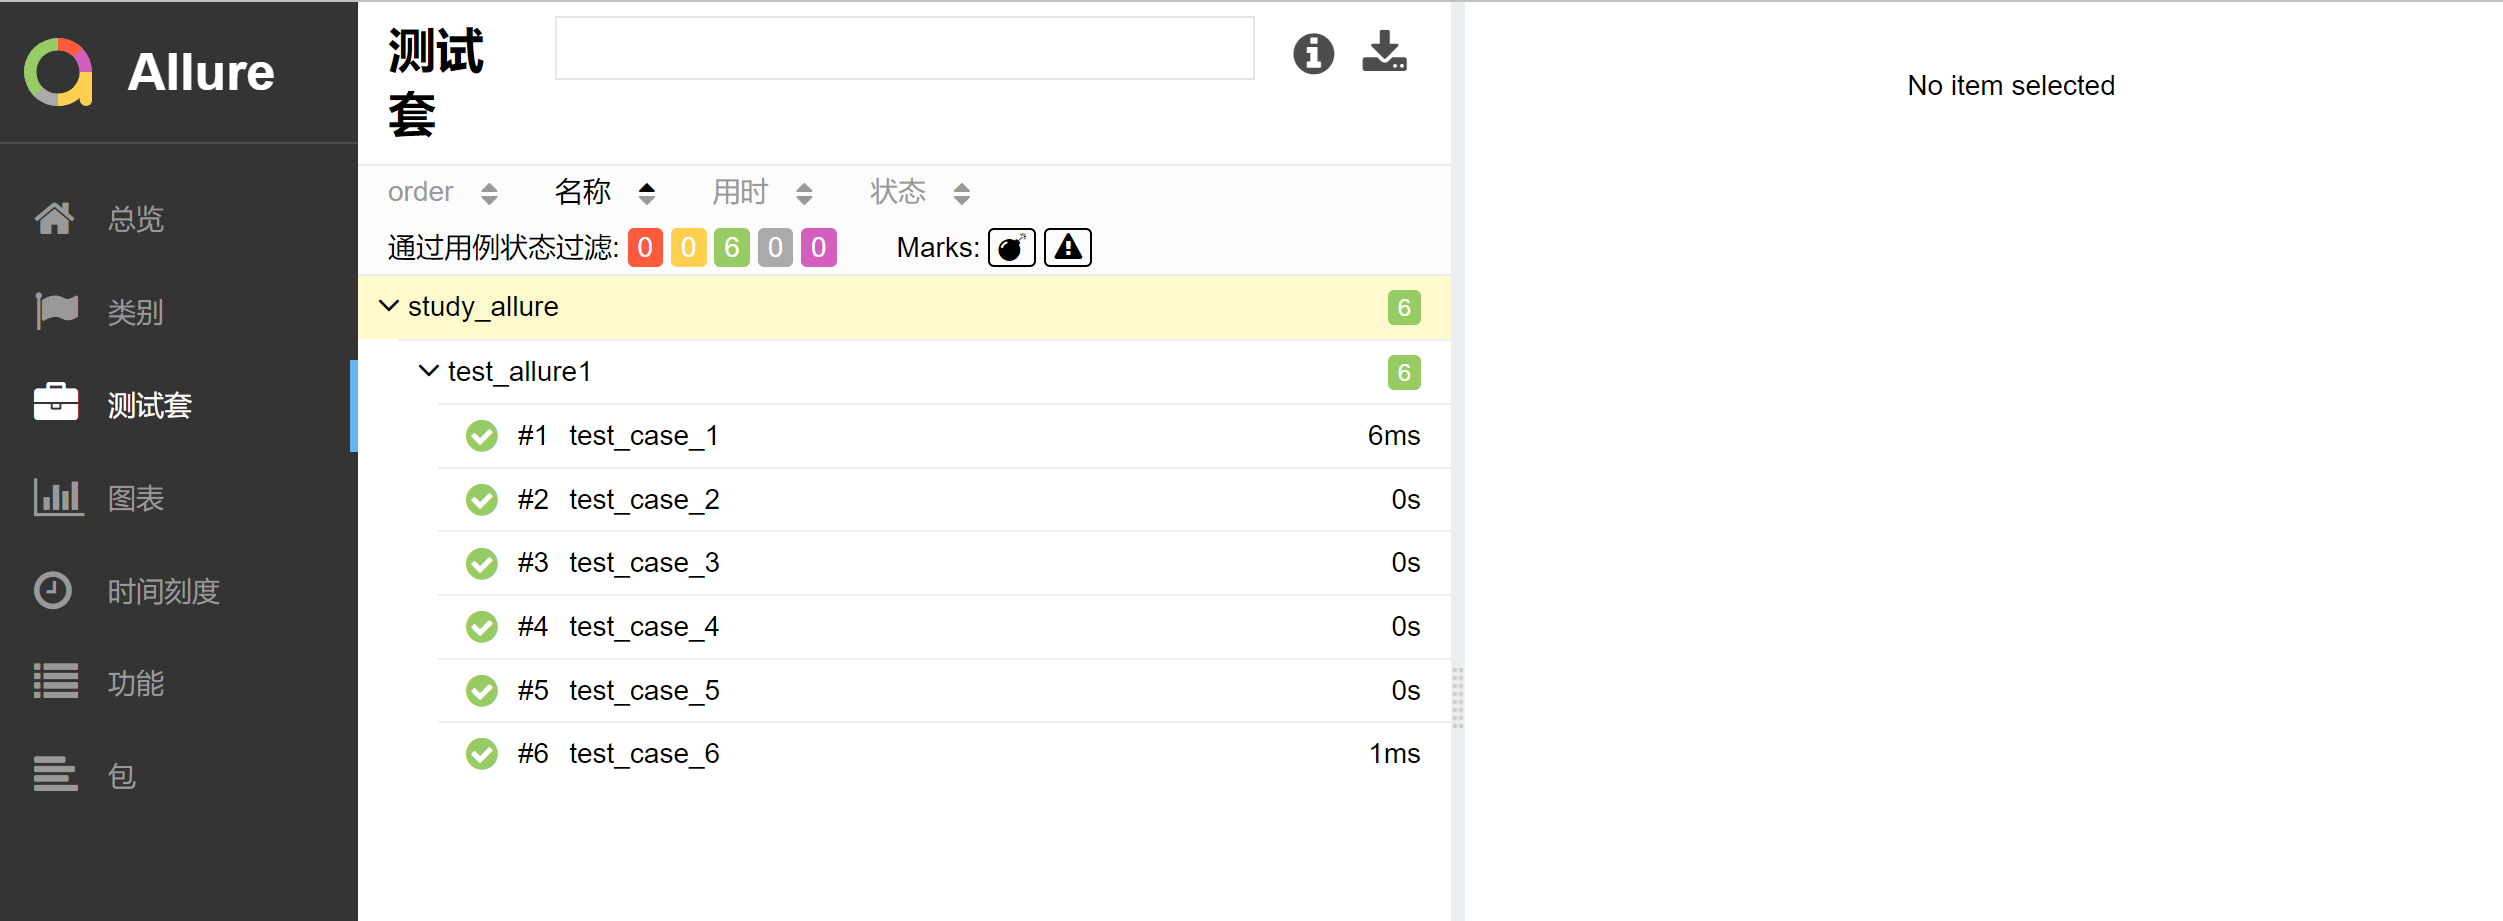
–clean-alluredir 参数 清空 allure 历史报告记录
pytest 运行 测试用例生成 allure 报告时,当测试用例名称修改后重新运行,会保留历史运行记录
又或者分开运行两个测试用例文件,但是 allure 报告生成目录是同一个,那么 allure 报告会同时显示两个文件的测试用例运行情况
pytest 提供了 --clean-alluredir 参数可以清空 allure 报告生成的目录
#!/usr/bin/env python
# -*- coding: utf-8 -*-
# @Time    : 2022/6/19 14:34
# @Author  : shisuiyi
# @File    : main.py
# @Software: win10 Tensorflow1.13.1 python3.9
import os

import pytest


def run(web: bool = True):
    pytest.main(['--alluredir=allure_result_files/data', '--clean-alluredir'])
    if web:
        # 自动以服务形式打开报告
        os.system('allure serve allure_result_files/data')
    else:
        os.system(
            'allure generate allure_result_files/data -o allure_result_files/html --clean'
        )

"""
allure generate :命令语法
allure_result_files/data:找到json的临时报告
-o allure_result_files/html:在report目录下生成allure报告
–clean:每次运行都删除点之前的
"""

if __name__ == "__main__":
    run()
allure 命令行参数
帮助文档
C:\Users\12446>allure -h
Could not parse arguments: Expected a command, got -h
Usage: allure [options] [command] [command options]
  Options:
    --help
      Print commandline help.
    -q, --quiet
      Switch on the quiet mode.
      Default: false
    -v, --verbose
      Switch on the verbose mode.
      Default: false
    --version
      Print commandline version.
      Default: false
  Commands:
    generate      Generate the report
      Usage: generate [options] The directories with allure results
        Options:
          -c, --clean
            Clean Allure report directory before generating a new one.
            Default: false
          --config
            Allure commandline config path. If specified overrides values from
            --profile and --configDirectory.
          --configDirectory
            Allure commandline configurations directory. By default uses
            ALLURE_HOME directory.
          --profile
            Allure commandline configuration profile.
          -o, --report-dir, --output
            The directory to generate Allure report into.
            Default: allure-report

    serve      Serve the report
      Usage: serve [options] The directories with allure results
        Options:
          --config
            Allure commandline config path. If specified overrides values from
            --profile and --configDirectory.
          --configDirectory
            Allure commandline configurations directory. By default uses
            ALLURE_HOME directory.
          -h, --host
            This host will be used to start web server for the report.
          -p, --port
            This port will be used to start web server for the report.
            Default: 0
          --profile
            Allure commandline configuration profile.

    open      Open generated report
      Usage: open [options] The report directory
        Options:
          -h, --host
            This host will be used to start web server for the report.
          -p, --port
            This port will be used to start web server for the report.
            Default: 0

    plugin      Generate the report
      Usage: plugin [options]
        Options:
          --config
            Allure commandline config path. If specified overrides values from
            --profile and --configDirectory.
          --configDirectory
            Allure commandline configurations directory. By default uses
            ALLURE_HOME directory.
          --profile
            Allure commandline configuration profile.
allure 命令的语法格式
allure [options] [command] [command options]
options 列表
  Options:
    --help 命令行帮助文档
    -q, --quiet
      切换至安静模式
      Default: false
    -v, --verbose
      切换至冗长模式
      Default: false
    --version
      版本信息
      Default: false
command 列表
generate
serve
open
plugin
generate 命令行参数
生成 allure 的html 报告
generate [options] allure 结果目录
Commands:
    generate      Generate the report
      Usage: generate [options] The directories with allure results
        Options:
          -c, --clean
            Clean Allure report directory before generating a new one.
            Default: false
          --config
            Allure commandline config path. If specified overrides values from
            --profile and --configDirectory.
          --configDirectory
            Allure commandline configurations directory. By default uses
            ALLURE_HOME directory.
          --profile
            Allure commandline configuration profile.
          -o, --report-dir, --output
            The directory to generate Allure report into.
            Default: allure-report
serve 命令行参数
   serve      Serve the report
      Usage: serve [options] The directories with allure results
        Options:
          --config
            Allure commandline config path. If specified overrides values from
            --profile and --configDirectory.
          --configDirectory
            Allure commandline configurations directory. By default uses
            ALLURE_HOME directory.
          -h, --host
            This host will be used to start web server for the report.
          -p, --port
            This port will be used to start web server for the report.
            Default: 0
          --profile
            Allure commandline configuration profile.
或者直接使用
#!/usr/bin/env python
# -*- coding: utf-8 -*-
# @Time    : 2022/6/19 14:34
# @Author  : shisuiyi
# @File    : main.py
# @Software: win10 Tensorflow1.13.1 python3.9
import os

import pytest


def run(web: bool = True):
    pytest.main(['--alluredir=allure_result_files/data', '--clean-alluredir'])
    if web:
        # 自动以服务形式打开报告
        os.system('allure serve allure_result_files/data')
    else:
        os.system(
            'allure generate allure_result_files/data -o allure_result_files/html --clean'
        )

"""
allure generate :命令语法
allure_result_files/data:找到json的临时报告
-o allure_result_files/html:在report目录下生成allure报告
–clean:每次运行都删除点之前的
"""

if __name__ == "__main__":
    run()

评论