


工具一:Json Server
简介
json-server是一款小巧的Mock工具,它可以不写一行代码在30秒内创建一套Restful风格的 api。相比较Django,flask来实现Mock要方便很多。
通俗来说,就是模拟服务端接口数据,一般用在前后端分离后,前端人员可以不依赖API开发,而在本地搭建一个JSON服务,自己产生测试数据。
主页地址:https://www.npmjs.com/package/json-server
Github项目地址:https://github.com/typicode/json-server
环境搭建
首选需要安装Node.js ,
国内用户建议配置好:cnpm
安装
cnpm install -g json-server
校验
安装完成后输入如下命令进行校验:
json-server -h
安装正确会提示如下内容:
C:\Users\12446>json-server -h
bin.js [options] <source>

Options:
  -c, --config                   Path to config file
                                                   [default: "json-server.json"]
  -p, --port                     Set port                        [default: 3000]
  -H, --host                     Set host                 [default: "localhost"]
  -w, --watch                    Watch file(s)                         [boolean]
  -r, --routes                   Path to routes file
  -m, --middlewares              Paths to middleware files               [array]
  -s, --static                   Set static files directory
      --read-only, --ro          Allow only GET requests               [boolean]
      --no-cors, --nc            Disable Cross-Origin Resource Sharing [boolean]
      --no-gzip, --ng            Disable GZIP Content-Encoding         [boolean]
  -S, --snapshots                Set snapshots directory          [default: "."]
  -d, --delay                    Add delay to responses (ms)
  -i, --id                       Set database id property (e.g. _id)
                                                                 [default: "id"]
      --foreignKeySuffix, --fks  Set foreign key suffix (e.g. _id as in post_id)
                                                                 [default: "Id"]
  -q, --quiet                    Suppress log messages from output     [boolean]
  -h, --help                     Show help                             [boolean]
  -v, --version                  Show version number                   [boolean]

Examples:
  bin.js db.json
  bin.js file.js
  bin.js http://example.com/db.json

https://github.com/typicode/json-server

C:\Users\12446>
入门使用
创建json数据——db.json
在任意一个文件夹下(此处我创建了一个json_action文件夹),进入到该文件夹里面,执行代码:
json-server --watch db.json
执行成功后会多出一个db.json文件。
D:\项目\json_action>json-server --watch db.json

  \{^_^}/ hi!

  Loading db.json
  Oops, db.json doesn't seem to exist
  Creating db.json with some default data

  Done

  Resources
  http://localhost:3000/posts
  http://localhost:3000/comments
  http://localhost:3000/profile

  Home
  http://localhost:3000

  Type s + enter at any time to create a snapshot of the database
  Watching...
此时我们可以访问 http://localhost:3000 (启动json-server后,点击才有效),看到如下页面: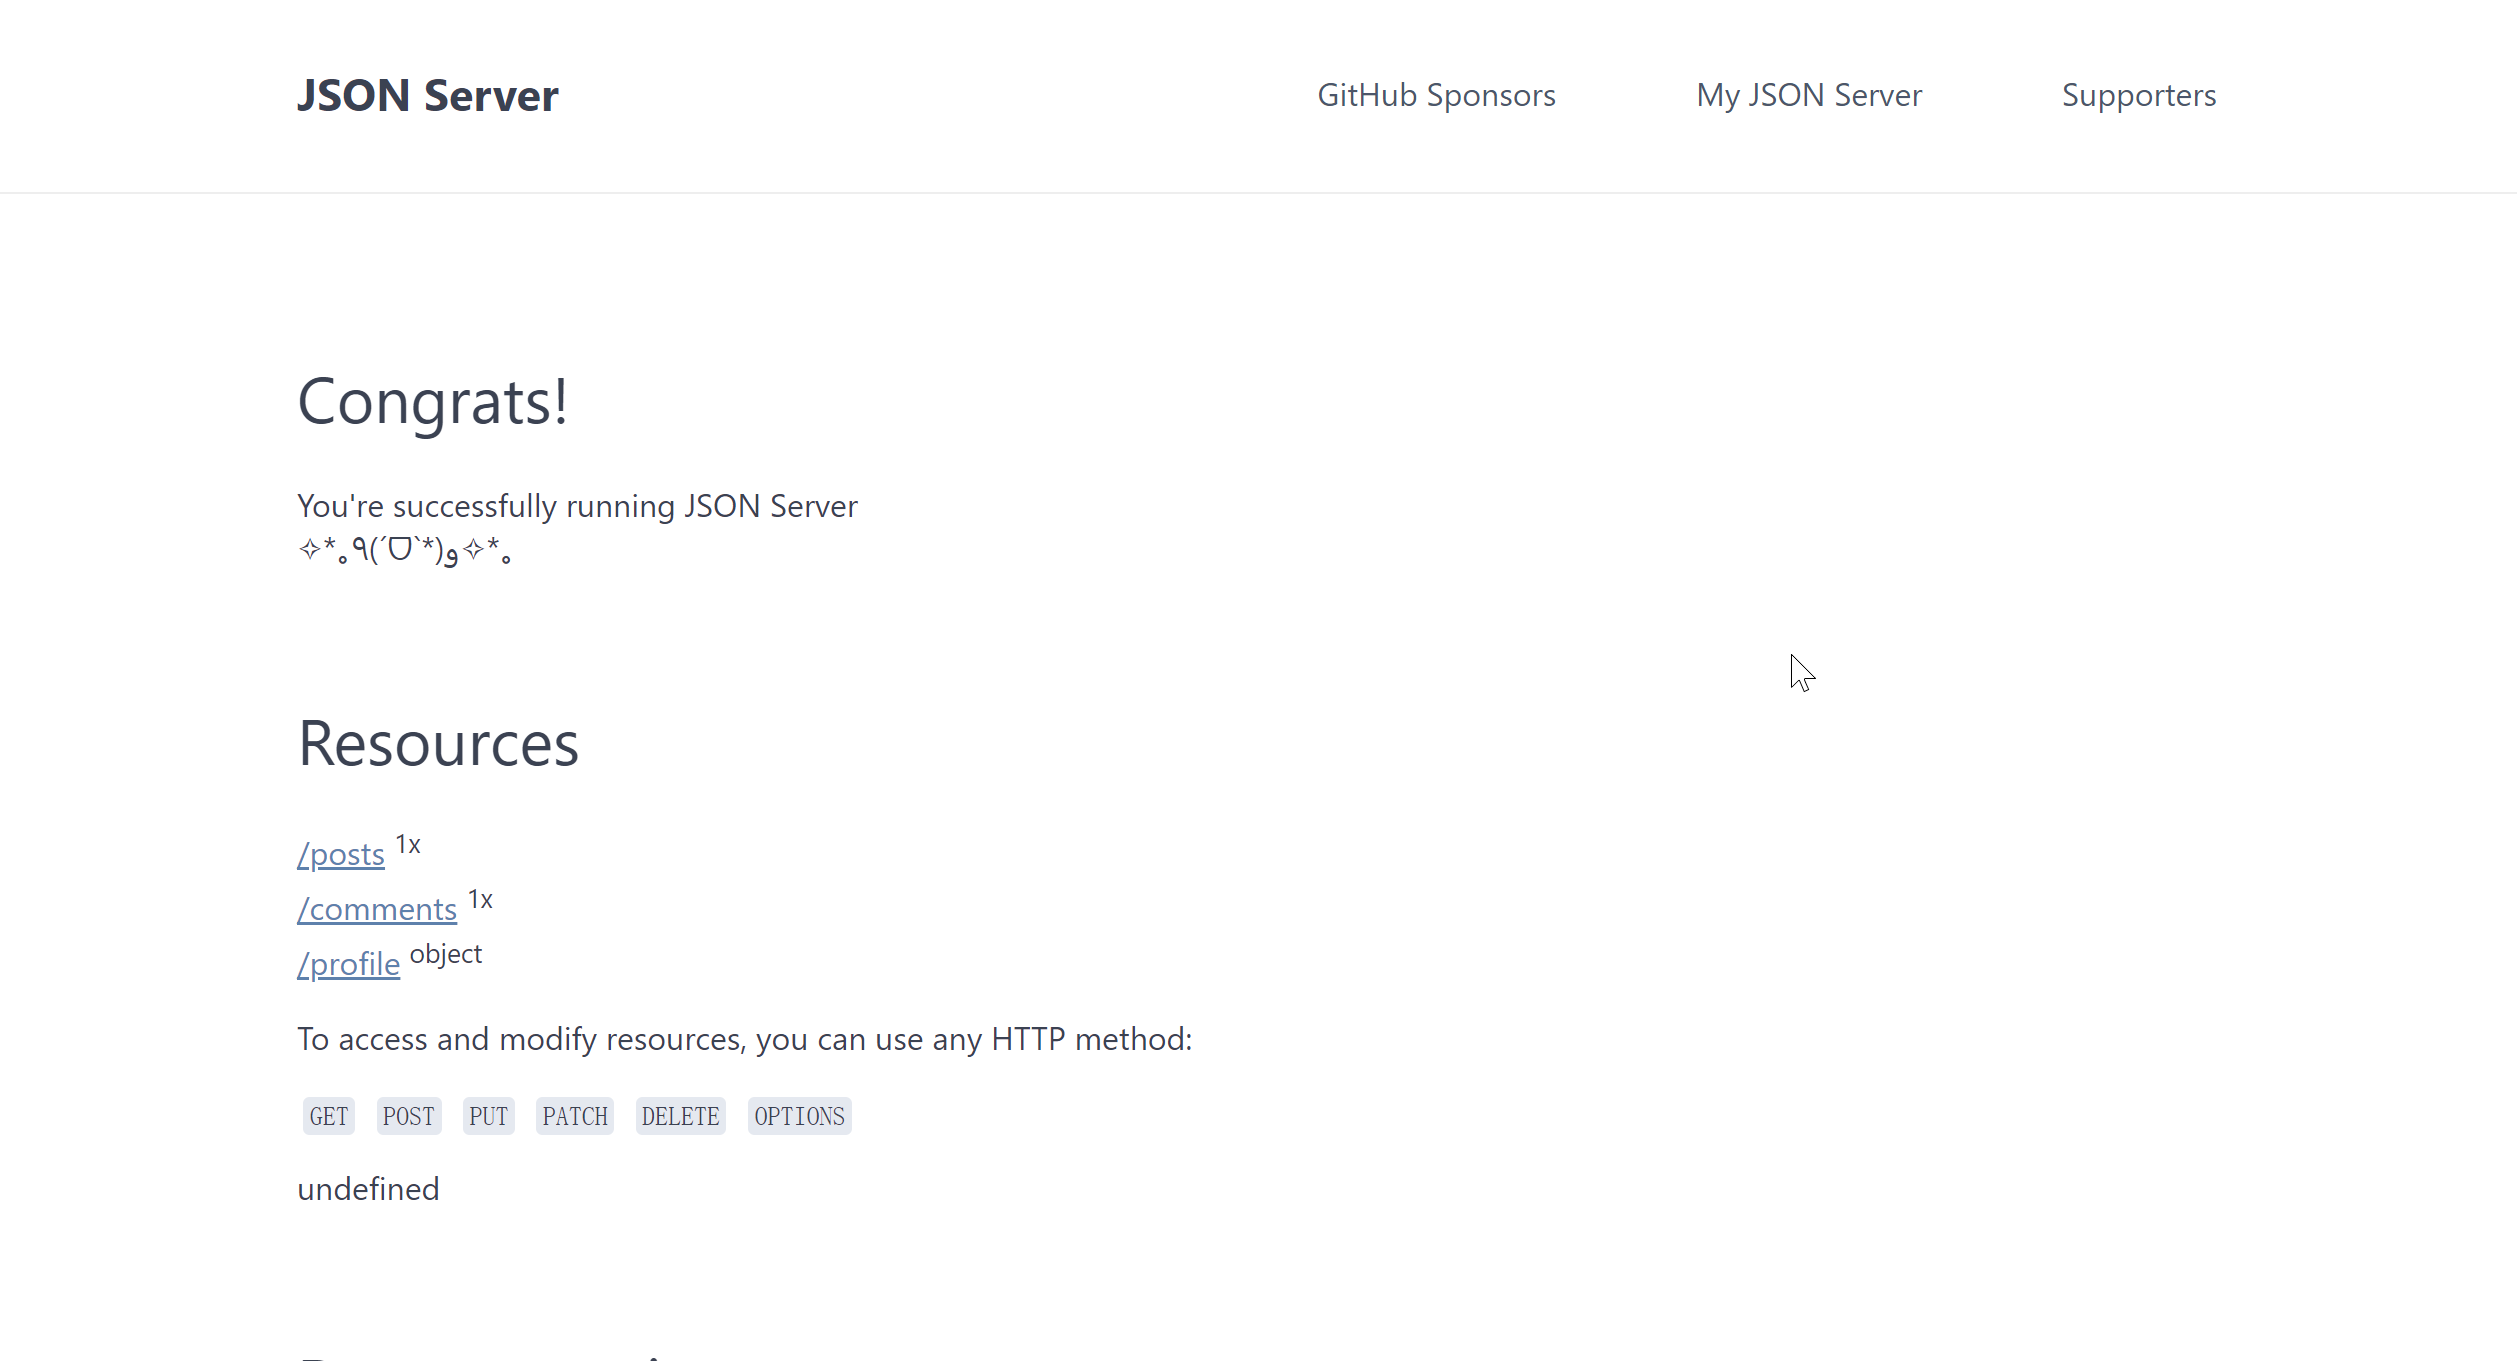
db.json里面自带的数据:
{
  "posts": [
    {
      "id": 1,
      "title": "json-server",
      "author": "typicode"
    }
  ],
  "comments": [
    {
      "id": 1,
      "body": "some comment",
      "postId": 1
    }
  ],
  "profile": {
    "name": "typicode"
  }
}
posts /comment /profile 分别是db.json里面的子对象。
修改端口号
json-server 默认是 3000 端口,我们也可以自己指定端口,指令如下:
json-server --watch db.json --port 3004
之后启动服务,只需要执行如下指令就可以了:
npm run mock

接口测试
操作数据
使用下面的db.json 数据
{
  "posts": [
    {
      "id": 1,
      "title": "json-server",
      "author": "typicode"
    },
    {
      "id": 2,
      "title": "json-server2",
      "author": "typicode2"
    },
    {
      "id": 3,
      "title": "json-server3",
      "author": {"name":"jack"}
    }
  ],
  "comments": [
    {
      "id": 1,
      "body": "some comment",
      "postId": 1
    }
  ],
  "profile": {
    "name": "typicode"
  }
}
接下来我们就可以GET, POST, PUT, PATCH or DELETE 方法来对数据进行操作。
获取数据
get直接获取
输入http://localhost:3004/posts 可以查看到对应的返回值:
浏览器地址访问就可以看做GET操作,所以不用写任何代码
[
{
"id": 1,
"title": "json-server",
"author": "typicode"
},
{
"id": 2,
"title": "json-server2",
"author": "typicode2"
},
{
"id": 3,
"title": "json-server3",
"author": {
"name": "jack"
}
}
]
可以得到所有posts 数据(对象数组)
过滤获取 Filter
根据id获取数据http://localhost:3004/posts/2
{
"id": 2,
"title": "json-server2",
"author": "typicode2"
}
可以指定id为1的获取指令还可以用如下指令,注意,此时返回的数据是一个数组。 http://localhost:3004/posts?id=2
[
{
"id": 2,
"title": "json-server2",
"author": "typicode2"
}
]
指定多个条件,用&符号连接:http://localhost:3004/posts?title=json-server2&author=typicode2
[
{
"id": 2,
"title": "json-server2",
"author": "typicode2"
}
]
指定过滤字段,使用.号可以查询更深层次属性http://localhost:3004/posts?author.name=jack
[
{
"id": 3,
"title": "json-server3",
"author": {
"name": "jack"
}
}
]
分页操作
分页采用 _page 来设置页码, _limit 来控制每页显示条数。如果没有指定 _limit ,默认每页显示10条。
GET /posts?_page=1
GET /posts?_page=1&_limit=2
排序 Sort
GET /posts?_sort=id&_order=asc  #升序
GET /posts?_sort=id&_order=desc #降序
_sort 表示排序字段,_order 表示具体的排序方式,默认是升序:asc降序为:desc。
多字段组合排序
GET /posts?_sort=para1,para2&_order=desc,asc
切片
切片与字符串数组切片类似,可以返回指定范围长度的数据内容,起始下标为0
_start指定纪录起始点,包含起点
_end指定终点,不包含终点
_limit指定返回的数量
GET /posts?_start=0&_end=3
GET /comments?_start=0&_end=2
GET /posts?_start=0&_limit=2
添加数据
使用POST请求可以增加数据,例如我们在Postman中进行如下配置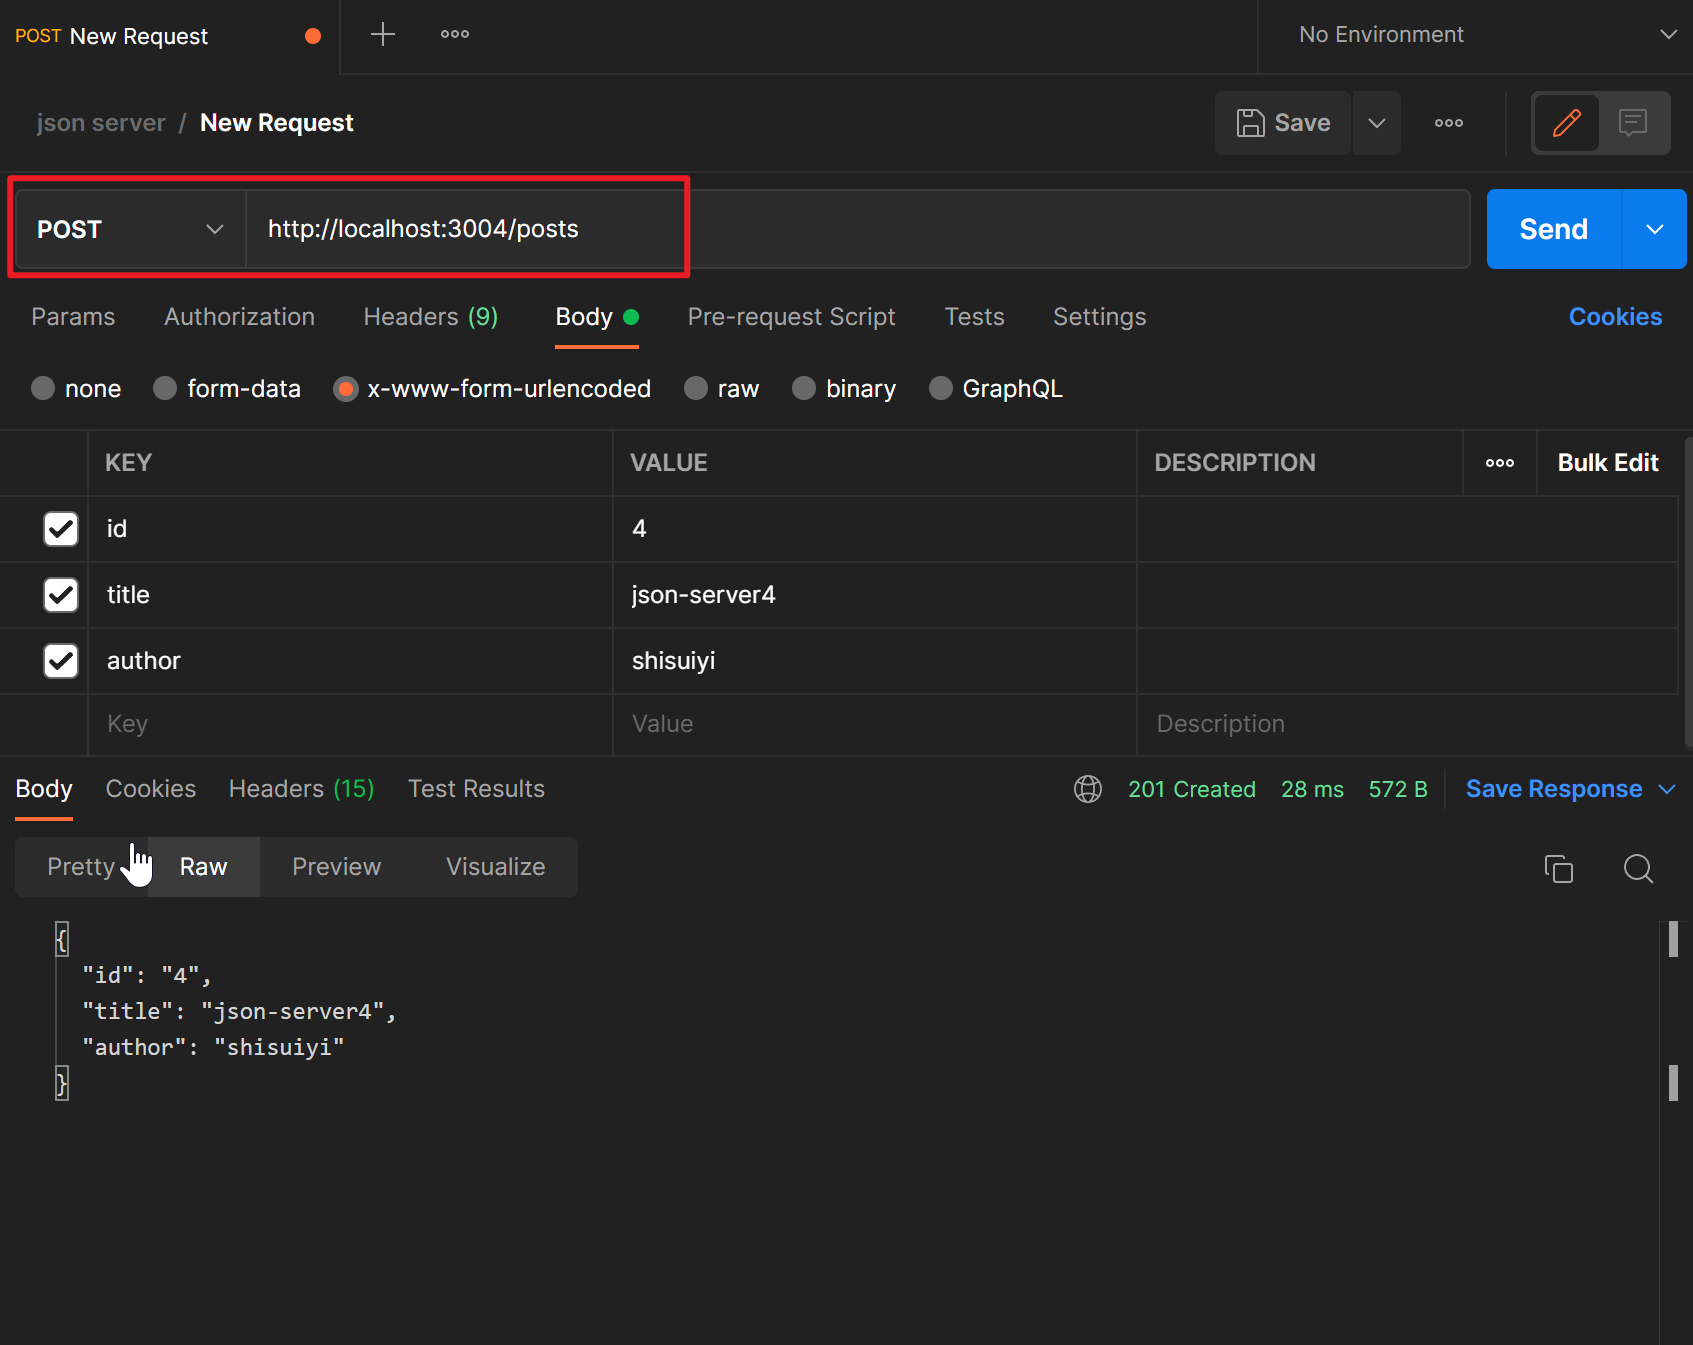
查看一下
[
{
"id": 1,
"title": "json-server",
"author": "typicode"
},
{
"id": 2,
"title": "json-server2",
"author": "typicode2"
},
{
"id": 3,
"title": "json-server3",
"author": {
"name": "jack"
}
},
{
"id": "4",
"title": "json-server4",
"author": "shisuiyi"
}
]
或者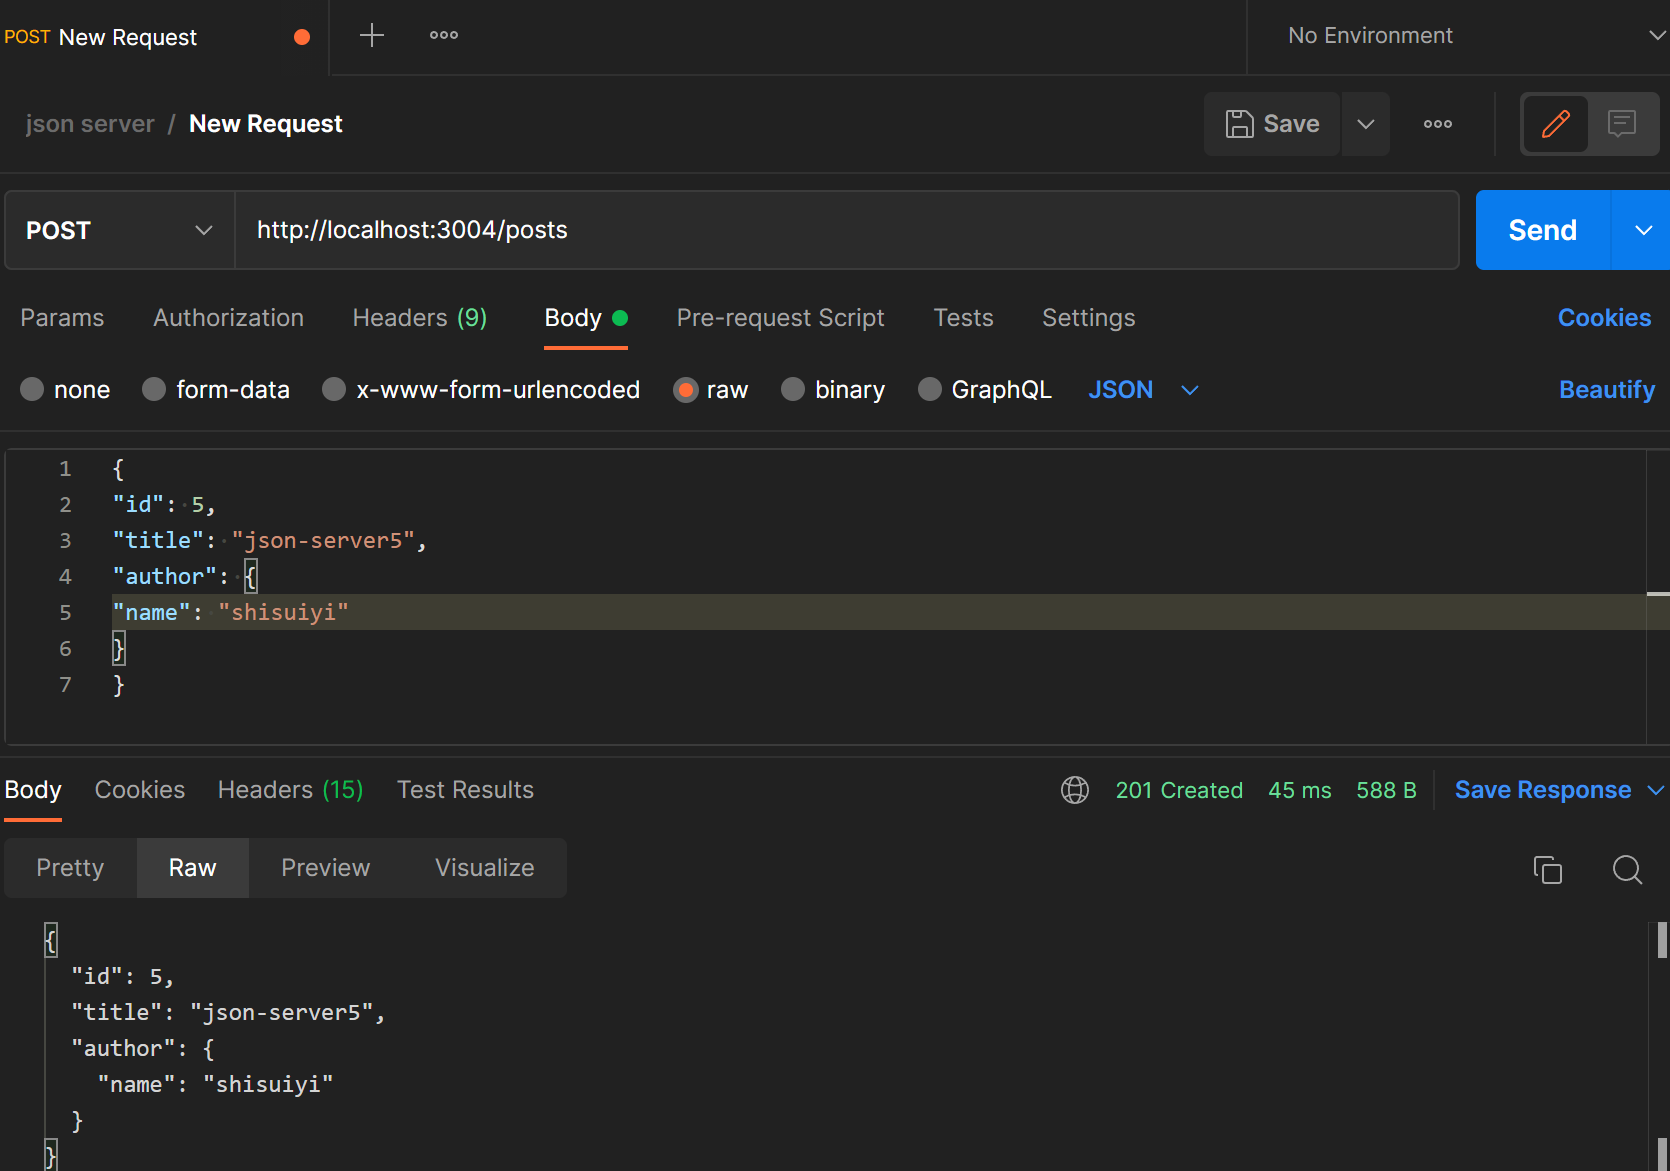
修改数据
使用PATCH或者PUT可以对数据更新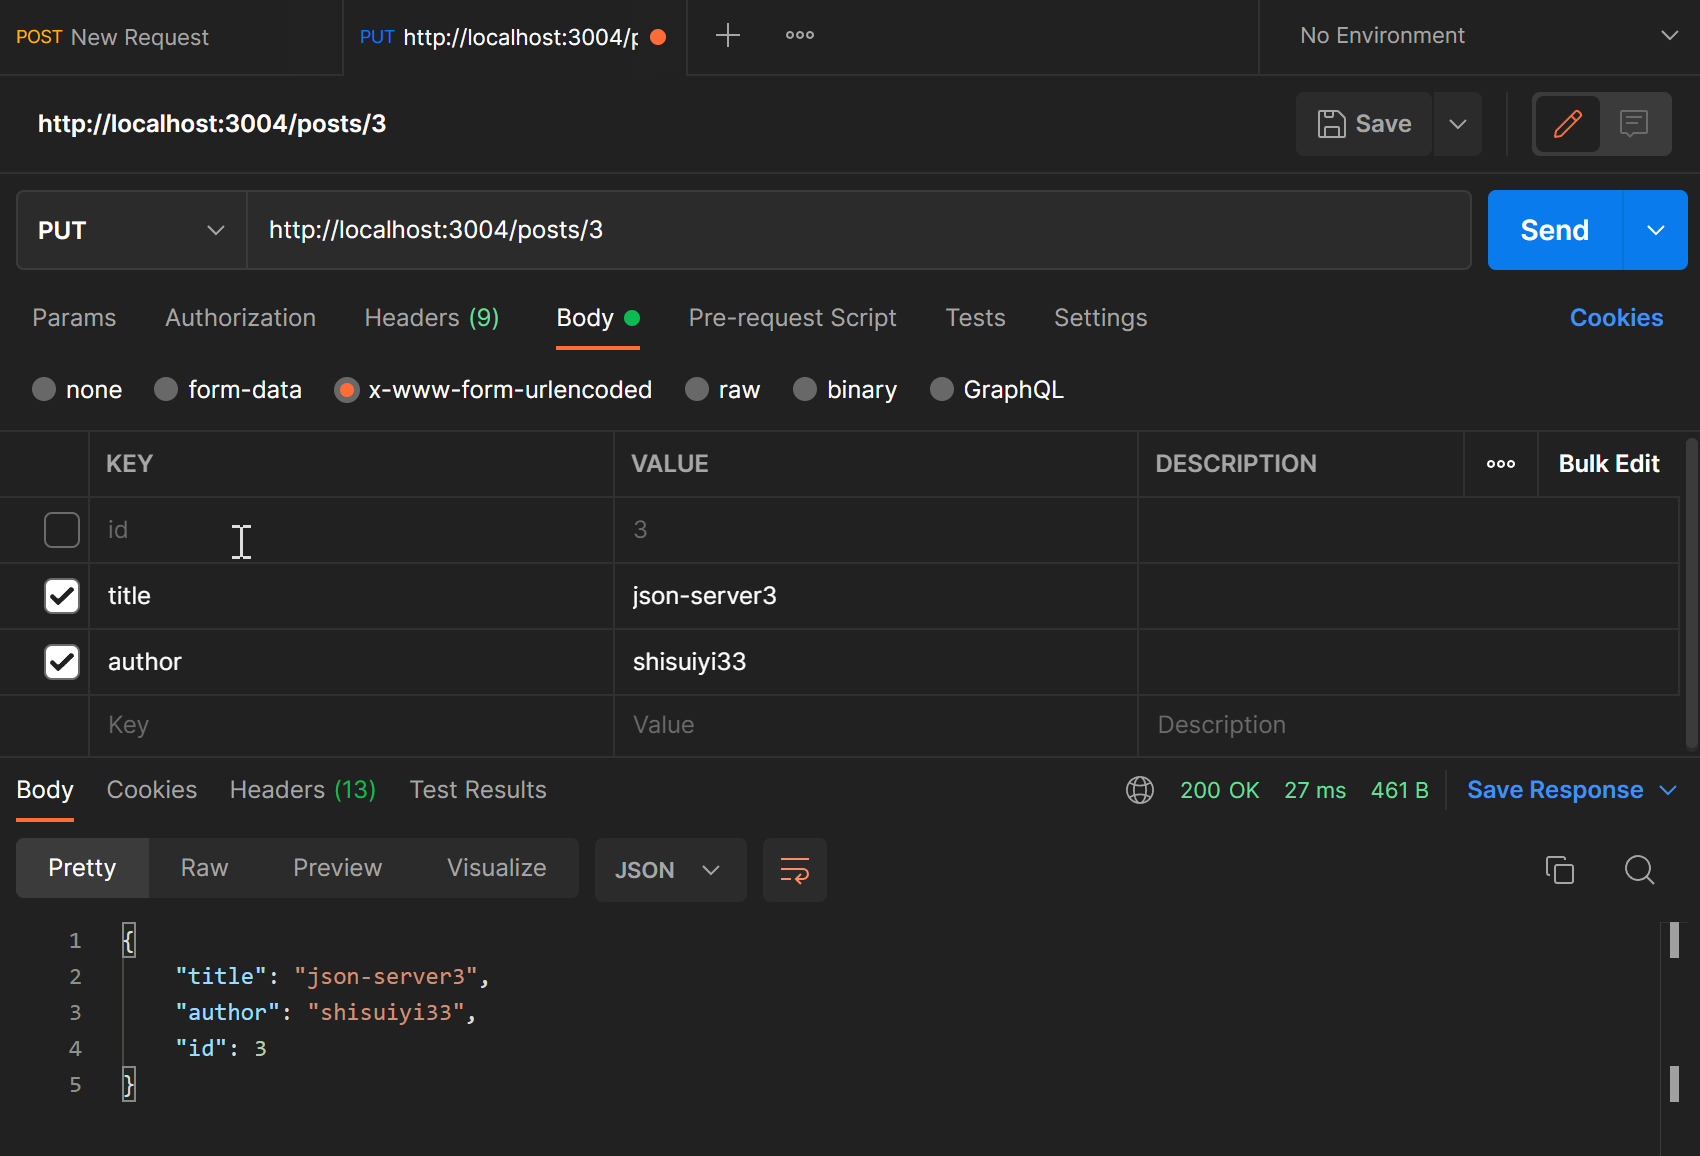
查看一下http://localhost:3004/posts/3
{
"title": "json-server3",
"author": "shisuiyi33",
"id": 3
}
删除
使用DELETE可以删除数据,例如 请求 http://localhost:3004/posts/3 ,则会删除id=3的数据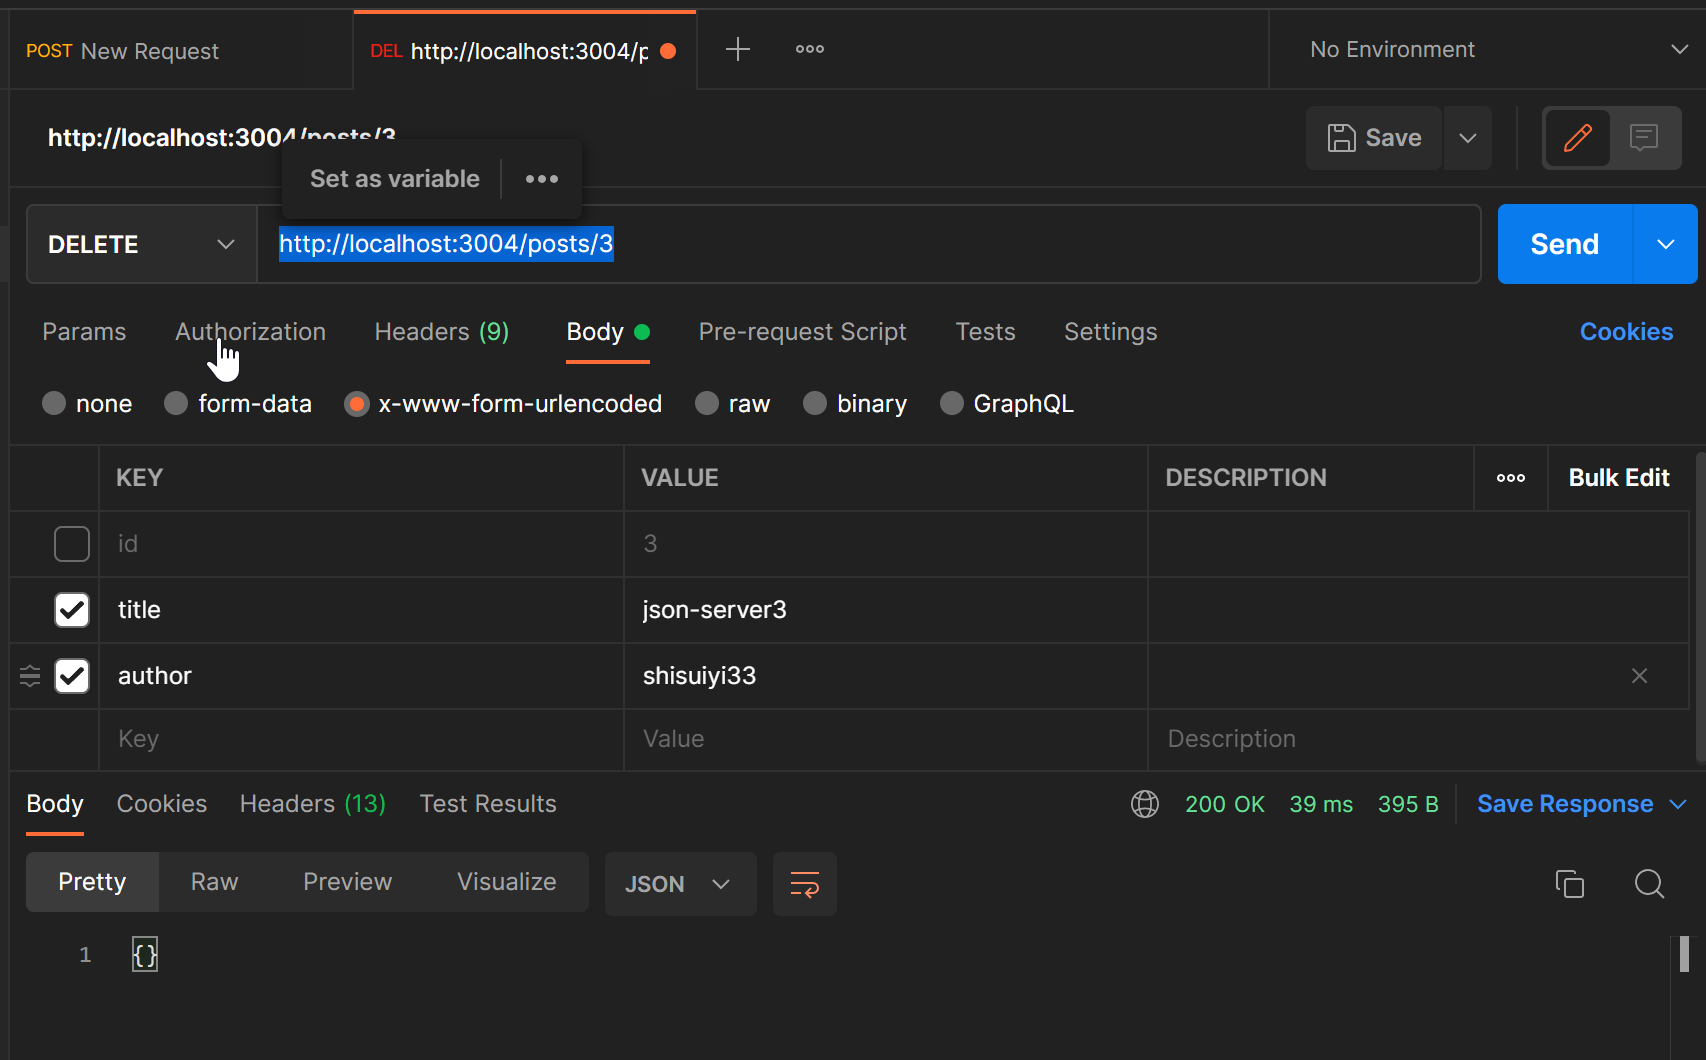
全局搜索
采用 q 来设置搜索内容: http://localhost:3004/posts?q=2
查看db
工具二:Flask
安装第三方模块
通过pip install flask安装(flask是一个轻量级的web开发框架)
验证
在命令行里输入 flask --version 查看Flask是否安装成功
flask模块的使用
简单的示例
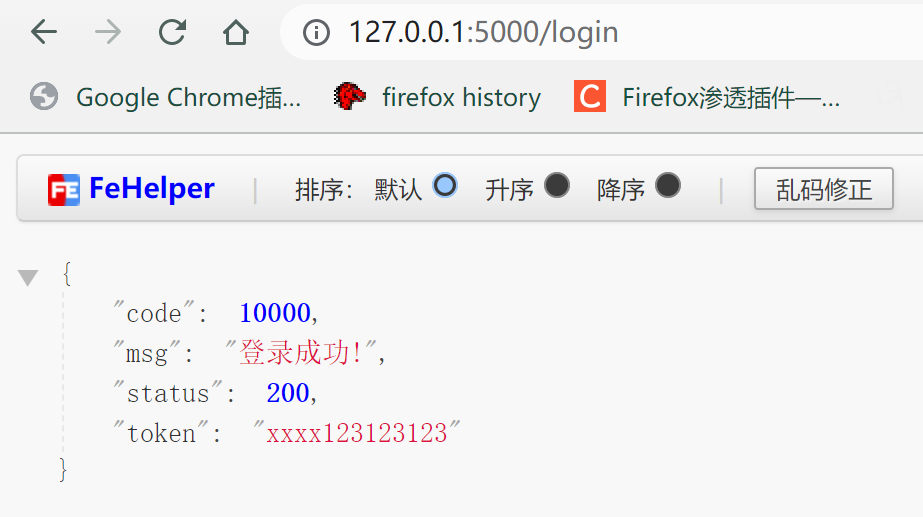
模拟一个登录接口
在API文档中说明如果登录成功,返回:状态码:200,
{"status": 200, "msg": "登录成功!", "code": 10000, "token": "xxxx123123123"}
#!/usr/bin/env python
# -*- coding: utf-8 -*-
# @Time    : 2022/7/3 14:24
# @Author  : shisuiyi
# @File    : mock.py
# @Software: win10 Tensorflow1.13.1 python3.9
from flask import Flask, jsonify

# 1. 初始化flask对象
app = Flask(__name__)


# 2. 创建一个函数,并将其装饰为一个mock server

# 定义视图函数,设置路由规则   ||  定义接口  模拟返回结果
@app.route("/login", methods=["get", "post"])
def login():
    # return {"status": 200, "msg": "登录成功!", "token": "xxxx123123123"}
    data = {"status": 200, "msg": "登录成功!", "code": 10000, "token": "xxxx123123123"}
    return jsonify(data)  #序列化json数据

#jsonfy与json.dumps区别:
# 使用jsonify时响应的Content-Type字段值为application/json,
# 而使用json.dumps时该字段值为text/html。


# 3. 运行
app.run()  #使用默认方式启动项目
# app.run(host='0.0.0.0', port=5566, debug=True)  # 以调试模式启动项目
# host='0.0.0.0’,表示可以使用127.0.0.1、1ocahost、ip(192.168.18.3)访问接口
运行后访问 http://127.0.0.1:5000/login
关于flask的详细用法以后再补充
工具三:pook的使用
仓库地址
用于 HTTP 流量模拟和期望的多功能、富有表现力和可破解的实用程序库,在Python中变得容易。深受gock的启发。
基本模拟:示例
# -*- coding: utf-8 -*-

import pook
import requests


@pook.on
def test_my_api():
    mock = pook.get('http://shibuyu.com/api/1', reply=200, response_json={"status": 200, "msg": "登录成功!", "code": 10000, "token": "xxxx123123123"})

    resp = requests.get('http://shibuyu.com/api/1')
    print(resp.json())
    assert resp.status_code == 200
    assert resp.json()['msg'] == "登录成功!"
    assert mock.calls == 1


if __name__ == '__main__':
    test_my_api()
# 输出
{'status': 200, 'msg': '登录成功!', 'code': 10000, 'token': 'xxxx123123123'}

Process finished with exit code 0
使用装饰器:示例
# -*- coding: utf-8 -*-
import pook
import requests
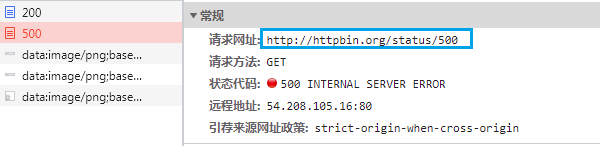
@pook.get('http://httpbin.org/status/500', reply=204)
@pook.get('http://httpbin.org/status/400', reply=200)
def fetch(url):
return requests.get(url)
res = fetch('http://httpbin.org/status/400')
print('#1 status:', res.status_code)
res = fetch('http://httpbin.org/status/500')
print('#2 status:', res.status_code)
# 输出
#1 status: 200
#2 status: 204
简单unittest集成:示例
# -*- coding: utf-8 -*-

import pook
import unittest
import requests


class TestUnitTestEngine(unittest.TestCase):

    @pook.on
    def test_request(self):
        pook.get('server.com/foo').reply(204)
        res = requests.get('http://server.com/foo')
        self.assertEqual(res.status_code, 204)

    def test_request_with_context_manager(self):
        with pook.use():
            pook.get('server.com/bar', reply=204)
            res = requests.get('http://server.com/bar')
            self.assertEqual(res.status_code, 205)


if __name__ == '__main__':
    unittest.main()
# 输出
205 != 204

Expected :204
Actual   :205
<Click to see difference>

test_request_with_context_manager
    self.assertEqual(res.status_code, 205)
AssertionError: 204 != 205

Ran 2 tests in 0.015s

FAILED (failures=1)

Process finished with exit code 1
简单pytest集成:示例
# -*- coding: utf-8 -*-
import pook
import pytest
import requests


@pook.activate
def test_simple_pook_request():
    pook.get('server.com/foo').reply(204)
    res = requests.get('http://server.com/foo')
    assert res.status_code == 204


@pook.on
def test_enable_engine():
    pook.get('server.com/foo').reply(204)
    res = requests.get('http://server.com/foo')
    assert res.status_code == 204
    pook.disable()


@pook.get('server.com/bar', reply=204)
def test_decorator():
    res = requests.get('http://server.com/bar')
    assert res.status_code == 204


def test_context_manager():
    with pook.use():
        pook.get('server.com/baz', reply=204)
        res = requests.get('http://server.com/baz')
        assert res.status_code == 204


@pook.on
def test_no_match_exception():
    pook.get('server.com/bar', reply=204)
    with pytest.raises(Exception):
        requests.get('http://server.com/baz')
# 输出

============================= test session starts =============================
collecting ... collected 5 items

pookdemo.py::test_simple_pook_request PASSED                             [ 20%]
pookdemo.py::test_enable_engine PASSED                                   [ 40%]
pookdemo.py::test_decorator PASSED                                       [ 60%]
pookdemo.py::test_context_manager PASSED                                 [ 80%]
pookdemo.py::test_no_match_exception PASSED                              [100%]

============================== 5 passed in 0.49s ==============================

Process finished with exit code 0
将上下文管理器用于隔离的 HTTP 流量拦截块:示例
首先试一下直接访问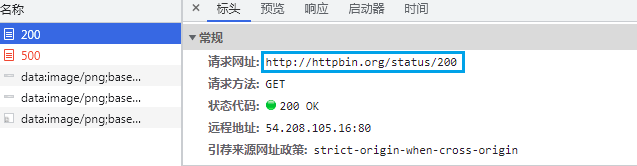
# -*- coding: utf-8 -*-

import pook
import unittest
import requests


import pook
import requests

# Enable HTTP traffic interceptor
with pook.use():
    pook.get('http://httpbin.org/status/500', reply=204)

    res = requests.get('http://httpbin.org/status/500')
    print('#1 status:', res.status_code)

# Interception-free HTTP traffic
res = requests.get('http://httpbin.org/status/200')
print('#2 status:', res.status_code)
# 输出
#1 status: 204
#2 status: 200

Process finished with exit code 0
工具四:requests-mock
待续:https://requests-mock.readthedocs.io/en/latest/pytest.html
评论